Activiti – are you ready for BPMN 2.0?

From the beginning of this year I got quite involved in project called Activiti. It’s a “light-weight workflow and Business Process Management (BPM) Platform” (according to creators. The project is led by JBPM creators – Tom Bayens and Joram Barrez and is backed by Alfresco and several other companies. I also contributed some small features :) Activiti has already made some noise in BPM world – check this, this, or this, and of course InfoQ.
So, what’s the fuss all about? What makes Activiti special? Of course – it depends what are you comparing it with. My experience involves mainly working with open source BPEL implementation, but I think some points remain valid.

So, here is my list of distinctive features:

BPMN 2.0 support I took quite a lot of time for this spec to arrive, but it’s finally here. The biggest step ahead comparing with BPMN 1.x is execution model – no more BPEL, you can use the same diagram for modelling and execution, and it has proper xsd schema! Of course, it won’t solve all round-trip headaches, but I think it’s quite important improvement. XML describing BPMN 2.0 process consists of nodes definitions and transition definitions: Activiti is one of the first BPM engines offering BPMN 2.0 support. Currently not all nodes are supported, but the list includes:
* exclusive and paralell gateways  

  • timer boundary and intermediate events (timer start event almost ready)    

  • various tasks: script, user, service, manual, rules, receive    

  • error events and handling them    

  • subprocesses (both embedded or not)     Not all of these nodes are fully defined in spec – e.g. it does not describe how service task invocation should look like. Therefore, Activiti comes with a set of custom extensions. They are meant to be as non-intrusive as possible – to make processes more portable. One of most commonly used are ones for describing service task behaviour: Another useful extension enables to associate html form and candidate user with user task: One of nice features of BPMN 2.0 is also providing xml schema for describing process diagram – aka Diagram Interchange. This enables good engines (such as Activiti ;)) to generate process diagram just on the basis of xml definition – which makes importing processes modelled in some external tool much easier. It looks like this: Maybe not too beautiful, but usable.

Goal of supporting full BPM cycle

Do you (still) believe that future tools for creating business processes will allow users to get rid of developers? I do not… Unless of course, business people will learn how to code ;) Otherwise what we’ll be left with are some nice zero-coding tools which look great on 15minutes (or event 2hours if they’re exprensive enough) but after running into real-life problems will demand extensive hacking.
Activiti pursues different goal, and proposes developing process cycle layer. Key points of this proposition are:

  • zero coding solutions won’t work
  • analysts are needed to model the process, developers are needed to create executable processes, and operations are needed to deploy and monitor them
  • each of these groups have their own set of tools which they’re familiar with
  • so let’s not reinvent the wheel but encourage them to collaborate but use their set of tools

So, how to achieve this? By creating another web application, of course ;) It’s name is Activiti Cycle and it’s meant to encourage collaboration between business, developers and operations, while allowing each of them to use their own, specific tools in their daily job. It’s more like a federated repository of BPM assets, such as Visio Diagrams, BPMN process definitions, maven process projects, deployment packages and so on. These artifacts can be linked, commented and tracked by various process stakeholders and also transformed.

Easy to embed and extend, also by quasi-REST API

One of biggest pains of BPEL based solutions is that they force you to integrate with the rest of you app using webservices. Fortunately, this is no longer the case. You can embed activiti engine in your (for example) Spring application just by importing few jars and configuring it as any other Spring component:
This is of course great for running processes that handle some Java tasks. What about user tasks? Activiti comes with decent webapps for handling human tasks and monitoring process state: Activiti Explorer – screens shows the list of tasks for a given user:  

Activiti Probe – screen shows monitoring process instance:  

But what if you want to/have to use some other frontend technology? Webapps that I mentioned before are really thin clients – all logic is hidden behind Activiti’s quasi-REST API (I use the word quasi not to be beaten by RESTafarians who will surely point out that Activiti API is just RPC over HTTP…). That means you can embed Activiti in you webapps/OSGi container/any other environment and integrate with frontend webapps using handy JSON/HTTP communication. Which looks more or less like this:

Using (defacto) standards When you create application using Activiti chances are high that you know many (if not all) building blocks & techniques:

  • development? Eclipse plugin & maven
  • connecting components together? you can choose: spring or (for JEE6 lovers) CDI
  • testing? just do your normal TDD (you do it, right? ;)) using Activiti JUnit testing utils

Eclipse plugin includes visual modeler, which enables you to draw executable BPMN 2.0 processes, and fill all needed properties:
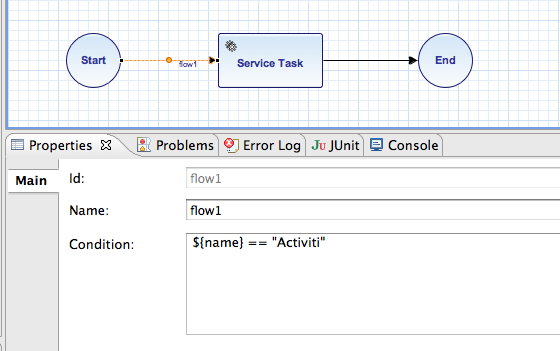
It uses Diagram Interchange format, so process diagram layout will remain the same when displaying process diagram in other applications. Testing is also pretty easy, as Activiti comes with good JUnit support. One of small, but important features is ability to simulate the clock – very handy when dealing with long running tasks.

Good integration capabilities

Activiti comes with capabilities allowing for integration with three most popular open source integration frameworks:

  • Mule ESB – integration is written by MuleSoft
  • SpringIntegration, contributed by SpringSource
  • last but cetainly not least: Apache Camel – which is contributed by TouK ;) – it’s still work in progress, but I hope to write a blog post soon about integrating Camel & Activiti

This allows to build processes that are closer to orchestration than simple workflows, containing only (or mostly) human tasks. Each of these integration frameworks comes with a vast collection of adapters using all popular (and not so popular) communication protocols. This allows process engine to concentrate on the process, and not on the communication details.

Summary I think it’s quite impressive set of features for a product that is less than year old. And what are Activiti plans for the future? Tom Bayens recently announced that Activiti is going to support some sort of Adaptive Case Management – which is one of top buzzwords in process world. Other goals include:

  • asynchronous continuations
  • moving towards full support of BPMN 2.0
  • extending Activiti Cycle – check Bernd’s Ruecker screencast showing Activiti Cycle approach to handling collaboration between analysts, developers and admins – it’s quite impressive

As for me, I’m finishing adding support for start timer tasks and hope to post something on Activiti-Camel intergration and running Activiti in OSGi environment soon – especially Apache Servicemix – so stay tuned. If you’ve found Activiti interesting, please start with 10 minutes 

Getting started guide, and if you know Polish, you can also have a look at my slides from Warsaw JUG presentation Thanks for reading my first post on this blog – hope you liked it.

You May Also Like

Integration testing custom validation constraints in Jersey 2

I recently joined a team trying to switch a monolithic legacy system into set of RESTful services in Java. They decided to use latest 2.x version of Jersey as a REST container which was not a first choice for me, since I’m not a big fan of JSR-* specs. But now I must admit that JAX-RS 2.x is doing things right: requires almost zero boilerplate code, support auto-discovery of features and prefers convention over configuration like other modern frameworks. Since the spec is still young, it’s hard to find good tutorials and kick-off projects with some working code. I created jersey2-starter project on GitHub which can be used as starting point for your own production-ready RESTful service. In this post I’d like to cover how to implement and integration test your own validation constraints of REST resources.

Custom constraints

One of the issues which bothers me when coding REST in Java is littering your class model with annotations. Suppose you want to build a simple Todo list REST service, when using Jackson, validation and Spring Data, you can easily end up with this as your entity class:

@Document
public class Todo {
    private Long id;
    @NotNull
    private String description;
    @NotNull
    private Boolean completed;
    @NotNull
    private DateTime dueDate;

    @JsonCreator
    public Todo(@JsonProperty("description") String description, @JsonProperty("dueDate") DateTime dueDate) {
        this.description = description;
        this.dueDate = dueDate;
        this.completed = false;
    }
    // getters and setters
}

Your domain model is now effectively blured by messy annotations almost everywhere. Let’s see what we can do with validation constraints (@NotNulls). Some may say that you could introduce some DTO layer with own validation rules, but it conflicts for me with pure REST API design, which stands that you operate on resources which should map to your domain classes. On the other hand - what does it mean that Todo object is valid? When you create a Todo you should provide a description and due date, but what when you’re updating? You should be able to change any of description, due date (postponing) and completion flag (marking as done) - but you should provide at least one of these as valid modification. So my idea is to introduce custom validation constraints, different ones for creation and modification:

@Target({TYPE, PARAMETER})
@Retention(RUNTIME)
@Constraint(validatedBy = ValidForCreation.Validator.class)
public @interface ValidForCreation {
    //...
    class Validator implements ConstraintValidator<ValidForCreation, Todo> {
    /...
        @Override
        public boolean isValid(Todo todo, ConstraintValidatorContext constraintValidatorContext) {
            return todo != null
                && todo.getId() == null
                && todo.getDescription() != null
                && todo.getDueDate() != null;
        }
    }
}

@Target({TYPE, PARAMETER})
@Retention(RUNTIME)
@Constraint(validatedBy = ValidForModification.Validator.class)
public @interface ValidForModification {
    //...
    class Validator implements ConstraintValidator<ValidForModification, Todo> {
    /...
        @Override
        public boolean isValid(Todo todo, ConstraintValidatorContext constraintValidatorContext) {
            return todo != null
                && todo.getId() == null
                && (todo.getDescription() != null || todo.getDueDate() != null || todo.isCompleted() != null);
        }
    }
}

And now you can move validation annotations to the definition of a REST endpoint:

@POST
@Consumes(APPLICATION_JSON)
public Response create(@ValidForCreation Todo todo) {...}

@PUT
@Consumes(APPLICATION_JSON)
public Response update(@ValidForModification Todo todo) {...}

And now you can remove those NotNulls from your model.

Integration testing

There are in general two approaches to integration testing:

  • test is being run on separate JVM than the app, which is deployed on some other integration environment
  • test deploys the application programmatically in the setup block.

Both of these have their pros and cons, but for small enough servoces, I personally prefer the second approach. It’s much easier to setup and you have only one JVM started, which makes debugging really easy. You can use a generic framework like Arquillian for starting your application in a container environment, but I prefer simple solutions and just use emdedded Jetty. To make test setup 100% production equivalent, I’m creating full Jetty’s WebAppContext and have to resolve all runtime dependencies for Jersey auto-discovery to work. This can be simply achieved with Maven resolved from Shrinkwrap - an Arquillian subproject:

    WebAppContext webAppContext = new WebAppContext();
    webAppContext.setResourceBase("src/main/webapp");
    webAppContext.setContextPath("/");
    File[] mavenLibs = Maven.resolver().loadPomFromFile("pom.xml")
                .importCompileAndRuntimeDependencies()
                .resolve().withTransitivity().asFile();
    for (File file: mavenLibs) {
        webAppContext.getMetaData().addWebInfJar(new FileResource(file.toURI()));
    }
    webAppContext.getMetaData().addContainerResource(new FileResource(new File("./target/classes").toURI()));

    webAppContext.setConfigurations(new Configuration[] {
        new AnnotationConfiguration(),
        new WebXmlConfiguration(),
        new WebInfConfiguration()
    });
    server.setHandler(webAppContext);

(this Stackoverflow thread inspired me a lot here)

Now it’s time for the last part of the post: parametrizing our integration tests. Since we want to test validation constraints, there are many edge paths to check (and make your code coverage close to 100%). Writing one test per each case could be a bad idea. Among the many solutions for JUnit I’m most convinced to the Junit Params by Pragmatists team. It’s really simple and have nice concept of JQuery-like helper for creating providers. Here is my tests code (I’m also using builder pattern here to create various kinds of Todos):

@Test
@Parameters(method = "provideInvalidTodosForCreation")
public void shouldRejectInvalidTodoWhenCreate(Todo todo) {
    Response response = createTarget().request().post(Entity.json(todo));

    assertThat(response.getStatus()).isEqualTo(BAD_REQUEST.getStatusCode());
}

private static Object[] provideInvalidTodosForCreation() {
    return $(
        new TodoBuilder().withDescription("test").build(),
        new TodoBuilder().withDueDate(DateTime.now()).build(),
        new TodoBuilder().withId(123L).build(),
        new TodoBuilder().build()
    );
}

OK, enough of reading, feel free to clone the project and start writing your REST services!

I recently joined a team trying to switch a monolithic legacy system into set of RESTful services in Java. They decided to use latest 2.x version of Jersey as a REST container which was not a first choice for me, since I’m not a big fan of JSR-* specs. But now I must admit that JAX-RS 2.x is doing things right: requires almost zero boilerplate code, support auto-discovery of features and prefers convention over configuration like other modern frameworks. Since the spec is still young, it’s hard to find good tutorials and kick-off projects with some working code. I created jersey2-starter project on GitHub which can be used as starting point for your own production-ready RESTful service. In this post I’d like to cover how to implement and integration test your own validation constraints of REST resources.

Custom constraints

One of the issues which bothers me when coding REST in Java is littering your class model with annotations. Suppose you want to build a simple Todo list REST service, when using Jackson, validation and Spring Data, you can easily end up with this as your entity class:

@Document
public class Todo {
    private Long id;
    @NotNull
    private String description;
    @NotNull
    private Boolean completed;
    @NotNull
    private DateTime dueDate;

    @JsonCreator
    public Todo(@JsonProperty("description") String description, @JsonProperty("dueDate") DateTime dueDate) {
        this.description = description;
        this.dueDate = dueDate;
        this.completed = false;
    }
    // getters and setters
}

Your domain model is now effectively blured by messy annotations almost everywhere. Let’s see what we can do with validation constraints (@NotNulls). Some may say that you could introduce some DTO layer with own validation rules, but it conflicts for me with pure REST API design, which stands that you operate on resources which should map to your domain classes. On the other hand - what does it mean that Todo object is valid? When you create a Todo you should provide a description and due date, but what when you’re updating? You should be able to change any of description, due date (postponing) and completion flag (marking as done) - but you should provide at least one of these as valid modification. So my idea is to introduce custom validation constraints, different ones for creation and modification:

@Target({TYPE, PARAMETER})
@Retention(RUNTIME)
@Constraint(validatedBy = ValidForCreation.Validator.class)
public @interface ValidForCreation {
    //...
    class Validator implements ConstraintValidator<ValidForCreation, Todo> {
    /...
        @Override
        public boolean isValid(Todo todo, ConstraintValidatorContext constraintValidatorContext) {
            return todo != null
                && todo.getId() == null
                && todo.getDescription() != null
                && todo.getDueDate() != null;
        }
    }
}

@Target({TYPE, PARAMETER})
@Retention(RUNTIME)
@Constraint(validatedBy = ValidForModification.Validator.class)
public @interface ValidForModification {
    //...
    class Validator implements ConstraintValidator<ValidForModification, Todo> {
    /...
        @Override
        public boolean isValid(Todo todo, ConstraintValidatorContext constraintValidatorContext) {
            return todo != null
                && todo.getId() == null
                && (todo.getDescription() != null || todo.getDueDate() != null || todo.isCompleted() != null);
        }
    }
}

And now you can move validation annotations to the definition of a REST endpoint:

@POST
@Consumes(APPLICATION_JSON)
public Response create(@ValidForCreation Todo todo) {...}

@PUT
@Consumes(APPLICATION_JSON)
public Response update(@ValidForModification Todo todo) {...}

And now you can remove those NotNulls from your model.

Integration testing

There are in general two approaches to integration testing:

  • test is being run on separate JVM than the app, which is deployed on some other integration environment
  • test deploys the application programmatically in the setup block.

Both of these have their pros and cons, but for small enough servoces, I personally prefer the second approach. It’s much easier to setup and you have only one JVM started, which makes debugging really easy. You can use a generic framework like Arquillian for starting your application in a container environment, but I prefer simple solutions and just use emdedded Jetty. To make test setup 100% production equivalent, I’m creating full Jetty’s WebAppContext and have to resolve all runtime dependencies for Jersey auto-discovery to work. This can be simply achieved with Maven resolved from Shrinkwrap - an Arquillian subproject:

    WebAppContext webAppContext = new WebAppContext();
    webAppContext.setResourceBase("src/main/webapp");
    webAppContext.setContextPath("/");
    File[] mavenLibs = Maven.resolver().loadPomFromFile("pom.xml")
                .importCompileAndRuntimeDependencies()
                .resolve().withTransitivity().asFile();
    for (File file: mavenLibs) {
        webAppContext.getMetaData().addWebInfJar(new FileResource(file.toURI()));
    }
    webAppContext.getMetaData().addContainerResource(new FileResource(new File("./target/classes").toURI()));

    webAppContext.setConfigurations(new Configuration[] {
        new AnnotationConfiguration(),
        new WebXmlConfiguration(),
        new WebInfConfiguration()
    });
    server.setHandler(webAppContext);

(this Stackoverflow thread inspired me a lot here)

Now it’s time for the last part of the post: parametrizing our integration tests. Since we want to test validation constraints, there are many edge paths to check (and make your code coverage close to 100%). Writing one test per each case could be a bad idea. Among the many solutions for JUnit I’m most convinced to the Junit Params by Pragmatists team. It’s really simple and have nice concept of JQuery-like helper for creating providers. Here is my tests code (I’m also using builder pattern here to create various kinds of Todos):

@Test
@Parameters(method = "provideInvalidTodosForCreation")
public void shouldRejectInvalidTodoWhenCreate(Todo todo) {
    Response response = createTarget().request().post(Entity.json(todo));

    assertThat(response.getStatus()).isEqualTo(BAD_REQUEST.getStatusCode());
}

private static Object[] provideInvalidTodosForCreation() {
    return $(
        new TodoBuilder().withDescription("test").build(),
        new TodoBuilder().withDueDate(DateTime.now()).build(),
        new TodoBuilder().withId(123L).build(),
        new TodoBuilder().build()
    );
}

OK, enough of reading, feel free to clone the project and start writing your REST services!

CasperJS for Java developers

Why CasperJS

Being a Java developer is kinda hard these days. Java may not be dead yet, but when keeping in sync with all the hipster JavaScript frameworks could make us feel a bit outside the playground. It’s even hard to list JavaScript frameworks with latest releases on one website.

In my current project, we are using AngularJS. It’a a nice abstraction of MV* pattern in frontend layer of any web application (we use Grails underneath). Here is a nice article with an 8-point Win List of Angular way of handling AJAX calls and updating the view. So it’s not only a funny new framework but a truly helper of keeping your code clean and neat.

But there is also another area when you can put helpful JS framework in place of plan-old-java one - functional tests. Especially when you are dealing with one page app with lots of asynchronous REST/JSON communication.

Selenium and Geb

In Java/JVM project the typical is to use Selenium with some wrapper like Geb. So you start your project, setup your CI-functional testing pipeline and… after 1 month of coding your tests stop working and being maintainable. The frameworks itselves are not bad, but the typical setup is so heavy and has so many points of failure that keeping it working in a real life project is really hard.

Here is my list of common myths about Selenium: * It allows you to record test scripts via handy GUI - maybe some static request/response sites. In modern web applications with asynchronous REST/JSON communication your tests must contain a lot of “waitFor” statements and you cannot automate where these should be included. * It allows you to test your web app against many browsers - don’t try to automate IE tests! You have to manually open your app in IE to see how it actually bahaves! * It integrates well with continuous integration servers like Jenkins - you have to setup Selenium Grid on server with X installed to run tests on Chrome or Firefox and a Windows server for IE. And the headless HtmlUnit driver lacks a lot of JS support.

So I decided to try something different and introduce a bit of JavaScript tooling in our project by using CasperJS.

Introduction

CasperJS is simple but powerful navigation scripting & testing utility for PhantomJS - scritable headless WebKit (which is an rendering engine used by Safari and Chrome). In short - CasperJS allows you to navigate and make assertions about web pages as they’d been rendered in Google Chrome. It is enough for me to automate the functional tests of my application.

If you want a gentle introduction to the world of CasperJS I suggest you to read: * Official website, especially installation guide and API * Introductionary article from CasperJS creator Nicolas Perriault * Highlevel testing with CasperJS by Kevin van Zonneveld * grails-angular-scaffolding plugin by Rob Fletcher with some working CasperJS tests

Full example

I run my test suite via following script:

casperjs test --direct --log-level=debug --testhost=localhost:8080 --includes=test/casper/includes/casper-angular.coffee,test/casper/includes/pages.coffee test/casper/specs/

casper-angular.coffe

casper.test.on "fail", (failure) ->
    casper.capture(screenshot)

testhost   = casper.cli.get "testhost"
screenshot = 'test-fail.png'

casper
    .log("Using testhost: #{testhost}", "info")
    .log("Using screenshot: #{screenshot}", "info")

casper.waitUntilVisible = (selector, message, callback) ->
    @waitFor ->
        @visible selector
    , callback, (timeout) ->
        @log("Selector [#{selector}] not visible, failing")
        withParentSelector selector, (parent) ->
            casper.log("Output of parent selector [#{parent}]")
            casper.debugHTML(parent)
        @echo message, "RED_BAR"
        @capture(screenshot)
        @test.fail(f("Wait timeout occured (%dms)", timeout))

withParentSelector = (selector, callback) ->
    if selector.lastIndexOf(" ") > 0
       parent = selector[0..selector.lastIndexOf(" ")-1]
       callback(parent)

Sample pages.coffee:

x = require('casper').selectXPath

class EditDocumentPage

    assertAt: ->
        casper.test.assertSelectorExists("div.customerAccountInfo", 'at EditDocumentPage')

    templatesTreeFirstCategory: 'ul.tree li label'
    templatesTreeFirstTemplate: 'ul.tree li a'
    closePreview: '.closePreview a'
    smallPreview: '.smallPreviewContent img'
    bigPreview: 'img.previewImage'
    confirmDelete: x("//div[@class='modal-footer']/a[1]")

casper.editDocument = new EditDocumentPage()

End a test script:

testhost = casper.cli.get "testhost" or 'localhost:8080'

casper.start "http://#{testhost}/app", ->
    @test.assertHttpStatus 302
    @test.assertUrlMatch /\/fakeLogin/, 'auto login'
    @test.assert @visible('input#Create'), 'mock login button'
    @click 'input#Create'

casper.then ->
    @test.assertUrlMatch /document#\/edit/, 'new document'
    @editDocument.assertAt()
    @waitUntilVisible @editDocument.templatesTreeFirstCategory, 'template categories not visible', ->
        @click @editDocument.templatesTreeFirstCategory
        @waitUntilVisible @editDocument.templatesTreeFirstTemplate, 'template not visible', ->
            @click @editDocument.templatesTreeFirstTemplate

casper.then ->
    @waitUntilVisible @editDocument.smallPreview, 'small preview not visible', ->
        # could be dblclick / whatever
        @mouseEvent('click', @editDocument.smallPreview)

casper.then ->
    @waitUntilVisible @editDocument.bigPreview, 'big preview should be visible', ->
        @test.assertEvalEquals ->
            $('.pageCounter').text()
        , '1/1', 'page counter should be visible'
        @click @editDocument.closePreview

casper.then ->
    @click 'button.cancel'
    @waitUntilVisible '.modal-footer', 'delete confirmation not visible', ->
        @click @editDocument.confirmDelete

casper.run ->
    @test.done()

Here is a list of CasperJS features/caveats used here:

  • Using CoffeeScript is a huge win for your test code to look neat
  • When using casper test command, beware of different (than above articles) logging setup. You can pass --direct --log-level=debug from commandline for best results. Logging is essential here since Phantom often exists without any error and you do want to know what just happened.
  • Extract your helper code into separate files and include them by using --includes switch.
  • When passing server URL as a commandline switch remember that in CoffeeScript variables are not visible between multiple source files (unless getting them via window object)
  • It’s good to override standard waitUntilVisible with capting a screenshot and making a proper log statement. In my version I also look for a parent selector and debugHTML the content of it - great for debugging what is actually rendered by the browser.
  • Selenium and Geb have a nice concept of Page Objects - an abstract models of pages rendered by your application. Using CoffeeScript you can write your own classes, bind selectors to properties and use then in your code script. Assigning the objects to casper instance will end up with quite nice syntax like @editDocument.assertAt().
  • There is some issue with CSS :first and :last selectors. I cannot get them working (but maybe I’m doing something wrong?). But in CasperJS you can also use XPath selectors which are fine for matching n-th child of some element (x("//div[@class='modal-footer']/a[1]")).
    Update: :first and :last are not CSS3 selectors, but JQuery ones. Here is a list of CSS3 selectors, all of these are supported by CasperJS. So you can use nth-child(1) is this case. Thanks Andy and Nicolas for the comments!

Working with CasperJS can lead you to a few hour stall, but after getting things working you have a new, cool tool in your box!