
There’s a long back story to Java annotations. Introduced in 2004 for Java 5 and supported by the javac compiler since Java 6 in 2002, they may be thought of as an industry standard approach to
metaprogramming. However, as mostly used in the Android ecosystem, it is not that popular technique in backend development. I had an
opportunity to dig into the subject while developing Krush, which is based on Kotlin annotation processing (KAPT). In this article I’ll try to show you the different approaches to annotation processing, starting from pure Java solutions, then moving to KAPT and finally to its
successor – Kotlin Symbol Processing.
Java annotation processors
Lombok *
Lombok is one of the first projects that comes into Java devs mind when thinking about annotation processing. You just add a single dependency into your pom.xml / add a plugin into Intellij Idea and some kind of magic turns your classes annotated with @Value into a functional immutable data structure. But in fact, Lombok is not a 100% pure example of an annotation processor… If you just run your debugger and step into generated toString / equals method, you’ll see no generated code:
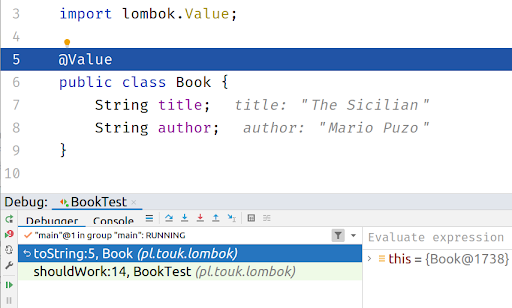
Lombok starts as an usual annotation processor, but during its run it modifies a compiler abstract syntax tree to insert desired methods to your classes, which is not an intended use-case for annotation processors. In some references this technique is even called a hack:
Lombok … uses annotation processing as a bootstrapping mechanism to include itself into the compilation process and modify the AST via some internal compiler APIs. This hacky technique has nothing to do with the intended purpose of annotation processing
Apart from not being the clearest solution, using Lombok for some time broke other annotation-processing based libraries configured to run on the same source code.
AutoValue
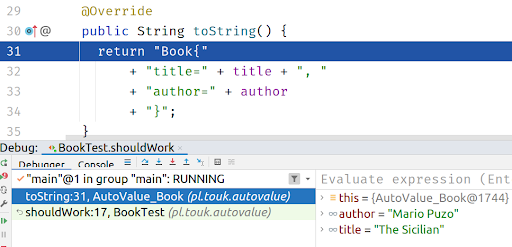
A similar library which uses annotation processing in a clear way is AutoValue. It processes the @AutoValue and @AutoValue.Builder annotations to generate immutable classes which allow you to safely step into using a debugger. Consider following example:
@AutoValue
abstract class Book {

   static Builder builder() {
       return new AutoValue_Book.Builder();
   }

   @AutoValue.Builder
   interface Builder {
       Builder title(String title);
       Builder author(String author);
       Book build();
   }

   abstract String title();
   abstract String author();
}
Then, if you create an instance of the class using a Builder, you can see generated toString / equals / hashCode methods in the debugger:
By quickly looking at the above code you can see some characteristics of using an annotation processor in your project:
- there is a minimal framework/convention that must be built into your classes (abstract getters, static builder method)
- you are using “third party” code (classes in this example) even by
directly referring it in your source code or in the runtime (like in @AutoValue example) - there is a need to run partial compilation before being able to use
generated code
Other examples of Java annotation processor include:
- MapStruct – java bean-to-bean mapping generator
- Dagger 2 – DI library (watch this awesome talk for a bit of Dagger history)
- Querydsl – typesafe SQL generator from JPA annotations
- Micronaut – DI part of a microservice framework
You can find other examples on this annotation processing list.
KAPT
I wasn’t aware how much annotation processing is used by libraries from the Android ecosystem. Butterknife, Room, Moshi, Hilt… these names are not quite familiar if you’re a backend developer working on the JVM. As Kotlin started gaining popularity in the Android community, it was crucial for it to support existing ecosystem libraries made for Java. That’s why KAPT was introduced – a Kotlin Annotation Processing Tool. The idea behind it was very simple:
- make a minimal step to transform Kotlin code to Java
- run annotation processing on Java sources, just as in any Java project
Krush
One of the examples of using KAPT is Krush – our lightweight persistence layer for Kotlin based on Exposed SQL DSL. Krush interprets standard JPA annotations on the entity classes to generate both Exposed DSL mappings and convenient methods transfer data from / to entity classes.
Consider following entity:
@Entity
data class Reservation(

   @Id
   val uid: UUID = UUID.randomUUID(),
   @Enumerated(EnumType.STRING)

   val status: Status = Status.FREE
)
By adding Krush we will have following mapping generated:
// generated
public object ReservationTable : Table("reservation") {
 public val uid: Column = uuid("uid")
 public override val primaryKey: Table.PrimaryKey = PrimaryKey(uid)
 public val status: Column =
    enumerationByName("status", 255, pl.touk.krush.Status::class)
}
However, during Krush implementation we observed some drawbacks of using annotation processing in 100% Kotlin codebase:
- no direct support for code generation. Java annotation API contains limited support for code generation using a
Filerinterface, that just lets you generate new files, with no distinction between source code, metadata, docs etc. A partial solution to this is using a third-party code generation library, like KotlinPoet, which contains a feature-rich DSL for generating Kotlin classes, properties etc. - missing Kotlin-specific information in the API – annotation processing API contains information about the structure of the code during compilation using
javax.lang.modelpackage. However, this is Java-specific, so you don’t have access to top-level functions, file annotations etc. However, some of additional Kotlin metadata can be retrieved by using kotlinpoet-metadata integration. - a need to generate Java stubs before running the annotation processing itself reduces the overall performance of project build process, some resources estimate that stub generation takes ⅓ time of the whole
kotlincrun, which can be painful for large codebases.
KSP
The downsides of using KAPT in pure Kotlin projects (especially Android-based), triggered Google to develop a Kotlin-specific approach, called Kotlin Symbol Processing. It is now a preferred way to implement annotation processing in Kotlin, since its release KAPT has been put into maintenance mode. It provides a separate from javax.lang.model, Kotlin-specific API representing your source code, no need to generate any Java stubs and a better integration with code generator libraries. Let’s look at basic features of KSP by doing a hands-on example.
Implementing @Slf4j
Let’s look at how to use KSP by writing a simple processor – an equivalent of Lombok’s @Slf4j.
We should start with an implementation of our annotation, SymbolProcessor and a provider for it:
annotation class Slf4j

class Slf4jProcessor(val env: SymbolProcessorEnvironment) : SymbolProcessor {

   override fun process(resolver: Resolver): List {
       val symbols = resolver.getSymbolsWithAnnotation(Slf4j::class.java.name)
       val ret = symbols.filter { !it.validate() }.toList()
       symbols
           .filter { it is KSClassDeclaration && it.validate() }
           .forEach { it.accept(Slf4jProcessorVisitor(), Unit) }
       return ret
   }

   inner class Slf4jProcessorVisitor : KSVisitorVoid()

}

class Slf4jProcessorProvider : SymbolProcessorProvider {
   override fun create(environment: SymbolProcessorEnvironment) = Slf4jProcessor(environment)
}
Apart from a bunch of bootstrapping code, you may notice that the main part of the implementation would be Slf4jProcessorVisitor – which is how KSP is traversing your source code – by using the visitor pattern. So what you have to do is write appropriate visitXXX method(s) to implement your processor functionality:
override fun visitClassDeclaration(classDeclaration: KSClassDeclaration, data: Unit) {
   val packageName = classDeclaration.packageName.asString()
   val ksType = classDeclaration.asType(emptyList())

    val fileSpec = FileSpec.builder(
        packageName = packageName,
        fileName = classDeclaration.simpleName.asString() + "Ext"
    ).apply {
        val className = ksType.toClassName()
        val loggerName = "_${className.simpleName.replaceFirstChar { it.lowercase() }}Logger"
        addProperty(
            PropertySpec.builder(loggerName, Logger::class.java)
                .addModifiers(KModifier.PRIVATE)
                .initializer("%T.getLogger(%T::class.java)", LoggerFactory::class.java, className)
                .build()
        )
        addProperty(
            PropertySpec.builder("logger", Logger::class.java)
                .receiver(className)
                .getter(
                    FunSpec.getterBuilder()
                        .addStatement("return $loggerName")
                        .build()
                )
                .build()
        )
    }.build()

    fileSpec.writeTo(codeGenerator = env.codeGenerator, aggregating = false)
}
So, I’m using KotlinPoet here, which is quite nice integrated with KSP by this writeTo method – so if you want to generate a new file you just build a FileSpec and then write it to appropriate folder configured by the KSP plugin by calling writeTo method.
In short, for each class annotated with @Slf4j annotation we generate a file with a _serviceLogger property which is initialized with standard LoggerFactory.getLogger call. KotlinPoet comes with a nice templating system, which allows you to just pass class declarations from the KSP model instead of resolving them manually, with imports etc.. The second property is an extension of our annotated class, which we express by using a receiver block, we can also make a custom getter by using another KotlinPoet call.
If we did everything right this how the generated code should look for annotated class:
import org.slf4j.Logger
import org.slf4j.LoggerFactory

private val _serviceLogger: Logger = LoggerFactory.getLogger(Service::class.java)

public val Service.logger: Logger
  get() = _serviceLogger
Which should allow us to use the logger in our class:
@Slf4j
class Service {
   fun test() {
       logger.info("Hello from KSP!")
   }
}
Summary
I hope this article helped you learn the history of annotation processing and motivation behind the KSP project. In fact KAPT is now in maintenance mode, so KSP should be the default library to use in new, pure Kotlin projects. However, if you think of migrating your existing library based on KAPT, you should be aware of some complications when java.lang.model is too tightly coupled to your model. For example the Dagger project has a rough road of supporting KSP, they must first introduce some common model based on XProcessing to support both KSP and traditional annotation processing.
The code for example @Slf4j processor can be found here.