TouK Nussknacker – using Apache Flink made easier for analysts and business

Few weeks ago we (TouK) revealed on Github our latest open source project – Nussknacker. What is it and why should you care?

Why?

First, some history: more than year ago one of our clients decided it’s high time for Real Time Marketing. They had pretty large data streams and lots of ideas for marketing campaigns, so one of the key success factors was the ability to process the data fast. We prepared a POC based on Apache Flink and it turned out that it’s really great piece of technology – fast and accurate.

There was just one problem – how to write and customize processes? Flink, as many modern stream processing engines, provides rich and friendly DSL, both in Java and Scala. But for our client that was not really enough. See, they are enterprise that do not employ developers – they have many decent, competent analysts who know the business and SQL – but not Java or (Heaven forbid…) Scala.

Nussknacker to the rescue!

So we decided to create a simple process designer for them. It looks more or less like this:
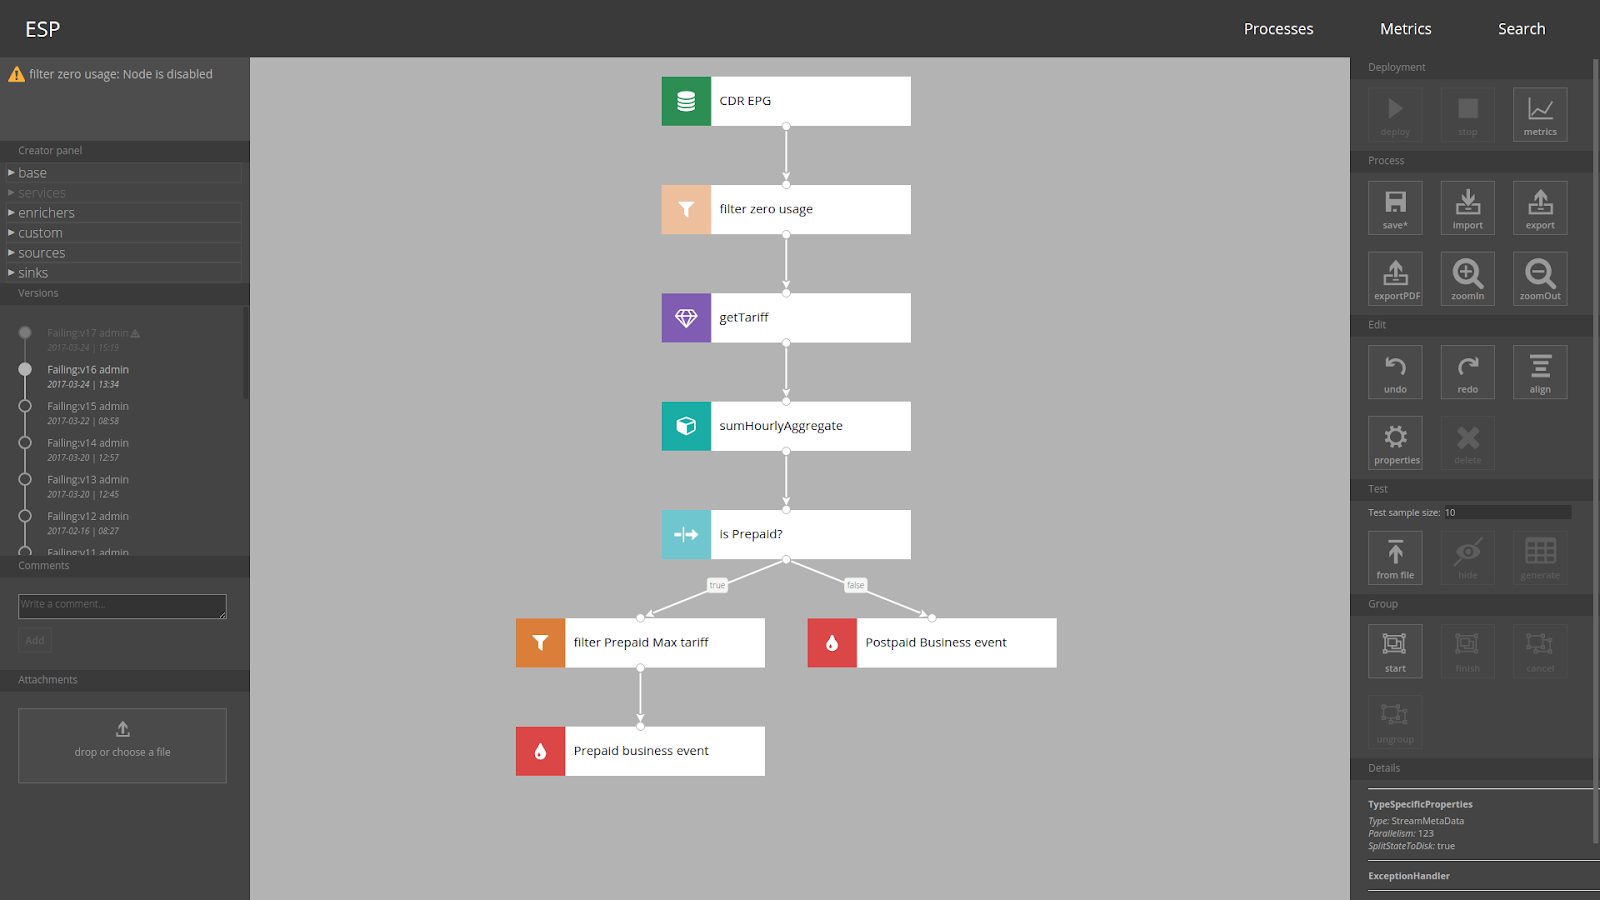
You draw a diagram, fill in the details (like filter expressions – “#input.usageData > 0” or SMS/mail content), then you press the Deploy button and voilà – your brand new process in running on Flink cluster!

Of course first somebody (that is, developer) has to prepare data sources (most probably Kafka topics), design data model (POJOs or case classes) and implement actions – like sending emails or sending some events to another Kafka topic. But once a model of data and external services are defined, an analyst can define and deploy processes all by him/herself.

More features

Sounds a bit scary to let your users run stream processes with GUI? Bad filter conditions can have serious performance implications if you deal with streams of tens of thousands of events per second… That’s why we let user test their diagrams first – each test case can be generated by sample of real data coming from e.g. Kafka and then run in Flink sandbox mini-cluster.

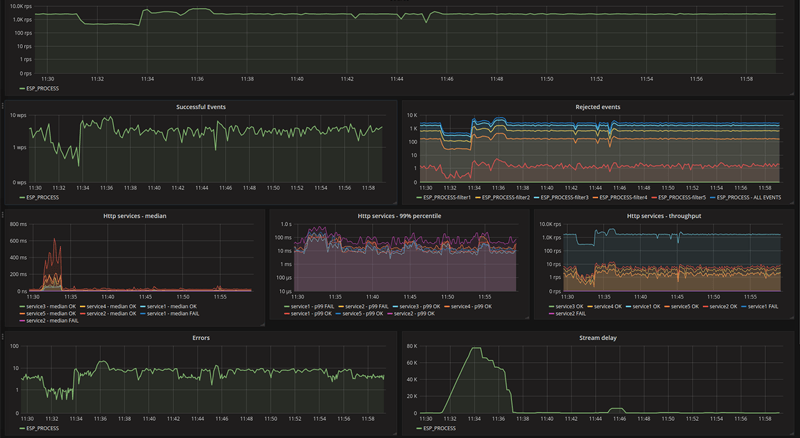
We have also many more features that make working with Nussknacker and Flink easier: subprocesses, versioning, generating PDF documentation, migration between environments and last but certainly not least – integration with InfluxDB/Grafana to provide detailed insight into how process is doing:
Where can I use it?

What are Nussknacker use cases? Our main deployments deal with RTM (Real Time Marketing). One of our clients started with RTM and then found out that Nussknacker is also great choice for fraud detection in real time. Industries we are working with include telcos, banks and media companies. We are also thinking about other possibilities – for example IoT.

Sounds cool?

If you are interested in easy access for semi-technical analysts to streaming data – give Nussknacker a try!

You can find the code at Github: https://github.com/touk/nussknacker, we also have a nice, Docker-based quickstart: https://touk.github.io/nussknacker/Quickstart.html.

And if you are coming to Flink Forward next week in Berlin – join me on Wednesday afternoon to hear more – <a href="https://berlin.flink-forward.org/kb_sessions/touk-nussknacker-creating-flink-jobs-with-gui/"https://berlin.flink-forward.org/kb_sessions/touk-nussknacker-creating-flink-jobs-with-gui/.

In next days/weeks we’ll post more information on TouK blog both on Nussknacker architecture and internals and on interesting use cases – stay tuned :)

You May Also Like

Integration testing custom validation constraints in Jersey 2

I recently joined a team trying to switch a monolithic legacy system into set of RESTful services in Java. They decided to use latest 2.x version of Jersey as a REST container which was not a first choice for me, since I’m not a big fan of JSR-* specs. But now I must admit that JAX-RS 2.x is doing things right: requires almost zero boilerplate code, support auto-discovery of features and prefers convention over configuration like other modern frameworks. Since the spec is still young, it’s hard to find good tutorials and kick-off projects with some working code. I created jersey2-starter project on GitHub which can be used as starting point for your own production-ready RESTful service. In this post I’d like to cover how to implement and integration test your own validation constraints of REST resources.

Custom constraints

One of the issues which bothers me when coding REST in Java is littering your class model with annotations. Suppose you want to build a simple Todo list REST service, when using Jackson, validation and Spring Data, you can easily end up with this as your entity class:

@Document
public class Todo {
    private Long id;
    @NotNull
    private String description;
    @NotNull
    private Boolean completed;
    @NotNull
    private DateTime dueDate;

    @JsonCreator
    public Todo(@JsonProperty("description") String description, @JsonProperty("dueDate") DateTime dueDate) {
        this.description = description;
        this.dueDate = dueDate;
        this.completed = false;
    }
    // getters and setters
}

Your domain model is now effectively blured by messy annotations almost everywhere. Let’s see what we can do with validation constraints (@NotNulls). Some may say that you could introduce some DTO layer with own validation rules, but it conflicts for me with pure REST API design, which stands that you operate on resources which should map to your domain classes. On the other hand - what does it mean that Todo object is valid? When you create a Todo you should provide a description and due date, but what when you’re updating? You should be able to change any of description, due date (postponing) and completion flag (marking as done) - but you should provide at least one of these as valid modification. So my idea is to introduce custom validation constraints, different ones for creation and modification:

@Target({TYPE, PARAMETER})
@Retention(RUNTIME)
@Constraint(validatedBy = ValidForCreation.Validator.class)
public @interface ValidForCreation {
    //...
    class Validator implements ConstraintValidator<ValidForCreation, Todo> {
    /...
        @Override
        public boolean isValid(Todo todo, ConstraintValidatorContext constraintValidatorContext) {
            return todo != null
                && todo.getId() == null
                && todo.getDescription() != null
                && todo.getDueDate() != null;
        }
    }
}

@Target({TYPE, PARAMETER})
@Retention(RUNTIME)
@Constraint(validatedBy = ValidForModification.Validator.class)
public @interface ValidForModification {
    //...
    class Validator implements ConstraintValidator<ValidForModification, Todo> {
    /...
        @Override
        public boolean isValid(Todo todo, ConstraintValidatorContext constraintValidatorContext) {
            return todo != null
                && todo.getId() == null
                && (todo.getDescription() != null || todo.getDueDate() != null || todo.isCompleted() != null);
        }
    }
}

And now you can move validation annotations to the definition of a REST endpoint:

@POST
@Consumes(APPLICATION_JSON)
public Response create(@ValidForCreation Todo todo) {...}

@PUT
@Consumes(APPLICATION_JSON)
public Response update(@ValidForModification Todo todo) {...}

And now you can remove those NotNulls from your model.

Integration testing

There are in general two approaches to integration testing:

  • test is being run on separate JVM than the app, which is deployed on some other integration environment
  • test deploys the application programmatically in the setup block.

Both of these have their pros and cons, but for small enough servoces, I personally prefer the second approach. It’s much easier to setup and you have only one JVM started, which makes debugging really easy. You can use a generic framework like Arquillian for starting your application in a container environment, but I prefer simple solutions and just use emdedded Jetty. To make test setup 100% production equivalent, I’m creating full Jetty’s WebAppContext and have to resolve all runtime dependencies for Jersey auto-discovery to work. This can be simply achieved with Maven resolved from Shrinkwrap - an Arquillian subproject:

    WebAppContext webAppContext = new WebAppContext();
    webAppContext.setResourceBase("src/main/webapp");
    webAppContext.setContextPath("/");
    File[] mavenLibs = Maven.resolver().loadPomFromFile("pom.xml")
                .importCompileAndRuntimeDependencies()
                .resolve().withTransitivity().asFile();
    for (File file: mavenLibs) {
        webAppContext.getMetaData().addWebInfJar(new FileResource(file.toURI()));
    }
    webAppContext.getMetaData().addContainerResource(new FileResource(new File("./target/classes").toURI()));

    webAppContext.setConfigurations(new Configuration[] {
        new AnnotationConfiguration(),
        new WebXmlConfiguration(),
        new WebInfConfiguration()
    });
    server.setHandler(webAppContext);

(this Stackoverflow thread inspired me a lot here)

Now it’s time for the last part of the post: parametrizing our integration tests. Since we want to test validation constraints, there are many edge paths to check (and make your code coverage close to 100%). Writing one test per each case could be a bad idea. Among the many solutions for JUnit I’m most convinced to the Junit Params by Pragmatists team. It’s really simple and have nice concept of JQuery-like helper for creating providers. Here is my tests code (I’m also using builder pattern here to create various kinds of Todos):

@Test
@Parameters(method = "provideInvalidTodosForCreation")
public void shouldRejectInvalidTodoWhenCreate(Todo todo) {
    Response response = createTarget().request().post(Entity.json(todo));

    assertThat(response.getStatus()).isEqualTo(BAD_REQUEST.getStatusCode());
}

private static Object[] provideInvalidTodosForCreation() {
    return $(
        new TodoBuilder().withDescription("test").build(),
        new TodoBuilder().withDueDate(DateTime.now()).build(),
        new TodoBuilder().withId(123L).build(),
        new TodoBuilder().build()
    );
}

OK, enough of reading, feel free to clone the project and start writing your REST services!

I recently joined a team trying to switch a monolithic legacy system into set of RESTful services in Java. They decided to use latest 2.x version of Jersey as a REST container which was not a first choice for me, since I’m not a big fan of JSR-* specs. But now I must admit that JAX-RS 2.x is doing things right: requires almost zero boilerplate code, support auto-discovery of features and prefers convention over configuration like other modern frameworks. Since the spec is still young, it’s hard to find good tutorials and kick-off projects with some working code. I created jersey2-starter project on GitHub which can be used as starting point for your own production-ready RESTful service. In this post I’d like to cover how to implement and integration test your own validation constraints of REST resources.

Custom constraints

One of the issues which bothers me when coding REST in Java is littering your class model with annotations. Suppose you want to build a simple Todo list REST service, when using Jackson, validation and Spring Data, you can easily end up with this as your entity class:

@Document
public class Todo {
    private Long id;
    @NotNull
    private String description;
    @NotNull
    private Boolean completed;
    @NotNull
    private DateTime dueDate;

    @JsonCreator
    public Todo(@JsonProperty("description") String description, @JsonProperty("dueDate") DateTime dueDate) {
        this.description = description;
        this.dueDate = dueDate;
        this.completed = false;
    }
    // getters and setters
}

Your domain model is now effectively blured by messy annotations almost everywhere. Let’s see what we can do with validation constraints (@NotNulls). Some may say that you could introduce some DTO layer with own validation rules, but it conflicts for me with pure REST API design, which stands that you operate on resources which should map to your domain classes. On the other hand - what does it mean that Todo object is valid? When you create a Todo you should provide a description and due date, but what when you’re updating? You should be able to change any of description, due date (postponing) and completion flag (marking as done) - but you should provide at least one of these as valid modification. So my idea is to introduce custom validation constraints, different ones for creation and modification:

@Target({TYPE, PARAMETER})
@Retention(RUNTIME)
@Constraint(validatedBy = ValidForCreation.Validator.class)
public @interface ValidForCreation {
    //...
    class Validator implements ConstraintValidator<ValidForCreation, Todo> {
    /...
        @Override
        public boolean isValid(Todo todo, ConstraintValidatorContext constraintValidatorContext) {
            return todo != null
                && todo.getId() == null
                && todo.getDescription() != null
                && todo.getDueDate() != null;
        }
    }
}

@Target({TYPE, PARAMETER})
@Retention(RUNTIME)
@Constraint(validatedBy = ValidForModification.Validator.class)
public @interface ValidForModification {
    //...
    class Validator implements ConstraintValidator<ValidForModification, Todo> {
    /...
        @Override
        public boolean isValid(Todo todo, ConstraintValidatorContext constraintValidatorContext) {
            return todo != null
                && todo.getId() == null
                && (todo.getDescription() != null || todo.getDueDate() != null || todo.isCompleted() != null);
        }
    }
}

And now you can move validation annotations to the definition of a REST endpoint:

@POST
@Consumes(APPLICATION_JSON)
public Response create(@ValidForCreation Todo todo) {...}

@PUT
@Consumes(APPLICATION_JSON)
public Response update(@ValidForModification Todo todo) {...}

And now you can remove those NotNulls from your model.

Integration testing

There are in general two approaches to integration testing:

  • test is being run on separate JVM than the app, which is deployed on some other integration environment
  • test deploys the application programmatically in the setup block.

Both of these have their pros and cons, but for small enough servoces, I personally prefer the second approach. It’s much easier to setup and you have only one JVM started, which makes debugging really easy. You can use a generic framework like Arquillian for starting your application in a container environment, but I prefer simple solutions and just use emdedded Jetty. To make test setup 100% production equivalent, I’m creating full Jetty’s WebAppContext and have to resolve all runtime dependencies for Jersey auto-discovery to work. This can be simply achieved with Maven resolved from Shrinkwrap - an Arquillian subproject:

    WebAppContext webAppContext = new WebAppContext();
    webAppContext.setResourceBase("src/main/webapp");
    webAppContext.setContextPath("/");
    File[] mavenLibs = Maven.resolver().loadPomFromFile("pom.xml")
                .importCompileAndRuntimeDependencies()
                .resolve().withTransitivity().asFile();
    for (File file: mavenLibs) {
        webAppContext.getMetaData().addWebInfJar(new FileResource(file.toURI()));
    }
    webAppContext.getMetaData().addContainerResource(new FileResource(new File("./target/classes").toURI()));

    webAppContext.setConfigurations(new Configuration[] {
        new AnnotationConfiguration(),
        new WebXmlConfiguration(),
        new WebInfConfiguration()
    });
    server.setHandler(webAppContext);

(this Stackoverflow thread inspired me a lot here)

Now it’s time for the last part of the post: parametrizing our integration tests. Since we want to test validation constraints, there are many edge paths to check (and make your code coverage close to 100%). Writing one test per each case could be a bad idea. Among the many solutions for JUnit I’m most convinced to the Junit Params by Pragmatists team. It’s really simple and have nice concept of JQuery-like helper for creating providers. Here is my tests code (I’m also using builder pattern here to create various kinds of Todos):

@Test
@Parameters(method = "provideInvalidTodosForCreation")
public void shouldRejectInvalidTodoWhenCreate(Todo todo) {
    Response response = createTarget().request().post(Entity.json(todo));

    assertThat(response.getStatus()).isEqualTo(BAD_REQUEST.getStatusCode());
}

private static Object[] provideInvalidTodosForCreation() {
    return $(
        new TodoBuilder().withDescription("test").build(),
        new TodoBuilder().withDueDate(DateTime.now()).build(),
        new TodoBuilder().withId(123L).build(),
        new TodoBuilder().build()
    );
}

OK, enough of reading, feel free to clone the project and start writing your REST services!