Analyzing 2018 World Cup match data with Clojure

So, Russia 2018 World Cup is over. There were lots of good moments, and some worse (especially for us, here in Poland….). But is there something we can learn from this event as programmers? Recently, I had a few free evenings and played a bit with a World Cup API. In this post I want to show you what is Clojure way of dealing with REST APIs and when it beats other languages in this field.

TLDR; The code is on GitHub. Setup is based on Atom and proto-repl package which makes the interactive development experience really pleasant. I highly recommend you follow its installation guide while dealing with my solution.

As a problem to solve, I wanted to find something not trivial, to show some of the Clojure super-powers. Finally, I came up with this:

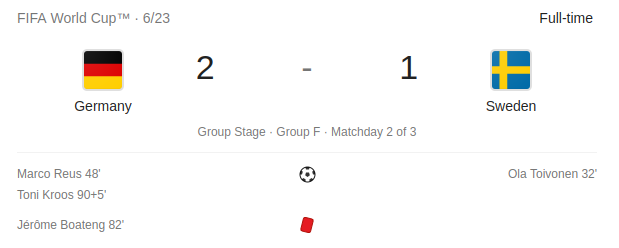
The problem: find all matches the winning team made a come-back — they lost a goal first, but managed to win.

For example Sweden — Germany in a group stage:

Ok, so a good starting point would be getting all matches data for further processing. I’m using clj-http as an http client (with cheshire for json parsing support):

(ns worldcup.matches
  (:require
    [clj-http.client :as http]))

(def api-root "https://worldcup.sfg.io")

(defn get-all-matches []
  (->
    (http/get (str api-root "/matches") {:as :json})
    :body))

The Clojure philosophy relies heavily on dealing with built-in data structures. In statically typed languages you’d probably start with modelling response JSON as some POJO classes; here you just get a map and can start to investigate it right from the beginning. Huge difference.

One thing that may not be clear in the above code is this -> macro. It is really helpful for nested collection operations. Instead of nesting (xxx (yyy (zzz … calls, you can use both -> and ->> macros to make code similar to e.g. Java equivalent:

(->> lst
  (map op1)
  (map op2)
  (filter p1)
  first)

lst.stream()
    .map(op1)
    .map(op2)
    .filter(p1)
    .findFirst()

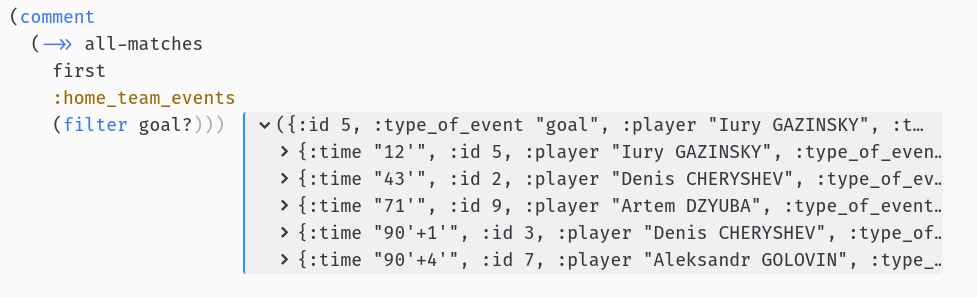
Ok, let’s start to investigate the API response. Using proto-repl it is trivial to examine the value of any data structure straight from your editor. Let’s see the match data — by using Proto REPL: Execute Block action — ctrl+alt+,s shortcut by default:

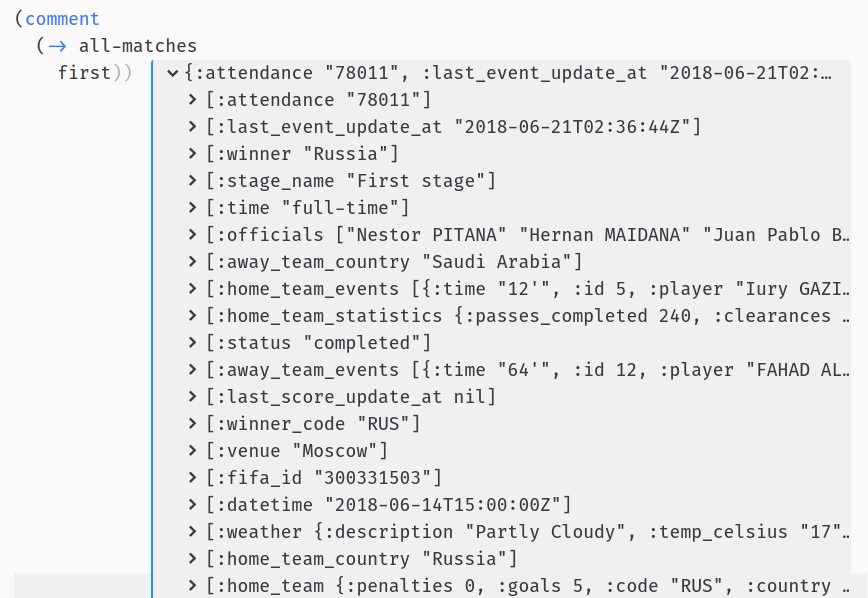
It’s a common practice to wrap interactive invocations into comment macro which makes them ignored when evaluating whole file at once.

Ok, so we have some basic attributes of the match, the number of goals for each team and some team events. Let’s investigate these:

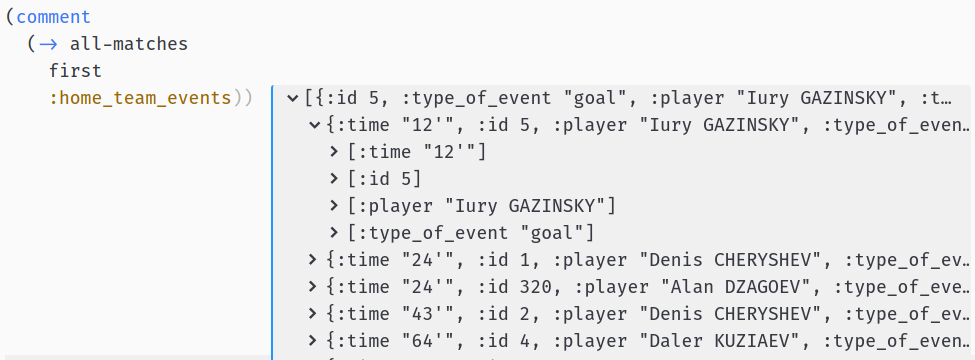
Looks promising — we have all the times of the goals scored by each team. Having this, our algorithm may look like this:

  1. Get times of goals for each team
  2. Sort goals by times
  3. Get the team with the first goal
  4. Check if the winner is the other team

Let’s start with filtering the goals from team’s events. First, we need to find how to filter goals from match events:

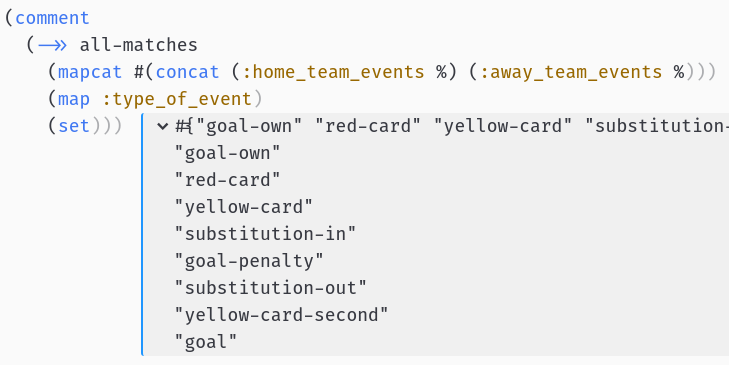
Ok, so we have goal, goal-penalty and goal-own:

defn goal? [e]
  (let [type (:type_of_event e)]
    (or (= "goal" type)
        (= "goal-penalty" type)
        (= "goal-own" type))))

Looks good.

We’ll also need the time when the goal was scored and this is in a really strange format, e.g 90'+4'. We need to split on + character, remove ' and trim and then add additional time to get exact minute of the goal:

(require '[clojure.string :as string])

(defn goal-time [t]
  (->> 
    (string/split t #"\+")
    (map string/trim)
    (map #(string/replace % #"'" ""))
    (map #(Integer/parseInt %))
    (reduce +)))

EDIT:

Bartek Tartanus (thanks!) found a bug in just adding additional time to half time: suppose we had late goal in the first half and early goal in the second (45'+5' and 46) — my algorithm will pick second half goal as earlier. We need to somehow pass half (or part for extra-time) data to sort goal times. Fortunately, Clojure sorts collections of pairs well:

We need to calculate both half (part) and exact time of scoring a goal:

(defn part [goal]
  (let [time (first goal)]
    (cond
      (<= time 45) 1
      (<= time 90) 2
      (<= time 105) 3   
      (<= time 120) 4))) ;; parts 3 and 4 are for extra-time

(defn parts [time-str]
  (->>
    (string/split time-str #"\+")
    (map string/trim)
    (map #(string/replace % #"'" ""))
    (map #(Integer/parseInt %))))

(defn part-and-time [time-str]
  (let [parts (parts time-str)]
    [(part parts) (reduce + parts)]))

Now we can test improved sorting:

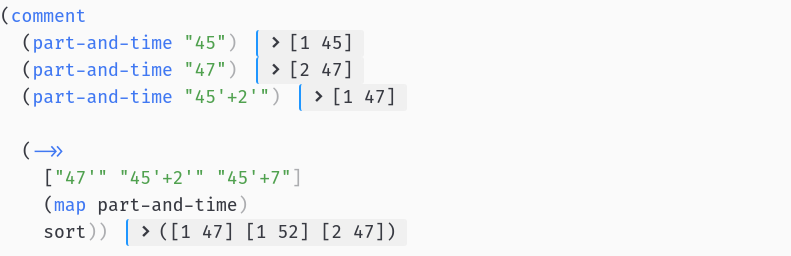
Seems to work! So let’s try to find a team that scored a first goal. My idea was to mix both :home and :away goal times in one collection:

([:home [1 38]] [:home [1 39]] [:away [1 28]])

and then sort by times:

([:away [1 28]] [:home [1 38]] [:home [1 39]])

to know the side that scored first goal (:away in this case).

(defn first-scored-side [match]
  (let [goal-times
          (concat
            (team-goal-times (:home_team_events match) :home)
            (team-goal-times (:away_team_events match) :away))]
   (->> goal-times (sort-by second) first first)))

I use first to get the first pair from sorted collection and then first again to get the first element from the pair:

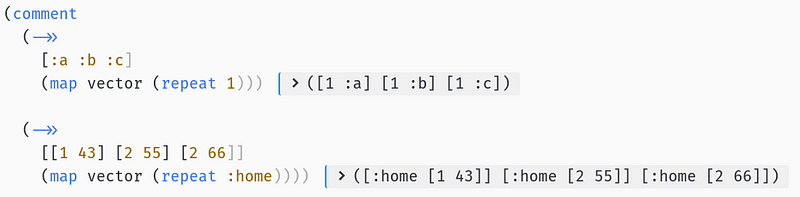
To create a list with goal times and side I used this function:

(defn team-goal-times [events side]
  (->> events
    (filter goal?)
    (map :time)
    (map part-and-time)
    (map vector (repeat side))))

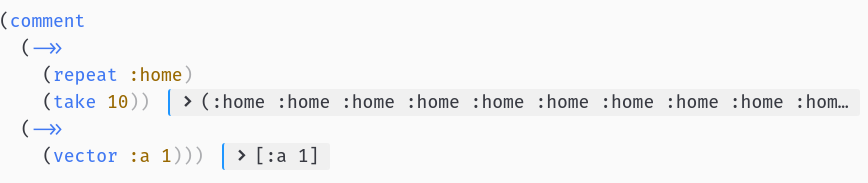
What’s happening in this last line? So, repeat returns an infinite lazy sequence with an element repeated and vector just creates an indexed collection from provided elements.

And map can also take two collections, applying provided function to pairs: <c1_first, c2_first>, <c1_second, c2_second>

Which leads us easily to this:

Ok, now we are ready write this come-back? function now:

(defn winner-side [match]
  (let [winner (:winner match)]
    (cond
      (= winner (:home_team_country match)) :home
      (= winner (:away_team_country match)) :away)))

(defn come-back? [match]
  (let [first-scored-side (first-scored-side match)
        winner-side (winner-side match)]
    (and (not (nil? winner-side))
         (not= winner-side first-scored-side))))

Let’s see if it works, just filter the team’s data from the match to remove noise:

(defn teams [match]
  (select-keys match [:home_team_country :away_team_country :winner]))

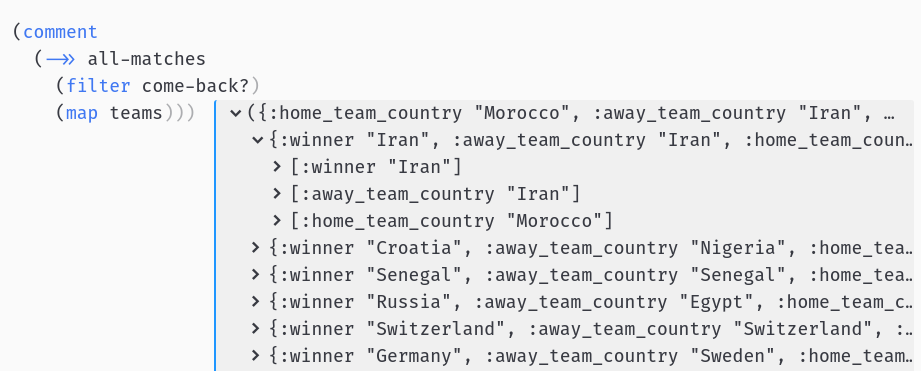
Ok, we got some results! But, hmm… Morocco — Iran?

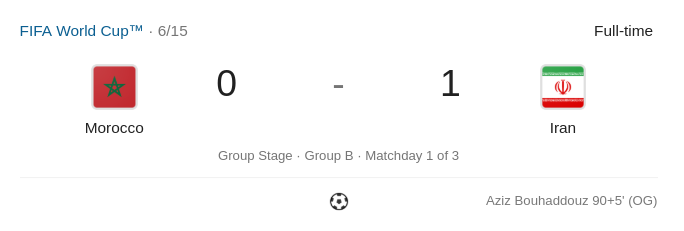
0:1 with last-minute own goal? This definitely doesn’t look like come-back…. Let’s look at this match events:

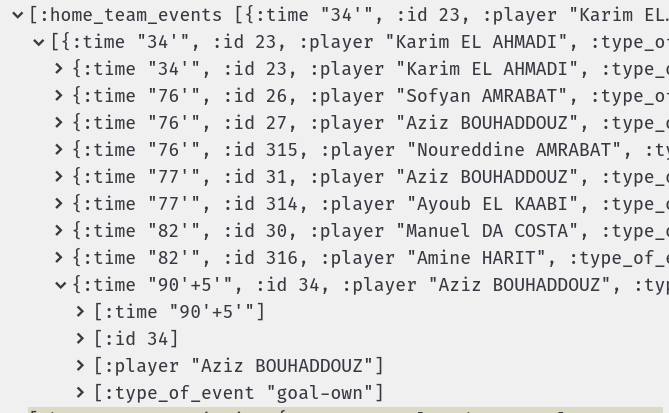
Ok, now I can see the problem. Own goals are contained in wrong side’s events! This goal should be in Iran’s events, otherwise our solution won’t work…

We can make a special case for own goals or just move own goals to correct side events. I decided to go with the second solution, knowing that Clojure is really good at transforming nested data structures e.g. with update and update-in functions:

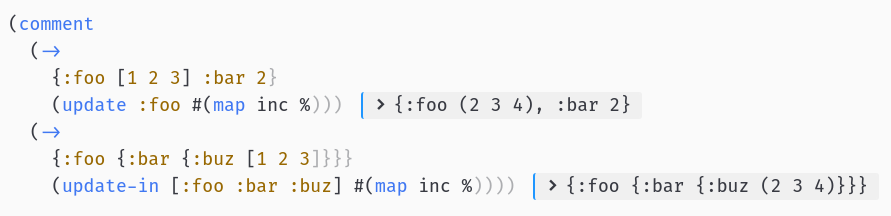
So, update takes a map, a key and a function and applies to value under that key, leaving rest of the map untouched. update-in works the same, but you can pass a whole path to some nested element in your data structure.

Let’s use update to move all the own-goals from :home_team_events to :away_team_events and vice-versa:

(defn own-goal? [event]
  (= "goal-own" (:type_of_event event)))

(defn own-goals [events]
  (->> events (filter own-goal?)))

(defn remove-own-goals [events]
  (remove own-goal? events))

(defn fix-match [match-to-fix]
  (let [own-home-goals (own-goals (:home_team_events match-to-fix))
        own-away-goals (own-goals (:away_team_events match-to-fix))]
   (-> match-to-fix
     (update :home_team_events remove-own-goals)
     (update :away_team_events remove-own-goals)
     (update :home_team_events concat own-away-goals)
     (update :away_team_events concat own-home-goals))))

And finally let’s fix come-back? function:

(defn come-back? [match-to-fix]
  (let [match (fix-match match-to-fix)
        first-scored-side (first-scored-side match)
        winner-side (winner-side match)]
    (and (not (nil? winner-side))
         (not= winner-side first-scored-side))))

Check the results again:

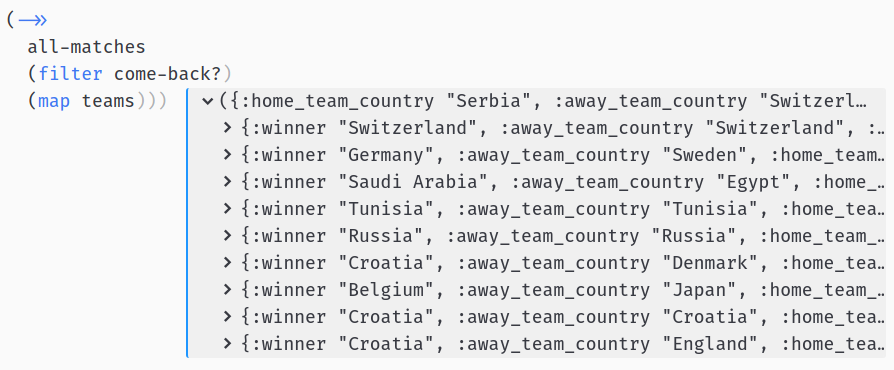
Yes, we have it! We found 9 such games, with overall leader Croatia coming back 3 times (2 by penalties).

You May Also Like

Private fields and methods are not private in groovy

I used to code in Java before I met groovy. Like most of you, groovy attracted me with many enhancements. This was to my surprise to discover that method visibility in groovy is handled different than Java!

Consider this example:

class Person {
private String name
public String surname

private Person() {}

private String signature() { "${name?.substring(0, 1)}. $surname" }

public String toString() { "I am $name $surname" }
}

How is this class interpreted with Java?

  1. Person has private constructor that cannot be accessed
  2. Field "name" is private and cannot be accessed
  3. Method signature() is private and cannot be accessed

Let's see how groovy interpretes Person:

public static void main(String[] args) {
def person = new Person() // constructor is private - compilation error in Java
println(person.toString())

person.@name = 'Mike' // access name field directly - compilation error in Java
println(person.toString())

person.name = 'John' // there is a setter generated by groovy
println(person.toString())

person.@surname = 'Foo' // access surname field directly
println(person.toString())

person.surname = 'Bar' // access auto-generated setter
println(person.toString())

println(person.signature()) // call private method - compilation error in Java
}

I was really astonished by its output:

I am null null
I am Mike null
I am John null
I am John Foo
I am John Bar
J. Bar

As you can see, groovy does not follow visibility directives at all! It treats them as non-existing. Code compiles and executes fine. It's contrary to Java. In Java this code has several errors, pointed out in comments.

I've searched a bit on this topic and it seems that this behaviour is known since version 1.1 and there is a bug report on that: http://jira.codehaus.org/browse/GROOVY-1875. It is not resolved even with groovy 2 release. As Tim Yates mentioned in this Stackoverflow question: "It's not clear if it is a bug or by design". Groovy treats visibility keywords as a hint for a programmer.

I need to keep that lesson in mind next time I want to make some field or method private!

Multi module Gradle project with IDE support

This article is a short how-to about multi-module project setup with usage of the Gradle automation build tool.

Here's how Rich Seller, a StackOverflow user, describes Gradle:
Gradle promises to hit the sweet spot between Ant and Maven. It uses Ivy's approach for dependency resolution. It allows for convention over configuration but also includes Ant tasks as first class citizens. It also wisely allows you to use existing Maven/Ivy repositories.
So why would one use yet another JVM build tool such as Gradle? The answer is simple: to avoid frustration involved by Ant or Maven.

Short story

I was fooling around with some fresh proof of concept and needed a build tool. I'm pretty familiar with Maven so created project from an artifact, and opened the build file, pom.xml for further tuning.
I had been using Grails with its own build system (similar to Gradle, btw) already for some time up then, so after quite a time without Maven, I looked on the pom.xml and found it to be really repulsive.

Once again I felt clearly: XML is not for humans.

After quick googling I found Gradle. It was still in beta (0.8 version) back then, but it's configured with Groovy DSL and that's what a human likes :)

Where are we

In the time Ant can be met but among IT guerrillas, Maven is still on top and couple of others like for example Ivy conquer for the best position, Gradle smoothly went into its mature age. It's now available in 1.3 version, released at 20th of November 2012. I'm glad to recommend it to anyone looking for relief from XML configured tools, or for anyone just looking for simple, elastic and powerful build tool.

Lets build

I have already written about basic project structure so I skip this one, reminding only the basic project structure:
<project root>

├── build.gradle
└── src
├── main
│ ├── java
│ └── groovy

└── test
├── java
└── groovy
Have I just referred myself for the 1st time? Achievement unlocked! ;)

Gradle as most build tools is run from a command line with parameters. The main parameter for Gradle is a 'task name', for example we can run a command: gradle build.
There is no 'create project' task, so the directory structure has to be created by hand. This isn't a hassle though.
Java and groovy sub-folders aren't always mandatory. They depend on what compile plugin is used.

Parent project

Consider an example project 'the-app' of three modules, let say:
  1. database communication layer
  2. domain model and services layer
  3. web presentation layer
Our project directory tree will look like:
the-app

├── dao-layer
│ └── src

├── domain-model
│ └── src

├── web-frontend
│ └── src

├── build.gradle
└── settings.gradle
the-app itself has no src sub-folder as its purpose is only to contain sub-projects and build configuration. If needed it could've been provided with own src though.

To glue modules we need to fill settings.gradle file under the-app directory with a single line of content specifying module names:
include 'dao-layer', 'domain-model', 'web-frontend'
Now the gradle projects command can be executed to obtain such a result:
:projects

------------------------------------------------------------
Root project
------------------------------------------------------------

Root project 'the-app'
+--- Project ':dao-layer'
+--- Project ':domain-model'
\--- Project ':web-frontend'
...so we know that Gradle noticed the modules. However gradle build command won't run successful yet because build.gradle file is still empty.

Sub project

As in Maven we can create separate build config file per each module. Let say we starting from DAO layer.
Thus we create a new file the-app/dao-layer/build.gradle with a line of basic build info (notice the new build.gradle was created under sub-project directory):
apply plugin: 'java'
This single line of config for any of modules is enough to execute gradle build command under the-app directory with following result:
:dao-layer:compileJava
:dao-layer:processResources UP-TO-DATE
:dao-layer:classes
:dao-layer:jar
:dao-layer:assemble
:dao-layer:compileTestJava UP-TO-DATE
:dao-layer:processTestResources UP-TO-DATE
:dao-layer:testClasses UP-TO-DATE
:dao-layer:test
:dao-layer:check
:dao-layer:build

BUILD SUCCESSFUL

Total time: 3.256 secs
To use Groovy plugin slightly more configuration is needed:
apply plugin: 'groovy'

repositories {
mavenLocal()
mavenCentral()
}

dependencies {
groovy 'org.codehaus.groovy:groovy-all:2.0.5'
}
At lines 3 to 6 Maven repositories are set. At line 9 dependency with groovy library version is specified. Of course plugin as 'java', 'groovy' and many more can be mixed each other.

If we have settings.gradle file and a build.gradle file for each module, there is no need for parent the-app/build.gradle file at all. Sure that's true but we can go another, better way.

One file to rule them all

Instead of creating many build.gradle config files, one per each module, we can use only the parent's one and make it a bit more juicy. So let us move the the-app/dao-layer/build.gradle a level up to the-app/build-gradle and fill it with new statements to achieve full project configuration:
def langLevel = 1.7

allprojects {

apply plugin: 'idea'

group = 'com.tamashumi'
version = '0.1'
}

subprojects {

apply plugin: 'groovy'

sourceCompatibility = langLevel
targetCompatibility = langLevel

repositories {
mavenLocal()
mavenCentral()
}

dependencies {
groovy 'org.codehaus.groovy:groovy-all:2.0.5'
testCompile 'org.spockframework:spock-core:0.7-groovy-2.0'
}
}

project(':dao-layer') {

dependencies {
compile 'org.hibernate:hibernate-core:4.1.7.Final'
}
}

project(':domain-model') {

dependencies {
compile project(':dao-layer')
}
}

project(':web-frontend') {

apply plugin: 'war'

dependencies {
compile project(':domain-model')
compile 'org.springframework:spring-webmvc:3.1.2.RELEASE'
}
}

idea {
project {
jdkName = langLevel
languageLevel = langLevel
}
}
At the beginning simple variable langLevel is declared. It's worth knowing that we can use almost any Groovy code inside build.gradle file, statements like for example if conditions, for/while loops, closures, switch-case, etc... Quite an advantage over inflexible XML, isn't it?

Next the allProjects block. Any configuration placed in it will influence - what a surprise - all projects, so the parent itself and sub-projects (modules). Inside of the block we have the IDE (Intellij Idea) plugin applied which I wrote more about in previous article (look under "IDE Integration" heading). Enough to say that with this plugin applied here, command gradle idea will generate Idea's project files with modules structure and dependencies. This works really well and plugins for other IDEs are available too.
Remaining two lines at this block define group and version for the project, similar as this is done by Maven.

After that subProjects block appears. It's related to all modules but not the parent project. So here the Groovy language plugin is applied, as all modules are assumed to be written in Groovy.
Below source and target language level are set.
After that come references to standard Maven repositories.
At the end of the block dependencies to groovy version and test library - Spock framework.

Following blocks, project(':module-name'), are responsible for each module configuration. They may be omitted unless allProjects or subProjects configure what's necessary for a specific module. In the example per module configuration goes as follow:
  • Dao-layer module has dependency to an ORM library - Hibernate
  • Domain-model module relies on dao-layer as a dependency. Keyword project is used here again for a reference to other module.
  • Web-frontend applies 'war' plugin which build this module into java web archive. Besides it referes to domain-model module and also use Spring MVC framework dependency.

At the end in idea block is basic info for IDE plugin. Those are parameters corresponding to the Idea's project general settings visible on the following screen shot.


jdkName should match the IDE's SDK name otherwise it has to be set manually under IDE on each Idea's project files (re)generation with gradle idea command.

Is that it?

In the matter of simplicity - yes. That's enough to automate modular application build with custom configuration per module. Not a rocket science, huh? Think about Maven's XML. It would take more effort to setup the same and still achieve less expressible configuration quite far from user-friendly.

Check the online user guide for a lot of configuration possibilities or better download Gradle and see the sample projects.
As a tasty bait take a look for this short choice of available plugins:
  • java
  • groovy
  • scala
  • cpp
  • eclipse
  • netbeans
  • ida
  • maven
  • osgi
  • war
  • ear
  • sonar
  • project-report
  • signing
and more, 3rd party plugins...