Control your bandwidth using ntop

I was looking for tool which could help me check who is using my bandwidth. Here are requirements which I want from this kind of tool:local hosts bandwidth distribution – it is helpful when you are loosing your bandwidth and don’t know who abuse it in …

I was looking for tool which could help me check who is using my bandwidth. Here are requirements which I want from this kind of tool:

  1. local hosts bandwidth distribution – it is helpful when you are loosing your bandwidth and don’t know who abuse it in your local network
  2. remote hosts bandwidth distribution – it is useful in situation when you want to have control over DoS attacks for your public homepage or when your QoS are not set well


Gargoyle

My first shoot is to check what features can give me my TP-Link TL-WR941ND router. I’ve installed on it Gargoyle (modification of OpenWRT with some additional features) some time ago. It has some useful monitoring features:

  • bandwidth distribution pie charts which answer for my first requirement but I can’t check the time when bandwidth was used there
  • connections track – from this I can check two sides of connection (also remote host) and how much of data was send/received but it also doesn’t show this information in time domain and it is served in less friendly, text form


It was no exactly what I’m looking for. Therefor I checked what what can we find in OPKG (OpenWRT Package Management).

SNMP + NagiosGraph

I tried to find how I can link Nagios (with NagiosGraph) with my router because I already have some experience with this tools. I found out that there is check_snmp Nagios plugin which can realize this. In OPKG there is mini-snmpd package. It is light SNMP server implementation. You can run it after login by SSH to you router and execute this command:

After this you can check available from server data:
In returned MIB tree there are some useful data like server’s uptime, disk space and also interface’s bandwidth. The last one, stored in Round Robin Database and printed by NagiosGraph will give graphs of bandwidth usage in time domain. But will not show who exactly use bandwidth!


Other software

I continue searches in OpenWRT packages. I came across good OpenWRT wiki page: http://wiki.openwrt.org/doc/howto/bwmon describing some available stuff.


ntop

Among other there is mentioned ntop – extensive application written in C with many views showing statistics of network protocols usage. Installation of this application on my router with 400MHz CPU will be not the best idea. So I tried to install it on my home server and only send data to it from router by fprobe. At first I installed ntop available from ubuntu 12.04 server’s APT repository. There is available 3:4.1.0+dfsg1-1 version. After some simple configuration steps ntop start drawing graphs.


I simulate situation when from remote server I was downloading a big file from my home server. I was disappointed when noticed that I can’t read that this situation taking place from ntop graphs.


listening on interface in promiscuous mode

Some time ago I’ve done tcpdump logs analyzer on my studies. I remind that interface working in promiscuous mode can collect all data about local network traffic just like the router. To enable this mode you should exec this command:

Or if you want to set this state persistent you should edit your /etc/network/interfaces to look like this:
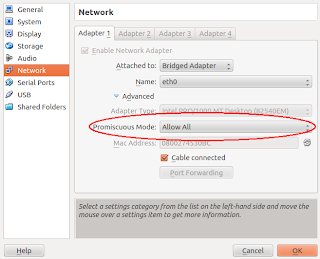
If the server where you want to listen for all packages is a VirutalBox vhost you should also verify that it is set promiscuous mode to ”Allow all” in their network configuration like on screenshot below.

ntop v.5.0.2

After this settings we can run ntop on any server in our local network. I give a try for a development version which you can download from ntop homepage: http://www.ntop.org/get-started/download/. Configure script led me through necessary packages that you must install before compilation. After this I run make and sudo make install. To manage ntop using init scripts I used existing /etc/init.d/ntop script and just edited a line with location of DEAMON value – setting them to /usr/local/bin/ntop value. I also removed -n 0 switch from /etc/default/ntop because I hope that bug with DNS resolution is already fixed (it is a little note in config about it).


I started deamon by service ntop start. In syslog there was nothing alarming – ntop started collecting traffic statistics. After login I checked available features.

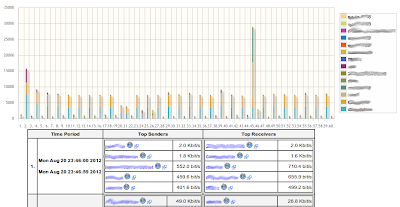
  • Network load – this page shows all load in our network in four time intervals: 10mins, last hour, last day, last month
  • Top talkers – similar to network load intervals, shows how hosts were using bandwidth in past
  • Traffic maps: Region map & hosts map – ntop is connected to Google Maps and shows where are located hosts that we are talking to
  • Activity: how changes activity of hosts in every hour
  • And other – there are other useful things like Protocol statistics, Map of connections between hosts generated in dot and many more
After some tests I noticed that now I have full control about how my network is used (also find out that I have some scheduled script that every minute send unnecessary MBs of data ;-)).


little fix

This tests help me find out that there is a little bug in page showing top talkers of an hour. I submitted patch fixing it to ntop’s request tracker if you are interested in: http://sourceforge.net/tracker/?func=detail&aid=3559097&group_id=17233&atid=367233. This is a patch to r5644.

On the end

My adventure with traffic monitoring tools ended on ntop. It is a great tool which fits my needs. Now I know who consumes my resources and can set QoS rules which make my internet connection more responsive.

You May Also Like

Integration testing custom validation constraints in Jersey 2

I recently joined a team trying to switch a monolithic legacy system into set of RESTful services in Java. They decided to use latest 2.x version of Jersey as a REST container which was not a first choice for me, since I’m not a big fan of JSR-* specs. But now I must admit that JAX-RS 2.x is doing things right: requires almost zero boilerplate code, support auto-discovery of features and prefers convention over configuration like other modern frameworks. Since the spec is still young, it’s hard to find good tutorials and kick-off projects with some working code. I created jersey2-starter project on GitHub which can be used as starting point for your own production-ready RESTful service. In this post I’d like to cover how to implement and integration test your own validation constraints of REST resources.

Custom constraints

One of the issues which bothers me when coding REST in Java is littering your class model with annotations. Suppose you want to build a simple Todo list REST service, when using Jackson, validation and Spring Data, you can easily end up with this as your entity class:

@Document
public class Todo {
    private Long id;
    @NotNull
    private String description;
    @NotNull
    private Boolean completed;
    @NotNull
    private DateTime dueDate;

    @JsonCreator
    public Todo(@JsonProperty("description") String description, @JsonProperty("dueDate") DateTime dueDate) {
        this.description = description;
        this.dueDate = dueDate;
        this.completed = false;
    }
    // getters and setters
}

Your domain model is now effectively blured by messy annotations almost everywhere. Let’s see what we can do with validation constraints (@NotNulls). Some may say that you could introduce some DTO layer with own validation rules, but it conflicts for me with pure REST API design, which stands that you operate on resources which should map to your domain classes. On the other hand - what does it mean that Todo object is valid? When you create a Todo you should provide a description and due date, but what when you’re updating? You should be able to change any of description, due date (postponing) and completion flag (marking as done) - but you should provide at least one of these as valid modification. So my idea is to introduce custom validation constraints, different ones for creation and modification:

@Target({TYPE, PARAMETER})
@Retention(RUNTIME)
@Constraint(validatedBy = ValidForCreation.Validator.class)
public @interface ValidForCreation {
    //...
    class Validator implements ConstraintValidator<ValidForCreation, Todo> {
    /...
        @Override
        public boolean isValid(Todo todo, ConstraintValidatorContext constraintValidatorContext) {
            return todo != null
                && todo.getId() == null
                && todo.getDescription() != null
                && todo.getDueDate() != null;
        }
    }
}

@Target({TYPE, PARAMETER})
@Retention(RUNTIME)
@Constraint(validatedBy = ValidForModification.Validator.class)
public @interface ValidForModification {
    //...
    class Validator implements ConstraintValidator<ValidForModification, Todo> {
    /...
        @Override
        public boolean isValid(Todo todo, ConstraintValidatorContext constraintValidatorContext) {
            return todo != null
                && todo.getId() == null
                && (todo.getDescription() != null || todo.getDueDate() != null || todo.isCompleted() != null);
        }
    }
}

And now you can move validation annotations to the definition of a REST endpoint:

@POST
@Consumes(APPLICATION_JSON)
public Response create(@ValidForCreation Todo todo) {...}

@PUT
@Consumes(APPLICATION_JSON)
public Response update(@ValidForModification Todo todo) {...}

And now you can remove those NotNulls from your model.

Integration testing

There are in general two approaches to integration testing:

  • test is being run on separate JVM than the app, which is deployed on some other integration environment
  • test deploys the application programmatically in the setup block.

Both of these have their pros and cons, but for small enough servoces, I personally prefer the second approach. It’s much easier to setup and you have only one JVM started, which makes debugging really easy. You can use a generic framework like Arquillian for starting your application in a container environment, but I prefer simple solutions and just use emdedded Jetty. To make test setup 100% production equivalent, I’m creating full Jetty’s WebAppContext and have to resolve all runtime dependencies for Jersey auto-discovery to work. This can be simply achieved with Maven resolved from Shrinkwrap - an Arquillian subproject:

    WebAppContext webAppContext = new WebAppContext();
    webAppContext.setResourceBase("src/main/webapp");
    webAppContext.setContextPath("/");
    File[] mavenLibs = Maven.resolver().loadPomFromFile("pom.xml")
                .importCompileAndRuntimeDependencies()
                .resolve().withTransitivity().asFile();
    for (File file: mavenLibs) {
        webAppContext.getMetaData().addWebInfJar(new FileResource(file.toURI()));
    }
    webAppContext.getMetaData().addContainerResource(new FileResource(new File("./target/classes").toURI()));

    webAppContext.setConfigurations(new Configuration[] {
        new AnnotationConfiguration(),
        new WebXmlConfiguration(),
        new WebInfConfiguration()
    });
    server.setHandler(webAppContext);

(this Stackoverflow thread inspired me a lot here)

Now it’s time for the last part of the post: parametrizing our integration tests. Since we want to test validation constraints, there are many edge paths to check (and make your code coverage close to 100%). Writing one test per each case could be a bad idea. Among the many solutions for JUnit I’m most convinced to the Junit Params by Pragmatists team. It’s really simple and have nice concept of JQuery-like helper for creating providers. Here is my tests code (I’m also using builder pattern here to create various kinds of Todos):

@Test
@Parameters(method = "provideInvalidTodosForCreation")
public void shouldRejectInvalidTodoWhenCreate(Todo todo) {
    Response response = createTarget().request().post(Entity.json(todo));

    assertThat(response.getStatus()).isEqualTo(BAD_REQUEST.getStatusCode());
}

private static Object[] provideInvalidTodosForCreation() {
    return $(
        new TodoBuilder().withDescription("test").build(),
        new TodoBuilder().withDueDate(DateTime.now()).build(),
        new TodoBuilder().withId(123L).build(),
        new TodoBuilder().build()
    );
}

OK, enough of reading, feel free to clone the project and start writing your REST services!

Mentoring in Software Craftsmanship

Maria Diaconu and  Alexandru Bolboaca are both strong supporters of Software Craftsmanship and Agile movements in Romania, with years of experience as developers, leaders, architects, managers and instructors. On their lecture at Agile Central Eur...Maria Diaconu and  Alexandru Bolboaca are both strong supporters of Software Craftsmanship and Agile movements in Romania, with years of experience as developers, leaders, architects, managers and instructors. On their lecture at Agile Central Eur...