TouK Hackathon – April 2021

The last time we wanted to organize a Hackathon our plans were thwarted by “you know what”. This state of affairs has lasted so long that we just couldn’t stand it anymore and launched the next edition of The Hackathon – remotely. This time we had to cope with new conditions – not all together in an open space, but everyone at home. We launched the communicator with a separate room per each project and went into action.
Here we present a brief summary from each team.

RCB Alert

tcb sms screenshot 
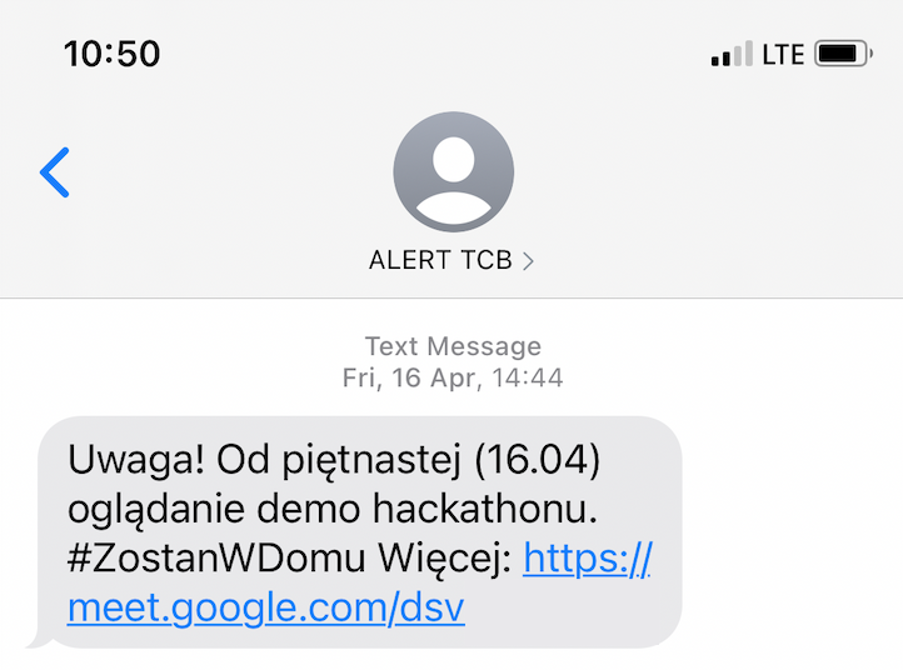
Every now and then we have a problem in our company – we need to inform everyone that the next day some loud redecorating is to take place or our air conditioning is to be cleaned – and we had better work remotely that day.
Unfortunately, sometimes our office managers gain this knowledge after our working hours, so there is no channel to notify everyone (hopefully – no one reads emails at home).

We found a solution to this problem during our last Hackathon.
We wrote a piece of software that orders an SMS to be sent to each person subscribed to TCB Alerts (it’s a pun on our government alerts – RCB).
This was the easy part – as we already had an SMS sending service.
However, we wanted this solution to be as easy as possible, so our office managers don’t have to open their laptops, connect to a VPN, search for special forms etc.
We decided to implement it as a hook to our communicator – RocketChat.
Now, when our office managers need to inform everyone in the evening, they need only to open the RocketChat app on their phone and type a message on a special channel – and that’s it!

We hope that this solution will help us to stay at home and work remotely during the days when it is inconvenient to work from the office.

TouK AboutMe

about me screenshot 
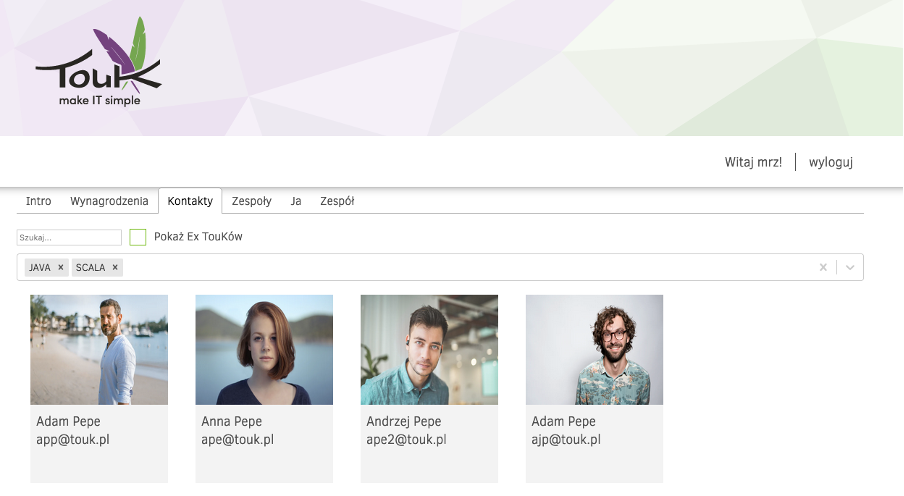
Currently at TouK we have several selfcare services providing information about TouKs (people working or cooperating with TouK).
The aim of our project was to join these services into one. Of course we know the rule that if you have three separate services then the worst approach is to add a new one. For this reason we enriched the most modern of them with new features such as TouK’s search, adding new information about people, teams information management and much more.
During the hackathon our team of four (+ the business owner) learnt a lot about frontend technologies such as CORS, MongoDB and LDAP.
We all hope that our work will prove to be useful for both current and future TouKs. Our team strove to provide a user experience so seamless that users would wonder at how easy selfcare management could be. We trust that with this hackathon we are a step closer to achieving that goal.

Business Config Manager

During our deployments of Nussknacker we often have the situation that the flow of development of scenarios was done by two teams. One of them is a team called “Configurators” – people who are close to business requirements but also with quite a high level of technical skills. Those people are responsible for the development of scenarios on the Nussknacker side. On the other hand, the second team is made up of Business members, those with lower technical skills but with a good knowledge of customer needs.
Configurators want to outsource some steps of development to business – so some changes can be made faster, without involving Configurators in the process. We found out that we should make a tool that can give Configurators the ability to create definitions of some configurations and after that, Business can fill in the values of those configurations. In the end, this configuration will be used in some steps of the scenario in Nussknacker.

After the deployment of the proof of concept, we realized that it is necessary to handle some important things:

  • Both definitions of configurations and values should be versioned and have some audit information, such as the author and time of the change.
  • Migrations of changes in definitions should be painless.
  • We should support many types of properties: from raw strings to some date time pickers and so on.
  • Configurations should have a lifecycle, so new ideas can be deployed on a lower environment and after some tests can be promoted to higher env.

After brainstorming before the Hackathon, we decided to use modern stack, but with some solid, battle-tested components:

We also designed the domain level of application.

On the first day of the Hackathon, we started with pair programming. We tried to go through all layers of the application to make sure that everyone in the team has a common vision of what the architecture will look like. After that we split the work into four separate parts:

  • Management of definitions
  • Management of values
  • Nussknacker integration with Business Config Service
  • Web application Finally, we integrated all the features together and completed the MVP step.

The project ended successfully. We proved that our design was correct, prepared a solid foundation for future development, and had a lot of fun designing the architecture and testing new tools.

Nussknacker Serverless

Most of you probably know Nussknacker – a powerful platform which allows non-technical users to author and deploy streaming scenarios on Apache Flink.
But Nussknacker Designer can also describe more business rules-oriented scenarios – used e.g. in recommendations or NBA domains. In this case, the scenario is deployed as a REST microservice. During the Hackathon we decided to make this setup more Kubernetes/Serverless-oriented. We decided that a Nussknacker scenario is a good candidate for K8 CRD and that KNative will provide us with a serverless deployment platform.
In two days we reached most of our goals:

  • Nussknacker creating scenario ConfigMap during deployment (in the future it will be CRD)
  • Custom Kubernetes operator/controller which transforms scenario ConfigMap into KNative service (scaling down to zero if needed :))
  • Simple REST microservice image, which serves the scenario
  • Everything deployed via Helm/GitlabCI to our DigitalOcean K8 cluster
    We are also pretty excited about the next steps – scenario observability (metrics, statuses), CRDs and making our serving image serverless ready – by using GraalVM native images.
    Hopefully, in the short to medium term, all of this will be accessible with our Nussknacker offering.

MusicBox

music box screenshot 
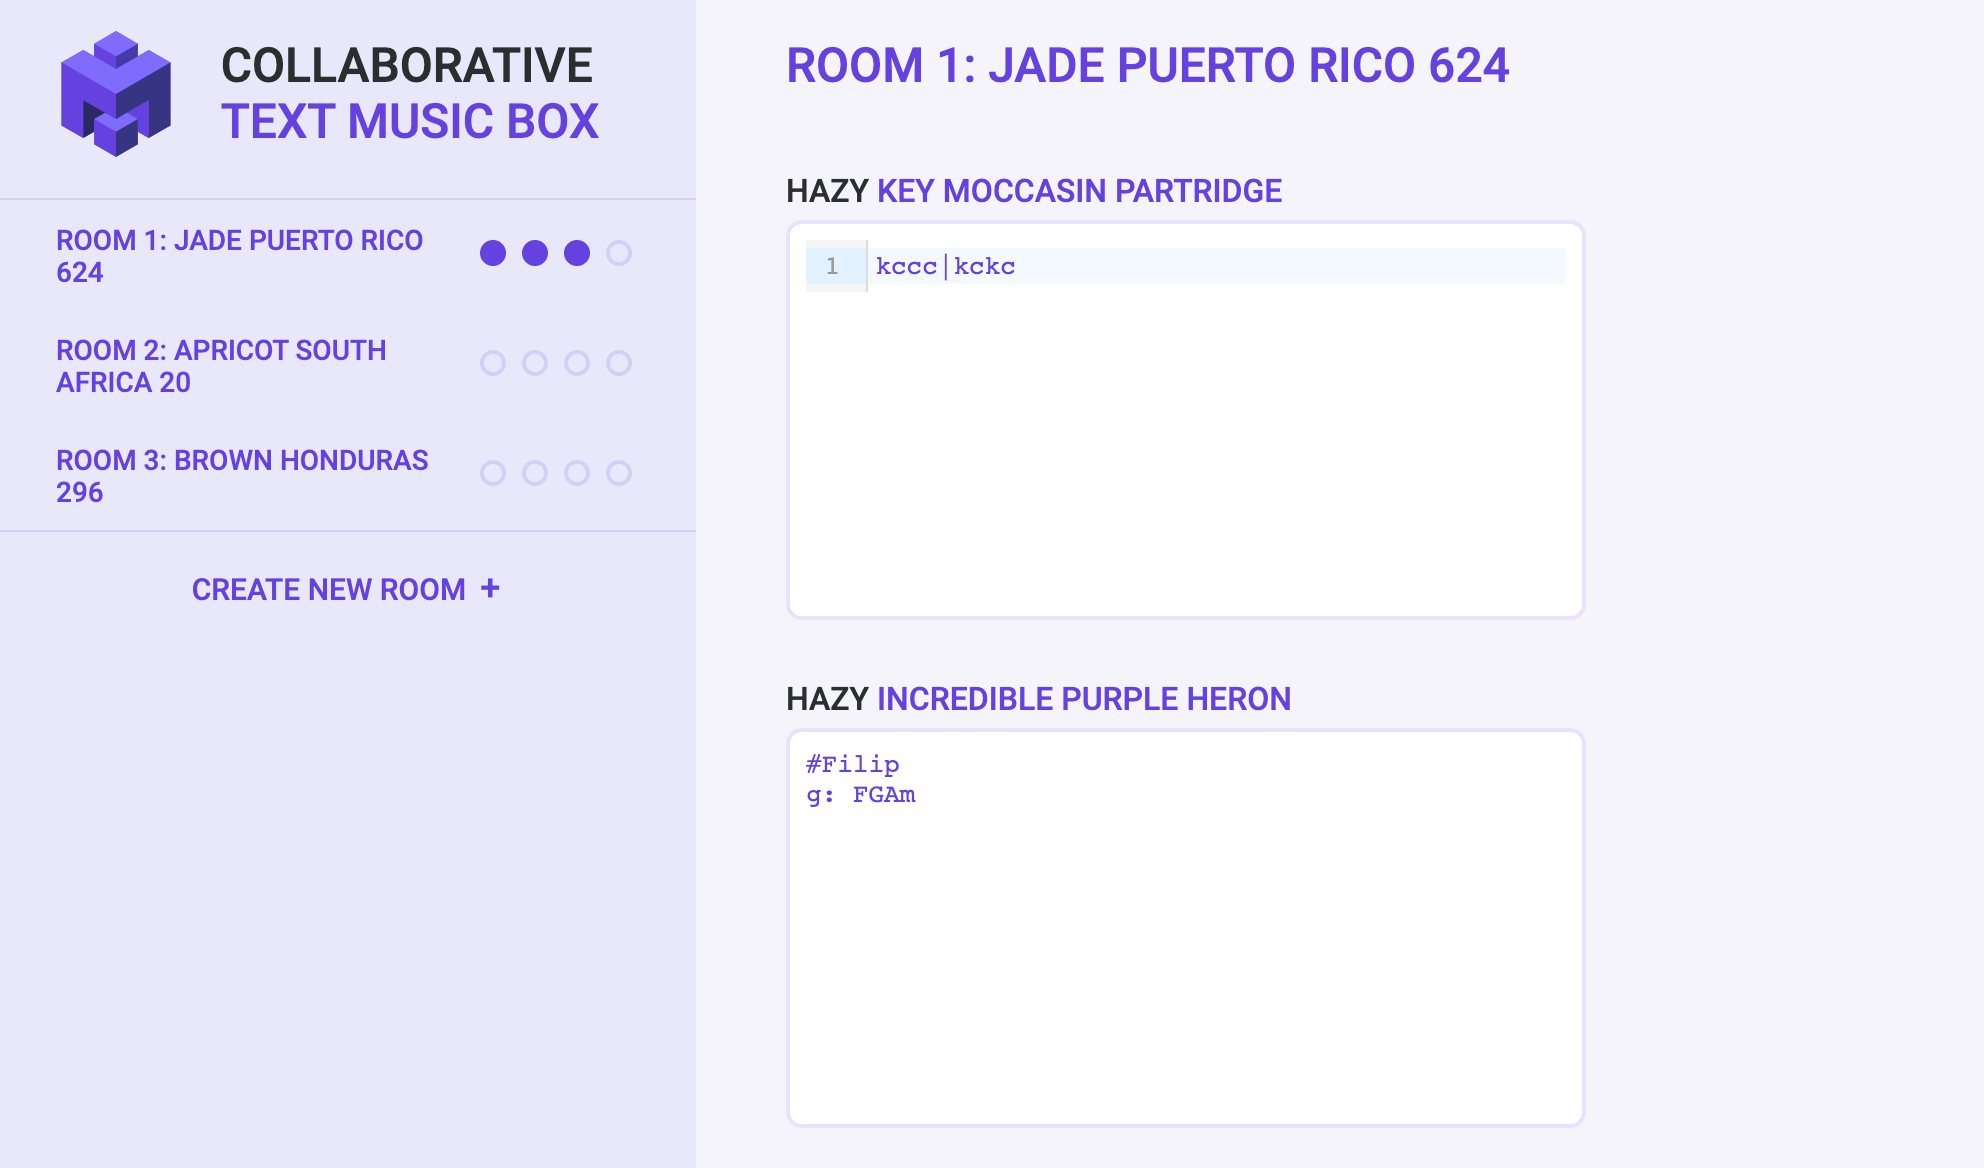
We have created a minimalistic web app for generating music in a loop based on text input.
The idea is to make writing music as easy as possible. E.g. |k h s h | is the most basic percussive beat, while |Am|C| gives a basic chord progression. Furthermore, there’s a collaborative mode (think jam sessions ;).

Frontend:

Backend:

Summary

In our opinion, The Hackathon was successful and fulfilled its task – that is, it allowed us to take a short break from our more important work and experiment with various fun technologies in good company. The fact that during the Hackathon team members were in a voice chat with each other certainly played a big role, which to some extent allowed us to build an atmosphere of cooperation in the fight against challenges.
We are already looking forward to the next hackathon – hopefully, this time on site.

If you want, here you can see what we did during the previous edition.

You May Also Like

Spock basics

Spock (homepage) is like its authors say 'testing and specification framework'. Spock combines very elegant and natural syntax with the powerful capabilities. And what is most important it is easy to use.

One note at the very beginning: I assume that you are already familiar with principles of Test Driven Development and you know how to use testing framework like for example JUnit.

So how can I start?


Writing spock specifications is very easy. We need basic configuration of Spock and Groovy dependencies (if you are using mavenized project with Eclipse look to my previous post: Spock, Java and Maven). Once we have everything set up and running smooth we can write our first specs (spec or specification is equivalent for test class in other frameworks like JUnit of TestNG).

What is great with Spock is fact that we can use it to test both Groovy projects and pure Java projects or even mixed projects.


Let's go!


Every spec class must inherit from spock.lang.Specification class. Only then test runner will recognize it as test class and start tests. We will write few specs for this simple class: User class and few tests not connected with this particular class.

We start with defining our class:
import spock.lang.*

class UserSpec extends Specification {

}
Now we can proceed to defining test fixtures and test methods.

All activites we want to perform before each test method, are to be put in def setup() {...} method and everything we want to be run after each test should be put in def cleanup() {...} method (they are equivalents for JUnit methods with @Before and @After annotations).

It can look like this:
class UserSpec extends Specification {
User user
Document document

def setup() {
user = new User()
document = DocumentTestFactory.createDocumentWithTitle("doc1")
}

def cleanup() {

}
}
Of course we can use field initialization for instantiating test objects:
class UserSpec extends Specification {
User user = new User()
Document document = DocumentTestFactory.createDocumentWithTitle("doc1")

def setup() {

}

def cleanup() {

}
}

What is more readable or preferred? It is just a matter of taste because according to Spock docs behaviour is the same in these two cases.

It is worth mentioning that JUnit @BeforeClass/@AfterClass are also present in Spock as def setupSpec() {...} and def cleanupSpec() {...}. They will be runned before first test and after last test method.


First tests


In Spock every method in specification class, expect setup/cleanup, is treated by runner as a test method (unless you annotate it with @Ignore).

Very interesting feature of Spock and Groovy is ability to name methods with full sentences just like regular strings:
class UserSpec extends Specification {
// ...

def "should assign coment to user"() {
// ...
}
}
With such naming convention we can write real specification and include details about specified behaviour in method name, what is very convenient when reading test reports and analyzing errors.

Test method (also called feature method) is logically divided into few blocks, each with its own purpose. Blocks are defined like labels in Java (but they are transformed with Groovy AST transform features) and some of them must be put in code in specific order.

Most basic and common schema for Spock test is:
class UserSpec extends Specification {
// ...

def "should assign coment to user"() {
given:
// do initialization of test objects
when:
// perform actions to be tested
then:
// collect and analyze results
}
}

But there are more blocks like:
  • setup
  • expect
  • where
  • cleanup
In next section I am going to describe each block shortly with little examples.

given block

This block is used to setup test objects and their state. It has to be first block in test and cannot be repeated. Below is little example how can it be used:
class UserSpec extends Specification {
// ...

def "should add project to user and mark user as project's owner"() {
given:
User user = new User()
Project project = ProjectTestFactory.createProjectWithName("simple project")
// ...
}
}

In this code given block contains initialization of test objects and nothing more. We create simple user without any specified attributes and project with given name. In case when some of these objects could be reused in more feature methods, it could be worth putting initialization in setup method.

when and then blocks

When block contains action we want to test (Spock documentation calls it 'stimulus'). This block always occurs in pair with then block, where we are verifying response for satisfying certain conditions. Assume we have this simple test case:
class UserSpec extends Specification {
// ...

def "should assign user to comment when adding comment to user"() {
given:
User user = new User()
Comment comment = new Comment()
when:
user.addComment(comment)
then:
comment.getUserWhoCreatedComment().equals(user)
}

// ...
}

In when block there is a call of tested method and nothing more. After we are sure our action was performed, we can check for desired conditions in then block.

Then block is very well structured and its every line is treated by Spock as boolean statement. That means, Spock expects that we write instructions containing comparisons and expressions returning true or false, so we can create then block with such statements:
user.getName() == "John"
user.getAge() == 40
!user.isEnabled()
Each of lines will be treated as single assertion and will be evaluated by Spock.

Sometimes we expect that our method throws an exception under given circumstances. We can write test for it with use of thrown method:
class CommentSpec extends Specification {
def "should throw exception when adding null document to comment"() {
given:
Comment comment = new Comment()
when:
comment.setCommentedDocument(null)
then:
thrown(RuntimeException)
}
}

In this test we want to make sure that passing incorrect parameters is correctly handled by tested method and that method throws an exception in response. In case you want to be certain that method does not throw particular exception, simply use notThrown method.


expect block

Expect block is primarily used when we do not want to separate when and then blocks because it is unnatural. It is especially useful for simple test (and according to TDD rules all test should be simple and short) with only one condition to check, like in this example (it is simple but should show the idea):
def "should create user with given name"() {
given:
User user = UserTestFactory.createUser("john doe")
expect:
user.getName() == "john doe"
}


More blocks!


That were very simple tests with standard Spock test layout and canonical divide into given/when/then parts. But Spock offers more possibilities in writing tests and provides more blocks.


setup/cleanup blocks

These two blocks have the very same functionality as the def setup and def cleanup methods in specification. They allow to perform some actions before test and after test. But unlike these methods (which are shared between all tests) blocks work only in methods they are defined in. 


where - easy way to create readable parameterized tests

Very often when we create unit tests there is a need to "feed" them with sample data to test various cases and border values. With Spock this task is very easy and straighforward. To provide test data to feature method, we need to use where block. Let's take a look at little the piece of code:

def "should successfully validate emails with valid syntax"() {
expect:
emailValidator.validate(email) == true
where:
email }

In this example, Spock creates variable called email which is used when calling method being tested. Internally feature method is called once, but framework iterates over given values and calls expect/when block as many times as there are values (however, if we use @Unroll annotation Spock can create separate run for each of given values, more about it in one of next examples).

Now, lets assume that we want our feature method to test both successful and failure validations. To achieve that goal we can create few 
parameterized variables for both input parameter and expected result. Here is a little example:

def "should perform validation of email addresses"() {
expect:
emailValidator.validate(email) == result
where:
email result }
Well, it looks nice, but Spock can do much better. It offers tabular format of defining parameters for test what is much more readable and natural. Lets take a look:
def "should perform validation of email addresses"() {
expect:
emailValidator.validate(email) == result
where:
email | result
"WTF" | false
"@domain" | false
"foo@bar.com" | true
"a@test" | false
}
In this code, each column of our "table" is treated as a separate variable and rows are values for subsequent test iterations.

Another useful feature of Spock during parameterizing test is its ability to "unroll" each parameterized test. Feature method from previous example could be defined as (the body stays the same, so I do not repeat it):
@Unroll("should validate email #email")
def "should perform validation of email addresses"() {
// ...
}
With that annotation, Spock generate few methods each with its own name and run them separately. We can use symbols from where blocks in @Unroll argument by preceding it with '#' sign what is a signal to Spock to use it in generated method name.


What next?


Well, that was just quick and short journey  through Spock and its capabilities. However, with that basic tutorial you are ready to write many unit tests. In one of my future posts I am going to describe more features of Spock focusing especially on its mocking abilities.