Deep dive into Spring Boot Actuator HTTP metrics

Actuator Metrics

As reported in Michał Bobowski post, we heavily use Spring Boot Actuator metrics system based on Micrometer. It provides a set of practical metrics regarding JVM stats like CPU or memory utilization. Our applications have to meet the most sophisticated needs of our clients thus we try to take advantage of http.server.request endpoint.

Introduction

By default, Spring Boot Actuator gathers endpoint statistics for all classes annotated with @RestController. It registers a WebMvcMetricsFilter bean, which is responsible for timing a request. A special TimingContext attribute is attached to the request so that Spring Boot knows when the request started.

Actuator metrics model

When you call http://localhost:8080/actuator/metrics/http.server.request endpoint you will get something similar to this:

{
  "name": "http.server.requests",
  "description": null,
  "baseUnit": "milliseconds",
  "measurements": [
    {
      "statistic": "COUNT",
      "value": 12
    },
    {
      "statistic": "TOTAL_TIME",
      "value": 21487.256644
    },
    {
      "statistic": "MAX",
      "value": 2731.787888
    }
  ],
  "availableTags": [
    {
      "tag": "exception",
      "values": [
        "None",
        "RuntimeException"
      ]
    },
    {
      "tag": "method",
      "values": [
        "GET"
      ]
    },
    {
      "tag": "uri",
      "values": [
        "/example/success"
      ]
    },
    {
      "tag": "outcome",
      "values": [
        "SERVER_ERROR",
        "SUCCESS"
      ]
    },
    {
      "tag": "status",
      "values": [
        "500",
        "200"
      ]
    }
  ]
}

You will surely see the measurements section. It provides types and values of statistics recorded at a certain point in time. Types of statistics are ones described in Statistics enum.
Another one is the availableTags section, which contains a set of default tags distinguishing each metric by URI, status, or method. You can easily put your tags there like a host or container. If you want to check metric for a particular tag, Actuator lets you do this by using tag query http://localhost:8080/actuator/metrics/http.server.request?tag=status:200

Metric system model

However, each monitoring system has its own metrics model and therefore uses different names for the same things. In our case, we use Influx Registry.
Let’s look into InfluxMeterRegistry class implementation.

private Stream writeTimer(Timer timer) {
    final Stream fields = Stream.of(
        new Field("sum", timer.totalTime(getBaseTimeUnit())),
        new Field("count", timer.count()),
        new Field("mean", timer.mean(getBaseTimeUnit())),
        new Field("upper", timer.max(getBaseTimeUnit()))
    );

    return Stream.of(influxLineProtocol(timer.getId(), "histogram", fields));
}

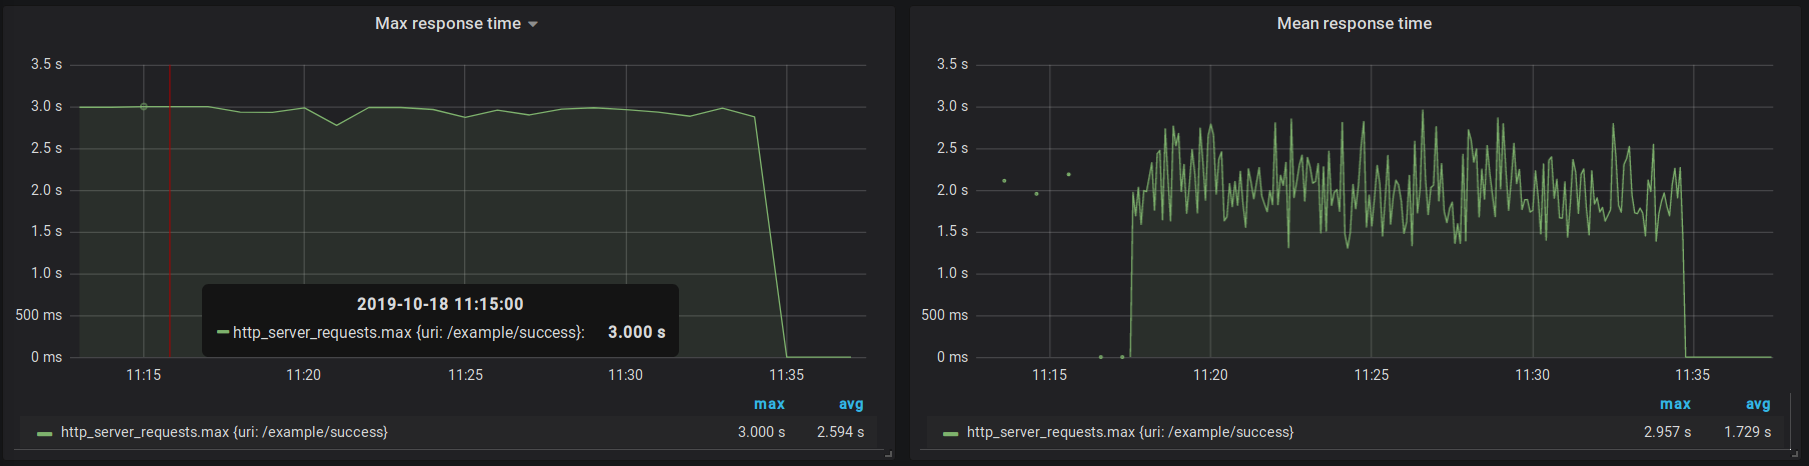
We see which field in influx corresponds to actuators measurement. Moreover, our registry equips us with an additional mean field, which is basically TOTAL_TIME divided by COUNT. Therefore we don’t need to calculate it manually inside our monitoring system.

Summary

(1) Be aware that the Actuator metric model directly corresponds to Micrometer model
(2) When it comes to timing requests carefully choose the step in which metrics are exported
(3) Do not mix composing metric values with aggregations, selectors, and transformations, e.g. mean(mean)

You May Also Like

Log4j and MDC in Grails

Log4j provides very useful feature: MDC - mapped diagnostic context. It can be used to store data in context of current thread. It may sound scary a bit but idea is simple.

My post is based on post http://burtbeckwith.com/blog/?p=521 from Burt Beckwith's excellent blog, it's definitely worth checking if you are interested in Grails.

Short background story...


Suppose we want to do logging our brand new shopping system and we want to have in each log customer's shopping basket number. And our system can be used at once by many users who can perform many transactions, actions like adding items and so on. How can we achieve that? Of course we can add basket number in every place where we do some logging but this task would be boring and error-prone. 

Instead of this we can use MDC to store variable with basket number in map. 

In fact MDC can be treated as map of custom values for current thread that can be used by logger. 


How to do that with Grails?


Using MDC with Grails is quite simple. All we need to do is to create our own custom filter which works for given urls and puts our data in MDC.

Filters in Grails are classes in directory grails-app/conf/* which names end with *Filters.groovy postfix. We can create this class manually or use Grails command: 
grails create-filters info.rnowak.App.Basket

In result class named BasketFilters will be created in grails-app/conf/info/rnowak/UberApp.

Initially filter class looks a little bit empty:
class BasketFilters {
def filters = {
all(controller:'*', action:'*') {
before = {

}
after = { Map model ->

}
afterView = { Exception e ->

}
}
}
}
All we need to do is fill empty closures, modify filter properties and put some data into MDC.

all is the general name of our filter, as class BasketFilters (plural!) can contain many various filters. You can name it whatever you want, for this post let assume it will be named basketFilter. 

Another thing is change of filter parameters. According to official documentation (link) we can customize our filter in many ways. You can specify controller to be filtered, its actions, filtered urls and so on. In our example you can stay with default option where filter is applied to every action of every controller. If you are interested in filtering only some urls, use uri parameter with expression describing desired urls to be filtered.

Three closures that are already defined in template have their function and they are started in these conditions:

  • before - as name says, it is executed before filtered action takes place
  • after - similarly, it is called after the action
  • afterView - called after rendering of the actions view
Ok, so now we know what are these mysterious methods and when they are called. But what can be done within them? In official Grails docs (link again) under section 7.6.3 there is a list of properties that are available to use in filter.

With that knowledge, we can proceed to implementing filter.

Putting something into MDC in filter


What we want to do is quite easy: we want to retrieve basket number from parameters and put it into MDC in our filter:
class BasketFilters {
def filters = {
basketFilter(controller:'*', action:'*') {
before = {
MDC.put("basketNumber", params.basketNumber ?: "")
}
after = { Map model ->
MDC.remove("basketNumber")
}
}
}
}

We retrieve basket number from Grails params map and then we put in map under specified key ("basketNumber" in this case), which will be later used in logger conversion pattern. It is important to remove custom value after processing of action to avoid leaks.

So we are putting something into MDC. But how make use of it in logs?


We can refer to custom data in MDC in conversion patter using syntax: %X{key}, where key is our key we used in filter to put data, like:
def conversionPattern = "%d{yyyy-MM-dd HH:mm:ss} %-5p %t [%c{1}] %X{basketNumber} - %m%n"


And that's it :) We've put custom data in log4j MDC and successfully used it in logs to display interesting values.

Clojure web development – state of the art

It’s now more than a year that I’m getting familiar with Clojure and the more I dive into it, the more it becomes the language. Once you defeat the “parentheses fear”, everything else just makes the difference: tooling, community, good engineering practices. So it’s now time for me to convince others. In this post I’ll try to walktrough a simple web application from scratch to show key tools and libraries used to develop with Clojure in late 2015.

Note for Clojurians: This material is rather elementary and may be useful for you if you already know Clojure a bit but never did anything bigger than hello world application.

Note for Java developers: This material shows how to replace Spring, Angular, grunt, live-reload with a bunch of Clojure tools and libraries and a bit of code.

The repo with final code and individual steps is here.

Bootstrap

I think all agreed that component is the industry standard for managing lifecycle of Clojure applications. If you are a Java developer you may think of it as a Spring (DI) replacement - you declare dependencies between “components” which are resolved on “system” startup. So you just say “my component needs a repository/database pool” and component library “injects” it for you.

To keep things simple I like to start with duct web app template. It’s a nice starter component application following the 12-factor philosophy. So let’s start with it:

lein new duct clojure-web-app +example

The +example parameter tells duct to create an example endpoint with HTTP routes - this would be helpful. To finish bootstraping run lein setup inside clojure-web-app directory.

Ok, let’s dive into the code. Component and injection related code should be in system.clj file:

(defn new-system [config]
  (let [config (meta-merge base-config config)]
    (-> (component/system-map
         :app  (handler-component (:app config))
         :http (jetty-server (:http config))
         :example (endpoint-component example-endpoint))
        (component/system-using
         {:http [:app]
          :app  [:example]
          :example []}))))

In the first section you instantiate components without dependencies, which are resolved in the second section. So in this example, “http” component (server) requires “app” (application abstraction), which in turn is injected with “example” (actual routes). If your component needs others, you just can get then by names (precisely: by Clojure keywords).

To start the system you must fire a REPL - interactive environment running within context of your application:

lein repl

After seeing prompt type (go). Application should start, you can visit http://localhost:3000 to see some example page.

A huge benefit of using component approach is that you get fully reloadable application. When you change literally anything - configuration, endpoints, implementation, you can just type (reset) in REPL and your application is up-to-date with the code. It’s a feature of the language, no JRebel, Spring-reloaded needed.

Adding REST endpoint

Ok, in the next step let’s add some basic REST endpoint returning JSON. We need to add 2 dependencies in project.clj file:

:dependencies
 ...
  [ring/ring-json "0.3.1"]
  [cheshire "5.1.1"]

Ring-json adds support for JSON for your routes (in ring it’s called middleware) and cheshire is Clojure JSON parser (like Jackson in Java). Modifying project dependencies if one of the few tasks that require restarting the REPL, so hit CTRL-C and type lein repl again.

To configure JSON middleware we have to add wrap-json-body and wrap-json-response just before wrap-defaults in system.clj:

(:require 
 ...
 [ring.middleware.json :refer [wrap-json-body wrap-json-response]])

(def base-config
   {:app {:middleware [[wrap-not-found :not-found]
                      [wrap-json-body {:keywords? true}]
                      [wrap-json-response]
                      [wrap-defaults :defaults]]

And finally, in endpoint/example.clj we must add some route with JSON response:

(:require 
 ...
 [ring.util.response :refer [response]]))

(defn example-endpoint [config]
  (routes
    (GET "/hello" [] (response {:hello "world"}))
    ...

Reload app with (reset) in REPL and test new route with curl:

curl -v http://localhost:3000/hello

< HTTP/1.1 200 OK
< Date: Tue, 15 Sep 2015 21:17:37 GMT
< Content-Type: application/json; charset=utf-8
< Set-Cookie: ring-session=37c337fb-6bbc-4e65-a060-1997718d03e0;Path=/;HttpOnly
< X-XSS-Protection: 1; mode=block
< X-Frame-Options: SAMEORIGIN
< X-Content-Type-Options: nosniff
< Content-Length: 151
* Server Jetty(9.2.10.v20150310) is not blacklisted
< Server: Jetty(9.2.10.v20150310)
<
* Connection #0 to host localhost left intact
{"hello": "world"}

It works! In case of any problems you can find working version in this commit.

Adding frontend with figwheel

Coding backend in Clojure is great, but what about the frontend? As you may already know, Clojure could be compiled not only to JVM bytecode, but also to Javascript. This may sound familiar if you used e.g. Coffescript. But ClojureScript philosophy is not only to provide some syntax sugar, but improve your development cycle with great tooling and fully interactive development. Let’s see how to achieve it.

The best way to introduce ClojureScript to a project is figweel. First let’s add fighweel plugin and configuration to project.clj:

:plugins
   ...
   [lein-figwheel "0.3.9"]

And cljsbuild configuration:

:cljsbuild
    {:builds [{:id "dev"
               :source-paths ["src-cljs"]
               :figwheel true
               :compiler {:main       "clojure-web-app.core"
                          :asset-path "js/out"
                          :output-to  "resources/public/js/clojure-web-app.js"
                          :output-dir "resources/public/js/out"}}]}

In short this tells ClojureScript compiler to take sources from src-cljs with figweel support and but resulting JavaScript into resources/public/js/clojure-web-app.js file. So we need to include this file in a simple HTML page:

<!DOCTYPE html>
<head>
</head>
<body>
  <div id="main">
  </div>
  <script src="js/clojure-web-app.js" type="text/javascript"></script>
</body>
</html>

To serve this static file we need to change some defaults and add corresponding route. In system.clj change api-defaults to site-defaults both in require section and base-config function. In example.clj add following route:

(GET "/" [] (io/resource "public/index.html")

Again (reset) in REPL window should reload everything.

But where is our ClojureScript source file? Let’s create file core.cljs in src-cljs/clojure-web-app directory:

(ns ^:figwheel-always clojure-web-app.core)

(enable-console-print!)

(println "hello from clojurescript")

Open another terminal and run lein fighweel. It should compile ClojureScript and print ‘Prompt will show when figwheel connects to your application’. Open http://localhost:3000. Fighweel window should prompt:

To quit, type: :cljs/quit
cljs.user=>

Type (js/alert "hello"). Boom! If everything worked you should see and alert in your browser. Open developers console in your browser. You should see hello from clojurescript printed on the console. Change it in core.cljs to (println "fighweel rocks") and save the file. Without reloading the page your should see updated message. Figweel rocks! Again, in case of any problems, refer to this commit.

In the next post I’ll show how to fetch data from MongoDB, serve it with REST to the broser and write ReactJs/Om components to render it. Stay tuned!