Introduction
Some time has passed since we wrote our last blogpost about Apache NiFi where we pointed out what could be improved. It’s a very nice tool, so we are still using it, but we’ve found some other things that could be improved to make it even better. Of course, we could write another post where all we do is complain, but does that make the world better? Unfortunately not. So we decided that we could do better than that. We took the most painful issue and implemented a solution – that’s how NiFi Flow Tester was created.
Use case
Let’s assume you have to create a simple flow in NiFi according to some specification your client gave you:
- read some XML files from directory
- validate them (using XSD file)
- convert them from XML to JSON
- log if something failed
- pass it for further processing if everything went well
after studying documentation and some googling you end up with this flow: 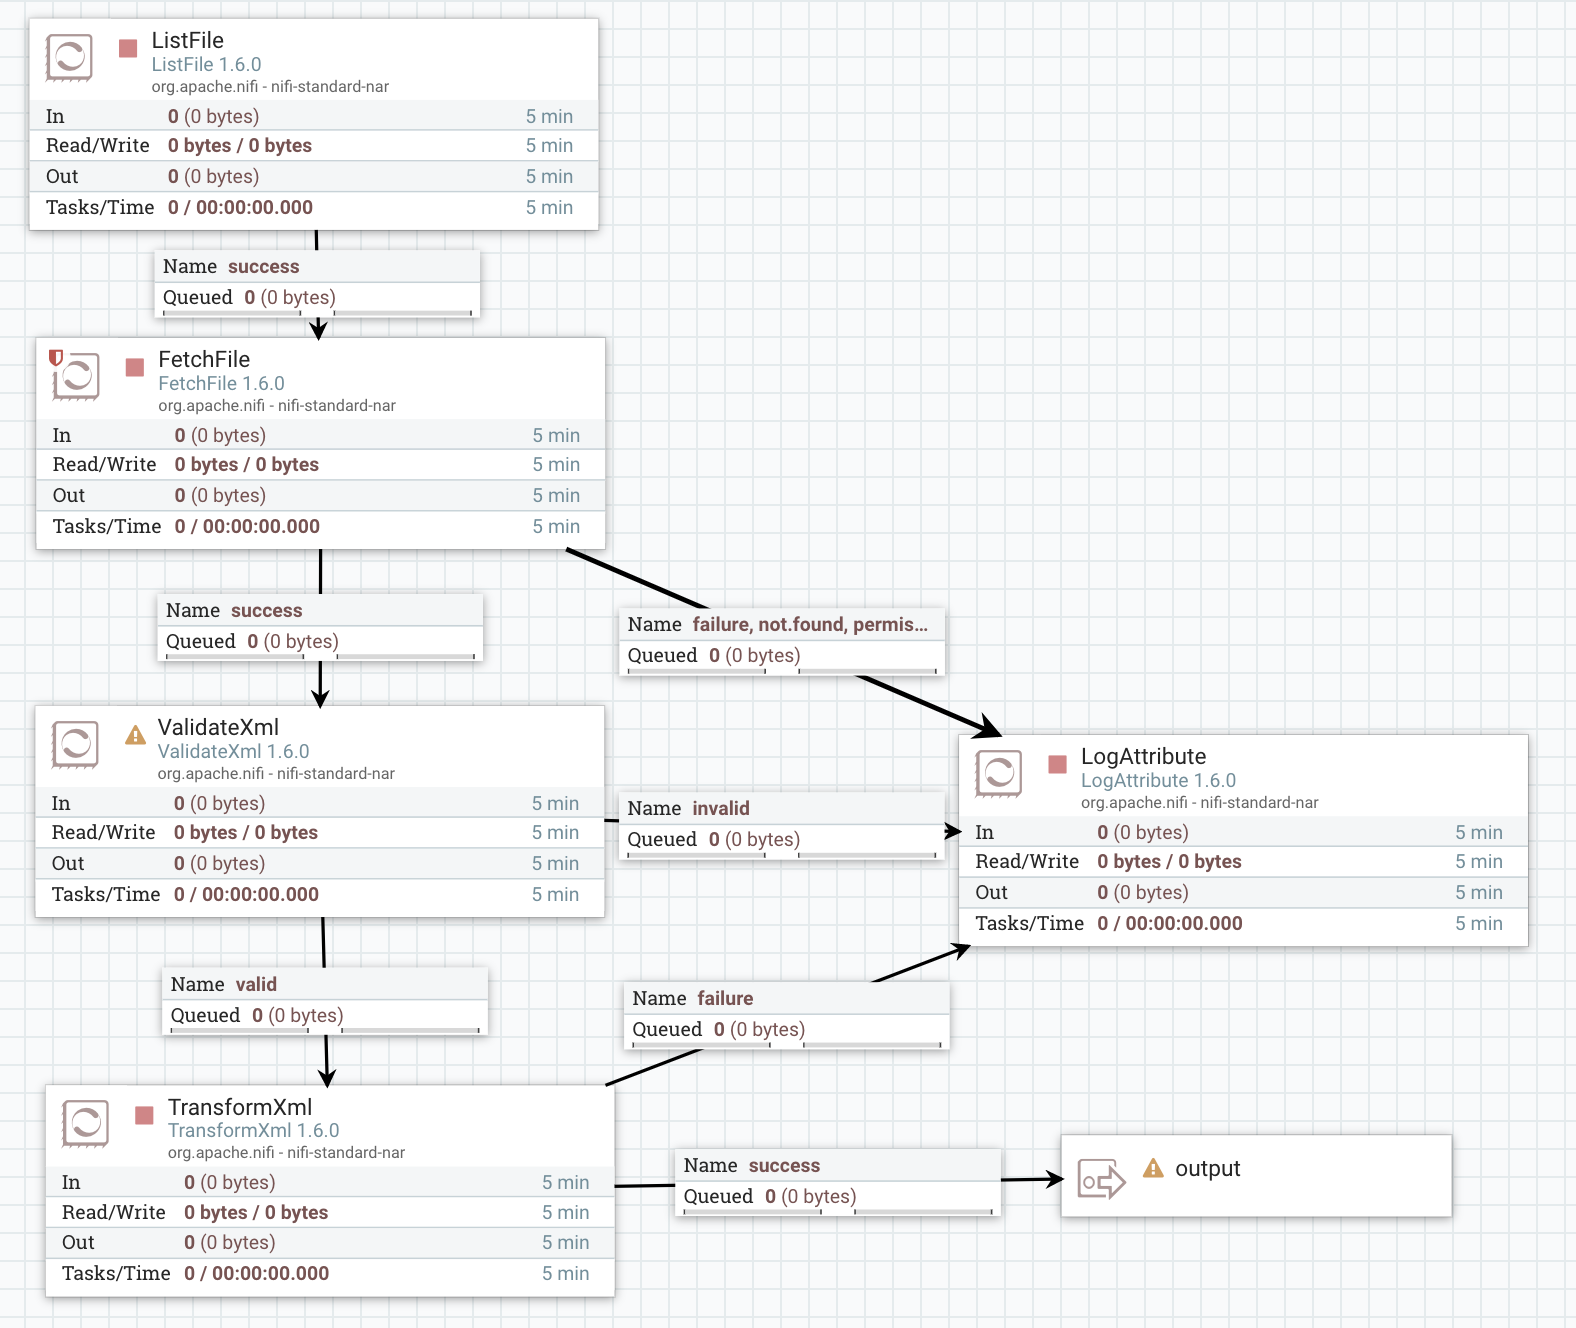 First you need to list all the files, then read their content, validate it, convert to JSON and pass it further. Looks great. Now it’s time for some tests – you have two options.
Test in NiFi directly – the bad
To test it manually, you need to copy some file to the input directory, wait to see what happens and if everything went well – you can verify it (again, manually) using ‘View data provenance’. Let’s try this approach. 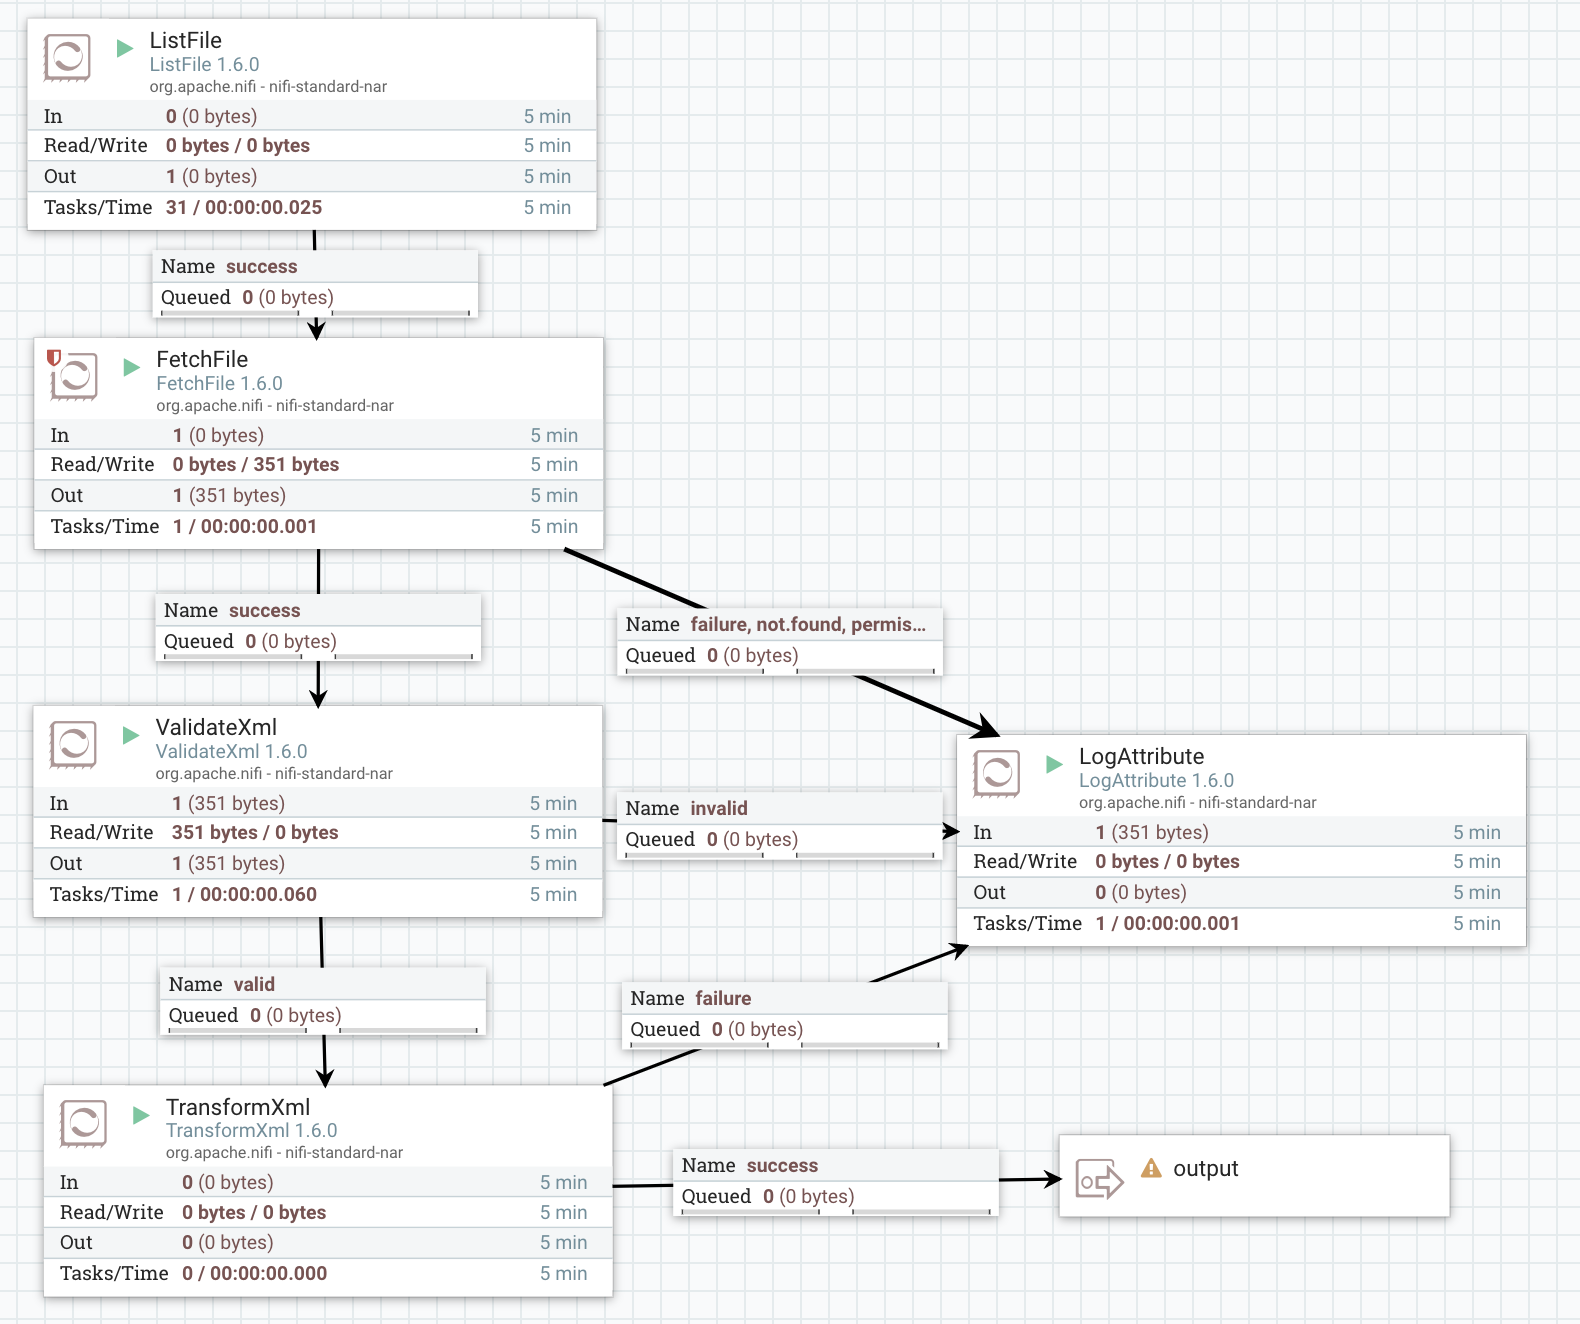 Something went wrong. Can you tell where? Something inside ValidateXml, but what exactly? So now to the LogAttribute -> View provenance data and check record attributes to find this one:
validatexml.invalid.error
The markup in the document following the root element must be well-formed.
Maybe there’s something wrong with XML file that your client gave you?
> cat data.txt
<person>
    <name>Foo</name>
    <type>student</type>
    <age>31</age>
</person>
<person>
    <name>Invalid age</name>
    <type>student</type>
    <age>-11</age>
</person>
<person>
    <name>Bar</name>
    <type>student</type>
    <age>12</age>
</person>
Looks like your client has some strange file format, where each line is a separate XML file. Ok, that’s fine you just need to add one more processor which splits text by each line and do the manual tests AGAIN… but at this point, you should have asked a question – is there a better way to do this? After all, we’re programmers and we love to write code.
Nifi Mock – the ugly
Nifi Mock library comes with a processor testing tool – TestRunner. Let’s use this to test our flow! TestRunner can only run one processor, but we can work it out. Let’s start with first one:
val listFileRunner = TestRunners.newTestRunner(new ListFile)
listFileRunner.setProperty(ListFile.DIRECTORY, s"$testDir/person/")
listFileRunner.run()
val listFileResults = listFileRunner.getFlowFilesForRelationship("success")
We create a runner with the processor, set a directory to read from, run it and get the results from the relationship. That was easy, let’s create another TestRunner with FetchFile processor, enqueue results from the previous step, run and collect results.
val fetchFileRunner = TestRunners.newTestRunner(new FetchFile)
listFileResults.foreach(f => fetchFileRunner.enqueue(f))
fetchFileRunner.run()
val fetchFileResults = fetchFileRunner.getFlowFilesForRelationship("success")
Great! Next one:
val splitTextRunner = TestRunners.newTestRunner(new SplitText)
splitTextRunner.setProperty(SplitText.LINE_SPLIT_COUNT, "1")
fetchFileResults.foreach(f => splitTextRunner.enqueue(f))
splitTextRunner.run()
val splitTextResults = splitTextRunner.getFlowFilesForRelationship(SplitText.REL_SPLITS)
Two more processors and we are done. And don’t forget to check all the runners and results names when you are done with copy-pasting this code! That’s not cool. I mean, we love to write code but this is too much boilerplate, isn’t it? I’m sure you saw the pattern here. We saw it too and that’s why we introduced a solution.
Nifi Flow Tester – the good
In our new library we have two ways to create flow. Today we will focus on the simple one, which is better for prototyping. First, we need to create new NifiFlowBuilder() and add some nodes to it:
new NifiFlowBuilder()
  .addNode(
    "ListFile",
    new ListFile,
    Map(ListFile.DIRECTORY.getName -> s"$testDir/person/")
  )
  .addNode("FetchFile", new FetchFile, Map())
  .addNode(
    "SplitText",
    new Split Text,
    Map(SplitText.LINE_SPLIT_COUNT.getName -> "1")
  )
  .addNode(
    "ValidateXml",
    new ValidateXml,
    Map(ValidateXml.SCHEMA_FILE.getName -> s"$testDir/person-schema.xsd")
  )
  .addNode(
    "TransformXml",
    new TransformXml,
    Map(TransformXml.XSLT_FILE_NAME.getName -> s"$testDir/xml-to-json.xsl")
  )
First, you need to specify the node name, which allows you to identify your node. It can be the same as the class name as long as you don’t use the same processor twice in flow. Then of course you need to specify the processor with all the parameters as simple Map[String, String]. The safest way to do this is to use processor’s class fields of type PropertyDescriptor. Unfortunately, they’re not always public, so sometimes you have written their name – instead of ListFile.DIRECTORY.getName we could write Input Directory.
When all the nodes are specified, we can add connections between them using node names. The first parameter is the source node, the second is a destination and the third is the selected relationship. Again, using processor class fields is less error prone but sometimes these fields are not public (for instance ListFile or FetchFile processor)
.addConnection("ListFile", "FetchFile", "success")
.addConnection("FetchFile", "SplitText", "success")
.addConnection("SplitText", "ValidateXml", SplitText.REL_SPLITS)
.addConnection("ValidateXml", "TransformXml", ValidateXml.REL_VALID)
.addOutputConnection("TransformXml", "success")
In the end, we add a connection to the output port to get the results. Everything looks good. Now just call build method to create flow. The entire code looks like this:
val flow = new NifiFlowBuilder()
      .addNode("ListFile", new ListFile, Map(ListFile.DIRECTORY.getName -> s"$testDir/person/"))
      .addNode("FetchFile", new FetchFile, Map())
      .addNode("SplitText", new SplitText, Map(SplitText.LINE_SPLIT_COUNT.getName -> "1"))
      .addNode("ValidateXml", new ValidateXml, Map(ValidateXml.SCHEMA_FILE.getName -> s"$testDir/person-schema.xsd"))
      .addNode("TransformXml", new TransformXml, Map(TransformXml.XSLT_FILE_NAME.getName -> s"$testDir/xml-to-json.xsl"))
      .addConnection("ListFile", "FetchFile", "success")
      .addConnection("FetchFile", "SplitText", "success")
      .addConnection( "SplitText", "ValidateXml", SplitText.REL_SPLITS)
      .addConnection("ValidateXml", "TransformXml", ValidateXml.REL_VALID)
      .addOutputConnection("TransformXml", "success")
      .build()
Now we just need to run the flow, collect the results and verify them:
flow.run()
val files = flow.executionResult.outputFlowFiles
files.head.assertContentEquals("""{"person":{"name":"Foo","type":"student","age":31}}""")
Disclaimer: this is not the best way to test if JSON is correct, but it was done for simplicity.
Conclusion
Apache NiFi seems to be perfect unless you start a serious data integration. Without the ability to test your changes fast, you will become extremely frustrated with clicking every time your client notices a bug. Sometimes it may be a bug of the NiFi itself, but you will never know it until you debug the code. That’s something our library can help you with. You can find it here: https://github.com/TouK/plumber