Meet Sputnik – static code analyser for Gerrit

Sputnik runs Checkstyle, PMD and FindBugs for your Gerrit patchsets I am happy to announce a first release of Sputnik! It is a static code analyzer that runs Checkstyle, PMD and FindBugs for your Gerrit patchsets. Its main advantage over my previous pr…

Sputnik runs Checkstyle, PMD and FindBugs for your Gerrit patchsets

I am happy to announce a first release of Sputnik! It is a static code analyzer that runs Checkstyle, PMD and FindBugs for your Gerrit patchsets. Its main advantage over my previous project Sonar Gerrit plugin is that Sputnik is a small, lightweight and standalone Java application. You don’t need any other software to run it. It bundles Checkstyle, PMD and FindBugs jars within distribution zip.

Workflow

Sputnik is intended to use with Gerrit and Continous Integration server, i. e. Jenkins. It works like this:

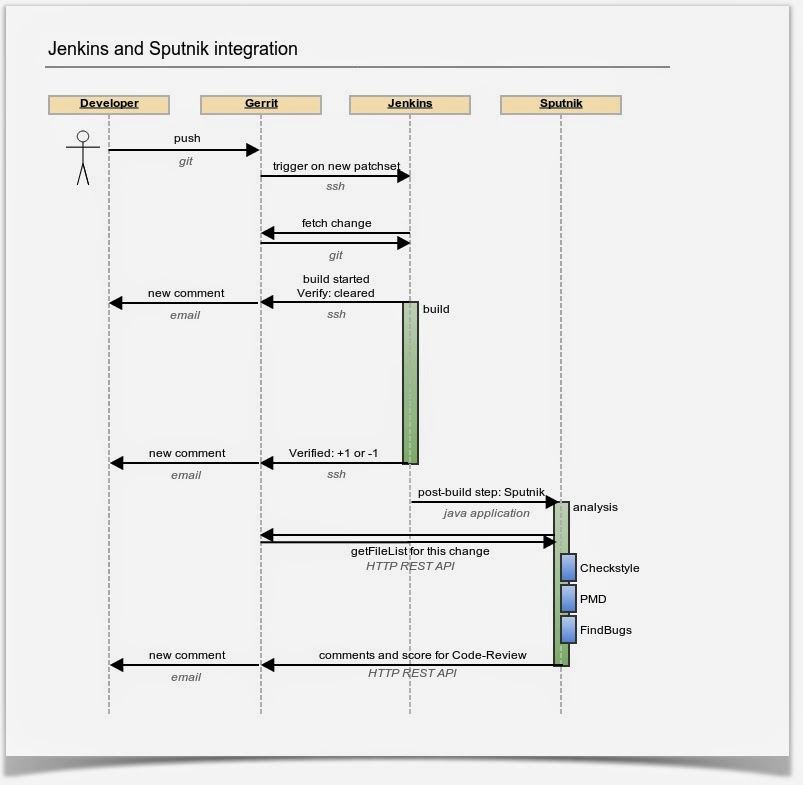
Your CI server is updated by ssh that a new patch is submitted to Gerrit. CI fetches this patch and builds a while project. After a build, CI server reports its result to Gerrit. It’s time for Sputnik now.

Sputnik runs regardless of build result (you can change that in your CI configuration). Sputnik fetches patchset’s file list from Gerrit over HTTP REST API. Then it runs an analysis only on these files! Even if your project is huge, analysis on several files takes only seconds. Sputnik collects comments from all three analysers: Checkstyle, PMD and FindBugs. It sends back all comments to Gerrit via HTTP REST API back. It’s very simple and very fast!

Installation and configuration

First, you need to build https://github.com/TouK/sputnik master or download distribution zip from here: sputnik-1.0.zip. Go to you CI server and extract it to a directory of your choice. Remember that a user you run CI builds needs to have an access rights to this directory (in my case it’s simply a jenkins user). Then you need to prepare your configuration file and write this file to the same directory as unzipped distribution. It is a simple Java properties file, which is pretty self-explanatory. Here is an example:

gerrit.host=gerrit.yourcompany.com
gerrit.port=8080
gerrit.username=sputnik
gerrit.password=Pa$$wo4d
checkstyle.enabled=true
checkstyle.configurationFile=/opt/jenkins/sputnik/checkstyle.xml
checkstyle.propertiesFile=
pmd.enabled=true
pmd.ruleSets=/opt/jenkins/sputnik/pmd.xml
findbugs.enabled=true
findbugs.includeFilter=/opt/jenkins/sputnik/findbugs.xml
findbugs.excludeFilter=

Now you need to configure you CI server to actually run Sputnik after a build. It is very simple for Jenkins, just add a Post-Build Step. You can adjust if Sputnik runs only on successful build or for every build – use radio buttons for this:

Last line with exit 0 is a workaround for a clean exit, even if Sputnik fails for some reason. Exit 0 guarantees you that result of this step doesn’t affect overall build result.

Summary

This is an example screenshot of Sputnik’s comments:

Sputnik always reports +1 as a result. It can be lacking in some network and authorisation configuration. But it’s open source so please submit issues and patches to its github page: https://github.com/TouK/sputnik.

Your feedback and pull requests are heartly welcome!

You May Also Like

Turing completeness II

Well, as I wrote in the previous post, sed is a Turing complete language. We can use it to implement some simple algorithms, or even a dc interpreter. But what does it really mean? How complex tasks may we achieve using plain sed?What about writin...Well, as I wrote in the previous post, sed is a Turing complete language. We can use it to implement some simple algorithms, or even a dc interpreter. But what does it really mean? How complex tasks may we achieve using plain sed?What about writin...

Multi module Gradle project with IDE support

This article is a short how-to about multi-module project setup with usage of the Gradle automation build tool.

Here's how Rich Seller, a StackOverflow user, describes Gradle:
Gradle promises to hit the sweet spot between Ant and Maven. It uses Ivy's approach for dependency resolution. It allows for convention over configuration but also includes Ant tasks as first class citizens. It also wisely allows you to use existing Maven/Ivy repositories.
So why would one use yet another JVM build tool such as Gradle? The answer is simple: to avoid frustration involved by Ant or Maven.

Short story

I was fooling around with some fresh proof of concept and needed a build tool. I'm pretty familiar with Maven so created project from an artifact, and opened the build file, pom.xml for further tuning.
I had been using Grails with its own build system (similar to Gradle, btw) already for some time up then, so after quite a time without Maven, I looked on the pom.xml and found it to be really repulsive.

Once again I felt clearly: XML is not for humans.

After quick googling I found Gradle. It was still in beta (0.8 version) back then, but it's configured with Groovy DSL and that's what a human likes :)

Where are we

In the time Ant can be met but among IT guerrillas, Maven is still on top and couple of others like for example Ivy conquer for the best position, Gradle smoothly went into its mature age. It's now available in 1.3 version, released at 20th of November 2012. I'm glad to recommend it to anyone looking for relief from XML configured tools, or for anyone just looking for simple, elastic and powerful build tool.

Lets build

I have already written about basic project structure so I skip this one, reminding only the basic project structure:
<project root>

├── build.gradle
└── src
├── main
│ ├── java
│ └── groovy

└── test
├── java
└── groovy
Have I just referred myself for the 1st time? Achievement unlocked! ;)

Gradle as most build tools is run from a command line with parameters. The main parameter for Gradle is a 'task name', for example we can run a command: gradle build.
There is no 'create project' task, so the directory structure has to be created by hand. This isn't a hassle though.
Java and groovy sub-folders aren't always mandatory. They depend on what compile plugin is used.

Parent project

Consider an example project 'the-app' of three modules, let say:
  1. database communication layer
  2. domain model and services layer
  3. web presentation layer
Our project directory tree will look like:
the-app

├── dao-layer
│ └── src

├── domain-model
│ └── src

├── web-frontend
│ └── src

├── build.gradle
└── settings.gradle
the-app itself has no src sub-folder as its purpose is only to contain sub-projects and build configuration. If needed it could've been provided with own src though.

To glue modules we need to fill settings.gradle file under the-app directory with a single line of content specifying module names:
include 'dao-layer', 'domain-model', 'web-frontend'
Now the gradle projects command can be executed to obtain such a result:
:projects

------------------------------------------------------------
Root project
------------------------------------------------------------

Root project 'the-app'
+--- Project ':dao-layer'
+--- Project ':domain-model'
\--- Project ':web-frontend'
...so we know that Gradle noticed the modules. However gradle build command won't run successful yet because build.gradle file is still empty.

Sub project

As in Maven we can create separate build config file per each module. Let say we starting from DAO layer.
Thus we create a new file the-app/dao-layer/build.gradle with a line of basic build info (notice the new build.gradle was created under sub-project directory):
apply plugin: 'java'
This single line of config for any of modules is enough to execute gradle build command under the-app directory with following result:
:dao-layer:compileJava
:dao-layer:processResources UP-TO-DATE
:dao-layer:classes
:dao-layer:jar
:dao-layer:assemble
:dao-layer:compileTestJava UP-TO-DATE
:dao-layer:processTestResources UP-TO-DATE
:dao-layer:testClasses UP-TO-DATE
:dao-layer:test
:dao-layer:check
:dao-layer:build

BUILD SUCCESSFUL

Total time: 3.256 secs
To use Groovy plugin slightly more configuration is needed:
apply plugin: 'groovy'

repositories {
mavenLocal()
mavenCentral()
}

dependencies {
groovy 'org.codehaus.groovy:groovy-all:2.0.5'
}
At lines 3 to 6 Maven repositories are set. At line 9 dependency with groovy library version is specified. Of course plugin as 'java', 'groovy' and many more can be mixed each other.

If we have settings.gradle file and a build.gradle file for each module, there is no need for parent the-app/build.gradle file at all. Sure that's true but we can go another, better way.

One file to rule them all

Instead of creating many build.gradle config files, one per each module, we can use only the parent's one and make it a bit more juicy. So let us move the the-app/dao-layer/build.gradle a level up to the-app/build-gradle and fill it with new statements to achieve full project configuration:
def langLevel = 1.7

allprojects {

apply plugin: 'idea'

group = 'com.tamashumi'
version = '0.1'
}

subprojects {

apply plugin: 'groovy'

sourceCompatibility = langLevel
targetCompatibility = langLevel

repositories {
mavenLocal()
mavenCentral()
}

dependencies {
groovy 'org.codehaus.groovy:groovy-all:2.0.5'
testCompile 'org.spockframework:spock-core:0.7-groovy-2.0'
}
}

project(':dao-layer') {

dependencies {
compile 'org.hibernate:hibernate-core:4.1.7.Final'
}
}

project(':domain-model') {

dependencies {
compile project(':dao-layer')
}
}

project(':web-frontend') {

apply plugin: 'war'

dependencies {
compile project(':domain-model')
compile 'org.springframework:spring-webmvc:3.1.2.RELEASE'
}
}

idea {
project {
jdkName = langLevel
languageLevel = langLevel
}
}
At the beginning simple variable langLevel is declared. It's worth knowing that we can use almost any Groovy code inside build.gradle file, statements like for example if conditions, for/while loops, closures, switch-case, etc... Quite an advantage over inflexible XML, isn't it?

Next the allProjects block. Any configuration placed in it will influence - what a surprise - all projects, so the parent itself and sub-projects (modules). Inside of the block we have the IDE (Intellij Idea) plugin applied which I wrote more about in previous article (look under "IDE Integration" heading). Enough to say that with this plugin applied here, command gradle idea will generate Idea's project files with modules structure and dependencies. This works really well and plugins for other IDEs are available too.
Remaining two lines at this block define group and version for the project, similar as this is done by Maven.

After that subProjects block appears. It's related to all modules but not the parent project. So here the Groovy language plugin is applied, as all modules are assumed to be written in Groovy.
Below source and target language level are set.
After that come references to standard Maven repositories.
At the end of the block dependencies to groovy version and test library - Spock framework.

Following blocks, project(':module-name'), are responsible for each module configuration. They may be omitted unless allProjects or subProjects configure what's necessary for a specific module. In the example per module configuration goes as follow:
  • Dao-layer module has dependency to an ORM library - Hibernate
  • Domain-model module relies on dao-layer as a dependency. Keyword project is used here again for a reference to other module.
  • Web-frontend applies 'war' plugin which build this module into java web archive. Besides it referes to domain-model module and also use Spring MVC framework dependency.

At the end in idea block is basic info for IDE plugin. Those are parameters corresponding to the Idea's project general settings visible on the following screen shot.


jdkName should match the IDE's SDK name otherwise it has to be set manually under IDE on each Idea's project files (re)generation with gradle idea command.

Is that it?

In the matter of simplicity - yes. That's enough to automate modular application build with custom configuration per module. Not a rocket science, huh? Think about Maven's XML. It would take more effort to setup the same and still achieve less expressible configuration quite far from user-friendly.

Check the online user guide for a lot of configuration possibilities or better download Gradle and see the sample projects.
As a tasty bait take a look for this short choice of available plugins:
  • java
  • groovy
  • scala
  • cpp
  • eclipse
  • netbeans
  • ida
  • maven
  • osgi
  • war
  • ear
  • sonar
  • project-report
  • signing
and more, 3rd party plugins...