Custom SonarQube rules for Unit Tests

It’s a tutorial about creating new rules for SonarQube analysis to be applied to Unit Tests. It is not trivial and involves a few tricky database steps, so I want to share my tutorial about it.It’s a tutorial about creating new rules for SonarQube analysis to be applied to Unit Tests. It is not trivial and involves a few tricky database steps, so I want to share my tutorial about it.

I need a new rule

In our project we use (formely Sonar) to manage our code quality. It is a great tool and I recommend everyone to set it up and read its reports.

Recently, we’ve agreed that it’s better to use assertj assertions in our unit tests than JUnit’s. So I’ve decided to write a simple rule that checks if some of JUnit asserts assertTrue, assertFalse, assertNull and others are used. Then, I’ve discovered it’s not so easy to do it with Sonar:

  • only 10 code quality rules are applied to unit tests – they are in special repository PMD Unit Tests (source)
  • these 10 rules are disabled by default, you have to enable them by hand
  • you cannot add new rules to this group

However, it turned out it is doable with a small tricks.

Custom PMD Unit Tests rule tutorial

Create your XPath expression by following this tutorial on how to create custom PMD rule. There is a visual editor to test your rules as you develop them – that’s great. My XPath expression to avoid all JUnit assertions looks like this:

//PrimaryPrefix/Name[@Image='assertEquals' or @Image='assertNull' or @Image='assertNotNull' or @Image='assertSame' or @Image='assertNotSame' or @Image='assertArrayEquals' or @Image='assertTrue' or @Image='assertFalse']

Go to your Sonar installation, log in as an Administrator, head to Quality Profiles and select a profile that you use. Search for “xpath” and change Activation to Any. You should see two results like this:

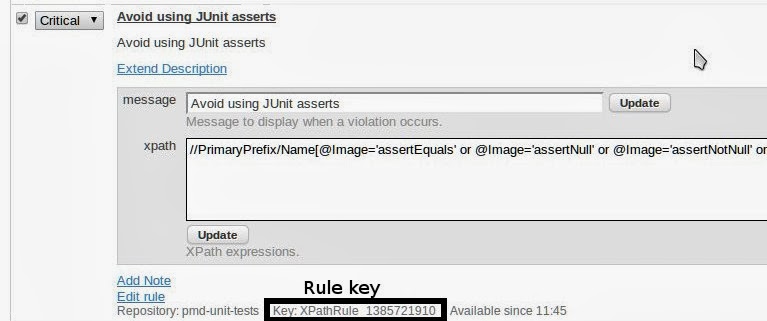
Expand XPath rule template (dont’ worry that it says it’s deprecated) and then click Copy rule. Fill a form with message and XPath and save it. Then take a look at the bottom – you need an identifier of this rule:

You have created a PMD rule, now you need to move it to PMD Unit Tests group. Connect to Sonar’s MySQL database. Search for your rule by key:

mysql> select id, plugin_rule_key, plugin_name, parent_id, status from rules where plugin_rule_key='XPathRule_1385721910';
+-----+----------------------+----------------+-----------+-------------+
| id  | plugin_rule_key      | plugin_name    | parent_id | status      |
+-----+----------------------+----------------+-----------+-------------+
| 903 | XPathRule_1385721910 | pmd            | NULL      | DEPRECATED  |
+-----+----------------------+----------------+-----------+-------------+
1 row in set (0.00 sec)

Update plugin_name and status (remember to use appropiate primary key for id column):

mysql> update rules set plugin_name='pmd-unit-tests', status='READY' where id=903;
Query OK, 1 row affected (0.00 sec)
Rows matched: 1 Changed: 1 Warnings: 0

There is one step left. Sonar will change this rule’s status to REMOVED on restart due to his boot checks. You need to trick him and change parent_id to other’s PMD Unit Tests rule. List all these rules and choose one’s identifier.

mysql> select id, plugin_name, status from rules where plugin_name='pmd-unit-tests';
+-----+----------------+---------+
| id  | plugin_name    | status  |
+-----+----------------+---------+
| 775 | pmd-unit-tests | READY   |
| 776 | pmd-unit-tests | READY   |
| 777 | pmd-unit-tests | READY   |
| 778 | pmd-unit-tests | READY   |
| 779 | pmd-unit-tests | READY   |
| 780 | pmd-unit-tests | READY   |
| 781 | pmd-unit-tests | READY   |
| 782 | pmd-unit-tests | READY   |
| 783 | pmd-unit-tests | READY   |
| 784 | pmd-unit-tests | READY   |
| 903 | pmd-unit-tests | READY   |
+-----+----------------+---------+
11 rows in set (0.00 sec)\

Choose any id you like, let’s say 775 and apply it as parent_id to your newly created rule:

mysql> update rules set parent_id=775 where id=903;
Query OK, 1 row affected (0.00 sec)
Rows matched: 1 Changed: 1 Warnings: 0

Go to your Quality profile and make sure your rule is active! Check it twice, it’s easy to forget that step. It’s all set up, enjoy your analysis!

You May Also Like

CasperJS for Java developers

Why CasperJS

Being a Java developer is kinda hard these days. Java may not be dead yet, but when keeping in sync with all the hipster JavaScript frameworks could make us feel a bit outside the playground. It’s even hard to list JavaScript frameworks with latest releases on one website.

In my current project, we are using AngularJS. It’a a nice abstraction of MV* pattern in frontend layer of any web application (we use Grails underneath). Here is a nice article with an 8-point Win List of Angular way of handling AJAX calls and updating the view. So it’s not only a funny new framework but a truly helper of keeping your code clean and neat.

But there is also another area when you can put helpful JS framework in place of plan-old-java one - functional tests. Especially when you are dealing with one page app with lots of asynchronous REST/JSON communication.

Selenium and Geb

In Java/JVM project the typical is to use Selenium with some wrapper like Geb. So you start your project, setup your CI-functional testing pipeline and… after 1 month of coding your tests stop working and being maintainable. The frameworks itselves are not bad, but the typical setup is so heavy and has so many points of failure that keeping it working in a real life project is really hard.

Here is my list of common myths about Selenium: * It allows you to record test scripts via handy GUI - maybe some static request/response sites. In modern web applications with asynchronous REST/JSON communication your tests must contain a lot of “waitFor” statements and you cannot automate where these should be included. * It allows you to test your web app against many browsers - don’t try to automate IE tests! You have to manually open your app in IE to see how it actually bahaves! * It integrates well with continuous integration servers like Jenkins - you have to setup Selenium Grid on server with X installed to run tests on Chrome or Firefox and a Windows server for IE. And the headless HtmlUnit driver lacks a lot of JS support.

So I decided to try something different and introduce a bit of JavaScript tooling in our project by using CasperJS.

Introduction

CasperJS is simple but powerful navigation scripting & testing utility for PhantomJS - scritable headless WebKit (which is an rendering engine used by Safari and Chrome). In short - CasperJS allows you to navigate and make assertions about web pages as they’d been rendered in Google Chrome. It is enough for me to automate the functional tests of my application.

If you want a gentle introduction to the world of CasperJS I suggest you to read: * Official website, especially installation guide and API * Introductionary article from CasperJS creator Nicolas Perriault * Highlevel testing with CasperJS by Kevin van Zonneveld * grails-angular-scaffolding plugin by Rob Fletcher with some working CasperJS tests

Full example

I run my test suite via following script:

casperjs test --direct --log-level=debug --testhost=localhost:8080 --includes=test/casper/includes/casper-angular.coffee,test/casper/includes/pages.coffee test/casper/specs/

casper-angular.coffe

casper.test.on "fail", (failure) ->
    casper.capture(screenshot)

testhost   = casper.cli.get "testhost"
screenshot = 'test-fail.png'

casper
    .log("Using testhost: #{testhost}", "info")
    .log("Using screenshot: #{screenshot}", "info")

casper.waitUntilVisible = (selector, message, callback) ->
    @waitFor ->
        @visible selector
    , callback, (timeout) ->
        @log("Selector [#{selector}] not visible, failing")
        withParentSelector selector, (parent) ->
            casper.log("Output of parent selector [#{parent}]")
            casper.debugHTML(parent)
        @echo message, "RED_BAR"
        @capture(screenshot)
        @test.fail(f("Wait timeout occured (%dms)", timeout))

withParentSelector = (selector, callback) ->
    if selector.lastIndexOf(" ") > 0
       parent = selector[0..selector.lastIndexOf(" ")-1]
       callback(parent)

Sample pages.coffee:

x = require('casper').selectXPath

class EditDocumentPage

    assertAt: ->
        casper.test.assertSelectorExists("div.customerAccountInfo", 'at EditDocumentPage')

    templatesTreeFirstCategory: 'ul.tree li label'
    templatesTreeFirstTemplate: 'ul.tree li a'
    closePreview: '.closePreview a'
    smallPreview: '.smallPreviewContent img'
    bigPreview: 'img.previewImage'
    confirmDelete: x("//div[@class='modal-footer']/a[1]")

casper.editDocument = new EditDocumentPage()

End a test script:

testhost = casper.cli.get "testhost" or 'localhost:8080'

casper.start "http://#{testhost}/app", ->
    @test.assertHttpStatus 302
    @test.assertUrlMatch /\/fakeLogin/, 'auto login'
    @test.assert @visible('input#Create'), 'mock login button'
    @click 'input#Create'

casper.then ->
    @test.assertUrlMatch /document#\/edit/, 'new document'
    @editDocument.assertAt()
    @waitUntilVisible @editDocument.templatesTreeFirstCategory, 'template categories not visible', ->
        @click @editDocument.templatesTreeFirstCategory
        @waitUntilVisible @editDocument.templatesTreeFirstTemplate, 'template not visible', ->
            @click @editDocument.templatesTreeFirstTemplate

casper.then ->
    @waitUntilVisible @editDocument.smallPreview, 'small preview not visible', ->
        # could be dblclick / whatever
        @mouseEvent('click', @editDocument.smallPreview)

casper.then ->
    @waitUntilVisible @editDocument.bigPreview, 'big preview should be visible', ->
        @test.assertEvalEquals ->
            $('.pageCounter').text()
        , '1/1', 'page counter should be visible'
        @click @editDocument.closePreview

casper.then ->
    @click 'button.cancel'
    @waitUntilVisible '.modal-footer', 'delete confirmation not visible', ->
        @click @editDocument.confirmDelete

casper.run ->
    @test.done()

Here is a list of CasperJS features/caveats used here:

  • Using CoffeeScript is a huge win for your test code to look neat
  • When using casper test command, beware of different (than above articles) logging setup. You can pass --direct --log-level=debug from commandline for best results. Logging is essential here since Phantom often exists without any error and you do want to know what just happened.
  • Extract your helper code into separate files and include them by using --includes switch.
  • When passing server URL as a commandline switch remember that in CoffeeScript variables are not visible between multiple source files (unless getting them via window object)
  • It’s good to override standard waitUntilVisible with capting a screenshot and making a proper log statement. In my version I also look for a parent selector and debugHTML the content of it - great for debugging what is actually rendered by the browser.
  • Selenium and Geb have a nice concept of Page Objects - an abstract models of pages rendered by your application. Using CoffeeScript you can write your own classes, bind selectors to properties and use then in your code script. Assigning the objects to casper instance will end up with quite nice syntax like @editDocument.assertAt().
  • There is some issue with CSS :first and :last selectors. I cannot get them working (but maybe I’m doing something wrong?). But in CasperJS you can also use XPath selectors which are fine for matching n-th child of some element (x("//div[@class='modal-footer']/a[1]")).
    Update: :first and :last are not CSS3 selectors, but JQuery ones. Here is a list of CSS3 selectors, all of these are supported by CasperJS. So you can use nth-child(1) is this case. Thanks Andy and Nicolas for the comments!

Working with CasperJS can lead you to a few hour stall, but after getting things working you have a new, cool tool in your box!