Context menu or Action buttons ?

Recently I was drawn into one of those UI “religious” disputes that has no easy answers and usually both sides are right. One of our web developers was trying out new web tech (with pretty rich widget library) and started to question himself about some basic usability decisions. The low level problem in this case is usually brought to “which widget should I use ?”. I’m not fond of bringing the usability problems to questions: Should I use Tabs over Menu ? Or should I use Context menu instead of buttons panel ? But sometimes if time is crucial factor and other usability levels are by default not addressed at all – better developer that asks those basic questions than developer that do not question himself at all.

Recently I was drawn into one of those UI “religious” disputes that has no easy answers and usually both sides are right. One of our web developers was trying out new web tech (with pretty rich widget library) and started to question himself about some basic usability decisions. The low level problem in this case is usually brought to “which widget should I use ?”. I’m not fond of bringing the usability problems to questions: Should I use Tabs over Menu ? Or should I use Context menu instead of buttons panel ? But sometimes if time is crucial factor and other usability levels are by default not addressed at all – better developer that asks those basic questions than developer that do not question himself at all. One of often “problematic” choice that is bring up by web developers is should user launch actions on selected objects (one of many or some of many) by “Context menu” or “Action buttons”. Basic example is shown below and it is usually a table or list of components that has some defined actions (i.e. on table where rows are single orders change status of selected order would be on of possible actions). Of course there are many other solutions that can be implemented (some actions can be handled directly in table row or cell) but narrowing choice to those two was subject of mentioned discussion. During those hot and fast discussions I wasn’t able to point out pros and cons of both solution that’s why I decided to grab them all in this one short post. I hope it will be helpful for same lone developers that thirstily look for best practise or choice while the answer is usually much contextual…

Action button panel

example_view_1

(plus) Pros

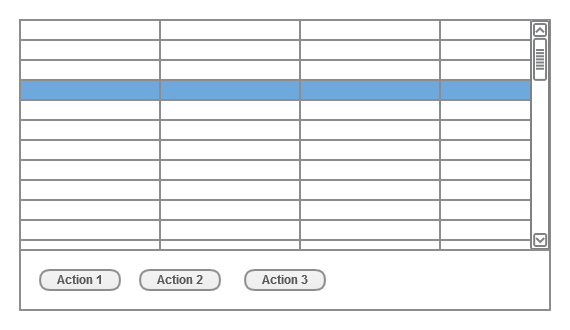
  • Clear indication of where and how many actions you can apply to selected row (or other selected object)
  • If action panel is visible all the time theme has expectable behaviour (at least if you are consistent at where you position your action panel)
  • Accessible solution on most mediums (mouse, touch screens, other pointing devices), panel can be bookmarked to be heard on reading devices
  • Action panel can be combined with Details panel (if there is enough space)
  • Actions can be described very precisely

(minus) Cons

  • Space consumption, even if some actions can be hidden under “Advanced” button, this design is always more “stuffed”
  • Can generate (sometimes really long) extra mouse moves and additional clicks
  • Keyboard support may be difficult if rows or selected widgets also use navigations buttons (tab key, arrows etc.)

Context menu

{#Test-Contextmenu}

example_view_2

(plus) Pros

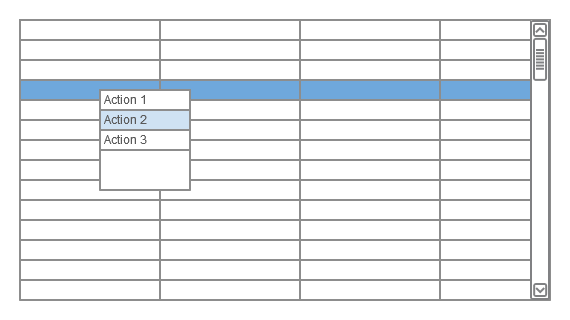
  • If you stick to short action names space consumption is minimal and since it’s used only during action selection it’s also less perceptible
  • Much faster if you use mouse or keyboard (with context menu shortcut / button)
  • Actions can be organised in tree like hierarchy which can be navigated (expanded) with minimal mouse moves and no additional mouse clicks
  • Nicely combines with drag&drop or multi record actions

(minus) Cons

  • Since context menu is invisible until explicitly called some people may not be aware that there are any actions available on selected objects
  • Poor support on some touch pads or touch screens, problematic support on screen readers
  • If used in web applications it overrides default browser context menu which can be a nuisance for some users
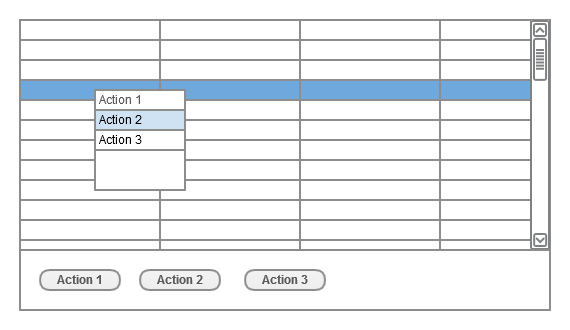
Why not both ?

{#Test-Whynotboth%3F}

example_view_3

(plus) Pros

  • Beginners has clear indication of where and what actions are available on selected objects
  • Advanced users can use faster context menu approach, that do not confuse beginners (they still has their action buttons)
  • Action buttons panel can be compressed to minimum, only to show most important actions (other actions can be hidden under “Advanced” button)
  • Action panel can be combined with Details panel, since action buttons would be minimal, there should be more space for details
  • Hide action panel option if workspace size is crucial (i.e. some clients has limited screen size) and users are aware of context menu

(minus) Cons

  • Initially you still loose some fix space
  • Redundancy may be confusing for some users (although this con is questionable – unaware beginners do not see any redundancy, advanced users can hide action panel if it REALLY bothers them)

Summary Choice between Context menu or Action buttons panel is pretty contextual and “right” choice strongly depends on supported media and user group. However there is pretty good “mix” solution that gives more pros than cons (unless redundancy is big problem for you) and will satisfy unaware beginners and users that strives for fast actions. If you come to mentioned choice, always give a chance to “why not both ?” scenario.

You May Also Like

4Developers 2010 Review

I've been to 4Developers in 2009 in Cracow, together with Tomasz Przybysz and we had very nice impressions, no wonder then I wanted to signed up for 2010 edition in Poznań as well. Tomasz was sick, but Jakub Kurlenda decided to come with me. This time...I've been to 4Developers in 2009 in Cracow, together with Tomasz Przybysz and we had very nice impressions, no wonder then I wanted to signed up for 2010 edition in Poznań as well. Tomasz was sick, but Jakub Kurlenda decided to come with me. This time...

CasperJS for Java developers

Why CasperJS

Being a Java developer is kinda hard these days. Java may not be dead yet, but when keeping in sync with all the hipster JavaScript frameworks could make us feel a bit outside the playground. It’s even hard to list JavaScript frameworks with latest releases on one website.

In my current project, we are using AngularJS. It’a a nice abstraction of MV* pattern in frontend layer of any web application (we use Grails underneath). Here is a nice article with an 8-point Win List of Angular way of handling AJAX calls and updating the view. So it’s not only a funny new framework but a truly helper of keeping your code clean and neat.

But there is also another area when you can put helpful JS framework in place of plan-old-java one - functional tests. Especially when you are dealing with one page app with lots of asynchronous REST/JSON communication.

Selenium and Geb

In Java/JVM project the typical is to use Selenium with some wrapper like Geb. So you start your project, setup your CI-functional testing pipeline and… after 1 month of coding your tests stop working and being maintainable. The frameworks itselves are not bad, but the typical setup is so heavy and has so many points of failure that keeping it working in a real life project is really hard.

Here is my list of common myths about Selenium: * It allows you to record test scripts via handy GUI - maybe some static request/response sites. In modern web applications with asynchronous REST/JSON communication your tests must contain a lot of “waitFor” statements and you cannot automate where these should be included. * It allows you to test your web app against many browsers - don’t try to automate IE tests! You have to manually open your app in IE to see how it actually bahaves! * It integrates well with continuous integration servers like Jenkins - you have to setup Selenium Grid on server with X installed to run tests on Chrome or Firefox and a Windows server for IE. And the headless HtmlUnit driver lacks a lot of JS support.

So I decided to try something different and introduce a bit of JavaScript tooling in our project by using CasperJS.

Introduction

CasperJS is simple but powerful navigation scripting & testing utility for PhantomJS - scritable headless WebKit (which is an rendering engine used by Safari and Chrome). In short - CasperJS allows you to navigate and make assertions about web pages as they’d been rendered in Google Chrome. It is enough for me to automate the functional tests of my application.

If you want a gentle introduction to the world of CasperJS I suggest you to read: * Official website, especially installation guide and API * Introductionary article from CasperJS creator Nicolas Perriault * Highlevel testing with CasperJS by Kevin van Zonneveld * grails-angular-scaffolding plugin by Rob Fletcher with some working CasperJS tests

Full example

I run my test suite via following script:

casperjs test --direct --log-level=debug --testhost=localhost:8080 --includes=test/casper/includes/casper-angular.coffee,test/casper/includes/pages.coffee test/casper/specs/

casper-angular.coffe

casper.test.on "fail", (failure) ->
    casper.capture(screenshot)

testhost   = casper.cli.get "testhost"
screenshot = 'test-fail.png'

casper
    .log("Using testhost: #{testhost}", "info")
    .log("Using screenshot: #{screenshot}", "info")

casper.waitUntilVisible = (selector, message, callback) ->
    @waitFor ->
        @visible selector
    , callback, (timeout) ->
        @log("Selector [#{selector}] not visible, failing")
        withParentSelector selector, (parent) ->
            casper.log("Output of parent selector [#{parent}]")
            casper.debugHTML(parent)
        @echo message, "RED_BAR"
        @capture(screenshot)
        @test.fail(f("Wait timeout occured (%dms)", timeout))

withParentSelector = (selector, callback) ->
    if selector.lastIndexOf(" ") > 0
       parent = selector[0..selector.lastIndexOf(" ")-1]
       callback(parent)

Sample pages.coffee:

x = require('casper').selectXPath

class EditDocumentPage

    assertAt: ->
        casper.test.assertSelectorExists("div.customerAccountInfo", 'at EditDocumentPage')

    templatesTreeFirstCategory: 'ul.tree li label'
    templatesTreeFirstTemplate: 'ul.tree li a'
    closePreview: '.closePreview a'
    smallPreview: '.smallPreviewContent img'
    bigPreview: 'img.previewImage'
    confirmDelete: x("//div[@class='modal-footer']/a[1]")

casper.editDocument = new EditDocumentPage()

End a test script:

testhost = casper.cli.get "testhost" or 'localhost:8080'

casper.start "http://#{testhost}/app", ->
    @test.assertHttpStatus 302
    @test.assertUrlMatch /\/fakeLogin/, 'auto login'
    @test.assert @visible('input#Create'), 'mock login button'
    @click 'input#Create'

casper.then ->
    @test.assertUrlMatch /document#\/edit/, 'new document'
    @editDocument.assertAt()
    @waitUntilVisible @editDocument.templatesTreeFirstCategory, 'template categories not visible', ->
        @click @editDocument.templatesTreeFirstCategory
        @waitUntilVisible @editDocument.templatesTreeFirstTemplate, 'template not visible', ->
            @click @editDocument.templatesTreeFirstTemplate

casper.then ->
    @waitUntilVisible @editDocument.smallPreview, 'small preview not visible', ->
        # could be dblclick / whatever
        @mouseEvent('click', @editDocument.smallPreview)

casper.then ->
    @waitUntilVisible @editDocument.bigPreview, 'big preview should be visible', ->
        @test.assertEvalEquals ->
            $('.pageCounter').text()
        , '1/1', 'page counter should be visible'
        @click @editDocument.closePreview

casper.then ->
    @click 'button.cancel'
    @waitUntilVisible '.modal-footer', 'delete confirmation not visible', ->
        @click @editDocument.confirmDelete

casper.run ->
    @test.done()

Here is a list of CasperJS features/caveats used here:

  • Using CoffeeScript is a huge win for your test code to look neat
  • When using casper test command, beware of different (than above articles) logging setup. You can pass --direct --log-level=debug from commandline for best results. Logging is essential here since Phantom often exists without any error and you do want to know what just happened.
  • Extract your helper code into separate files and include them by using --includes switch.
  • When passing server URL as a commandline switch remember that in CoffeeScript variables are not visible between multiple source files (unless getting them via window object)
  • It’s good to override standard waitUntilVisible with capting a screenshot and making a proper log statement. In my version I also look for a parent selector and debugHTML the content of it - great for debugging what is actually rendered by the browser.
  • Selenium and Geb have a nice concept of Page Objects - an abstract models of pages rendered by your application. Using CoffeeScript you can write your own classes, bind selectors to properties and use then in your code script. Assigning the objects to casper instance will end up with quite nice syntax like @editDocument.assertAt().
  • There is some issue with CSS :first and :last selectors. I cannot get them working (but maybe I’m doing something wrong?). But in CasperJS you can also use XPath selectors which are fine for matching n-th child of some element (x("//div[@class='modal-footer']/a[1]")).
    Update: :first and :last are not CSS3 selectors, but JQuery ones. Here is a list of CSS3 selectors, all of these are supported by CasperJS. So you can use nth-child(1) is this case. Thanks Andy and Nicolas for the comments!

Working with CasperJS can lead you to a few hour stall, but after getting things working you have a new, cool tool in your box!