Sonar Gerrit Plugin Release

I am happy to announce a first release of my Sonar Gerrit plugin. This plugin reports Sonar violations on your patchsets to your Gerrit server. Sonar analyses full project, but only files included in patchset are commented on Gerrit. Please forward to project page for installation instructions. This plugin is intended to use with Gerrit Trigger plugin for Jenkins CI server. Together they provide a great tool for automatic static code analysis.I am happy to announce a first release of my Sonar Gerrit plugin. This plugin reports Sonar violations on your patchsets to your Gerrit server. Sonar analyses full project, but only files included in patchset are commented on Gerrit. Please forward to project page for installation instructions. This plugin is intended to use with Gerrit Trigger plugin for Jenkins CI server. Together they provide a great tool for automatic static code analysis.

Initial release

I am happy to announce a first release of my Sonar Gerrit plugin. This plugin reports Sonar violations on your patchsets to your Gerrit server. Sonar analyses full project, but only files included in patchset are commented on Gerrit. Please forward to project page for installation instructions.

This plugin is intended to use with Gerrit Trigger plugin for Jenkins CI server. Together they provide a great tool for automatic static code analysis.

How does it work?

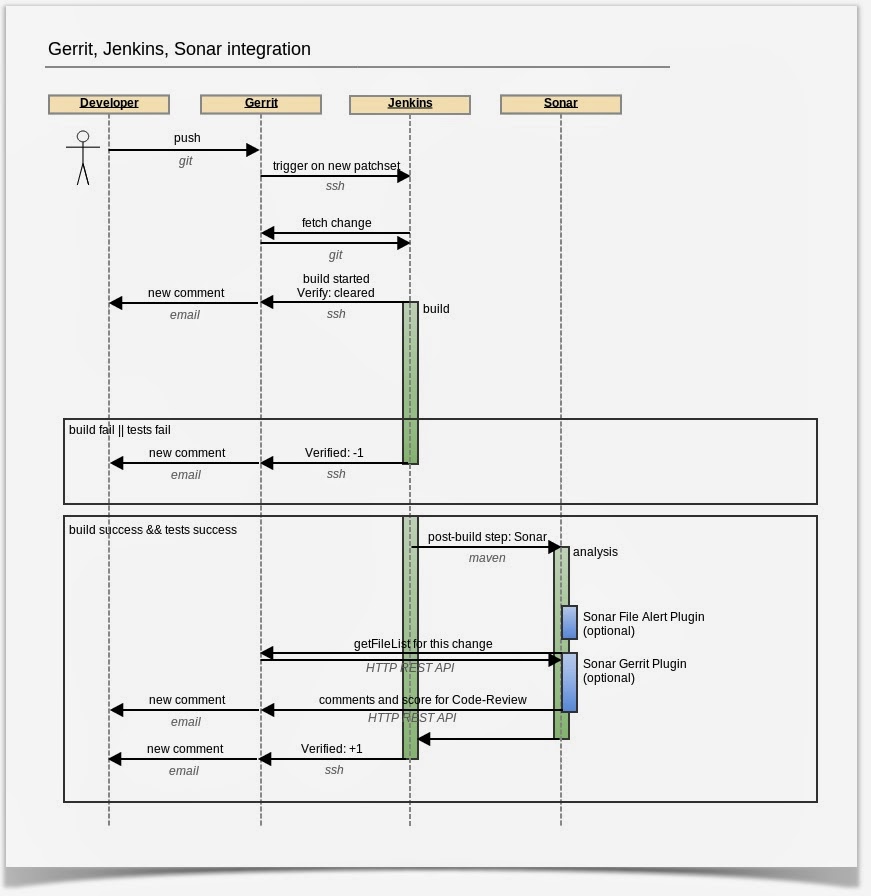
At the moment you push a patchset to Gerrit, Jenkins is notified with a ssh event. It fetches a code with a patchset and it builds your changes. It quits when build or tests fail.

But if it succeeds, Sonar analase your project in a post-build action. This is a place where my Sonar Gerrit plugin shines. It asks Gerrit for changed files before analysis and after Sonar analysis is finished, plugin reports comments on these files as a Gerrit reviewer. Currently plugin always reports +1 for Code Review, as it’s still in development. However, you should always treat these comments as hints to improve, not as direct errors.

Extras

I’ve released also a second plugin: Sonar File Alerts plugin. This plugin raises alerts on file level in Sonar. It extends default behaviour, which raises alerts only at root project level. It is useful when you create alert rules in Sonar like "Code Coverage < 60". Each file is checked against this rule!

If you use Sonar File Alerts plugin and an alert will be generated on some file, then a comment will be published on this file on Gerrit.

Feedback

Please provide a feedback on these plugins. Feel free to submit issues on github or comment. It’s still an early stage so your input is very welcome!

You May Also Like

Atom Feeds with Spring MVC

How to add feeds (Atom) to your web application with just two classes?
How about Spring MVC?

Here are my assumptions:
  • you are using Spring framework
  • you have some entity, say “News”, that you want to publish in your feeds
  • your "News" entity has creationDate, title, and shortDescription
  • you have some repository/dao, say "NewsRepository", that will return the news from your database
  • you want to write as little as possible
  • you don't want to format Atom (xml) by hand
You actually do NOT need to use Spring MVC in your application already. If you do, skip to step 3.


Step 1: add Spring MVC dependency to your application
With maven that will be:
<dependency>
    <groupId>org.springframework</groupId>
    <artifactId>spring-webmvc</artifactId>
    <version>3.1.0.RELEASE</version>
</dependency>

Step 2: add Spring MVC DispatcherServlet
With web.xml that would be:
<servlet>
    <servlet-name>dispatcher</servlet-name>
    <servlet-class>org.springframework.web.servlet.DispatcherServlet</servlet-class>
    <init-param>
        <param-name>contextConfigLocation</param-name>
        <param-value>classpath:spring-mvc.xml</param-value>
    </init-param>
    <load-on-startup>1</load-on-startup>
</servlet>
<servlet-mapping>
    <servlet-name>dispatcher</servlet-name>
    <url-pattern>/feed</url-pattern>
</servlet-mapping>
Notice, I set the url-pattern to “/feed” which means I don't want Spring MVC to handle any other urls in my app (I'm using a different web framework for the rest of the app). I also give it a brand new contextConfigLocation, where only the mvc configuration is kept.

Remember that, when you add a DispatcherServlet to an app that already has Spring (from ContextLoaderListener for example), your context is inherited from the global one, so you should not create beans that exist there again, or include xml that defines them. Watch out for Spring context getting up twice, and refer to spring or servlet documentation to understand what's happaning.

Step 3. add ROME – a library to handle Atom format
With maven that is:
<dependency>
    <groupId>net.java.dev.rome</groupId>
    <artifactId>rome</artifactId>
    <version>1.0.0</version>
</dependency>

Step 4. write your very simple controller
@Controller
public class FeedController {
    static final String LAST_UPDATE_VIEW_KEY = "lastUpdate";
    static final String NEWS_VIEW_KEY = "news";
    private NewsRepository newsRepository;
    private String viewName;

    protected FeedController() {} //required by cglib

    public FeedController(NewsRepository newsRepository, String viewName) {
        notNull(newsRepository); hasText(viewName);
        this.newsRepository = newsRepository;
        this.viewName = viewName;
    }

    @RequestMapping(value = "/feed", method = RequestMethod.GET)        
    @Transactional
    public ModelAndView feed() {
        ModelAndView modelAndView = new ModelAndView();
        modelAndView.setViewName(viewName);
        List<News> news = newsRepository.fetchPublished();
        modelAndView.addObject(NEWS_VIEW_KEY, news);
        modelAndView.addObject(LAST_UPDATE_VIEW_KEY, getCreationDateOfTheLast(news));
        return modelAndView;
    }

    private Date getCreationDateOfTheLast(List<News> news) {
        if(news.size() > 0) {
            return news.get(0).getCreationDate();
        }
        return new Date(0);
    }
}
And here's a test for it, in case you want to copy&paste (who doesn't?):
@RunWith(MockitoJUnitRunner.class)
public class FeedControllerShould {
    @Mock private NewsRepository newsRepository;
    private Date FORMER_ENTRY_CREATION_DATE = new Date(1);
    private Date LATTER_ENTRY_CREATION_DATE = new Date(2);
    private ArrayList<News> newsList;
    private FeedController feedController;

    @Before
    public void prepareNewsList() {
        News news1 = new News().title("title1").creationDate(FORMER_ENTRY_CREATION_DATE);
        News news2 = new News().title("title2").creationDate(LATTER_ENTRY_CREATION_DATE);
        newsList = newArrayList(news2, news1);
    }

    @Before
    public void prepareFeedController() {
        feedController = new FeedController(newsRepository, "viewName");
    }

    @Test
    public void returnViewWithNews() {
        //given
        given(newsRepository.fetchPublished()).willReturn(newsList);
        
        //when
        ModelAndView modelAndView = feedController.feed();
        
        //then
        assertThat(modelAndView.getModel())
                .includes(entry(FeedController.NEWS_VIEW_KEY, newsList));
    }

    @Test
    public void returnViewWithLastUpdateTime() {
        //given
        given(newsRepository.fetchPublished()).willReturn(newsList);

        //when
        ModelAndView modelAndView = feedController.feed();

        //then
        assertThat(modelAndView.getModel())
                .includes(entry(FeedController.LAST_UPDATE_VIEW_KEY, LATTER_ENTRY_CREATION_DATE));
    }

    @Test
    public void returnTheBeginningOfTimeAsLastUpdateInViewWhenListIsEmpty() {
        //given
        given(newsRepository.fetchPublished()).willReturn(new ArrayList<News>());

        //when
        ModelAndView modelAndView = feedController.feed();

        //then
        assertThat(modelAndView.getModel())
                .includes(entry(FeedController.LAST_UPDATE_VIEW_KEY, new Date(0)));
    }
}
Notice: here, I'm using fest-assert and mockito. The dependencies are:
<dependency>
 <groupId>org.easytesting</groupId>
 <artifactId>fest-assert</artifactId>
 <version>1.4</version>
 <scope>test</scope>
</dependency>
<dependency>
 <groupId>org.mockito</groupId>
 <artifactId>mockito-all</artifactId>
 <version>1.8.5</version>
 <scope>test</scope>
</dependency>

Step 5. write your very simple view
Here's where all the magic formatting happens. Be sure to take a look at all the methods of Entry class, as there is quite a lot you may want to use/fill.
import org.springframework.web.servlet.view.feed.AbstractAtomFeedView;
[...]

public class AtomFeedView extends AbstractAtomFeedView {
    private String feedId = "tag:yourFantastiSiteName";
    private String title = "yourFantastiSiteName: news";
    private String newsAbsoluteUrl = "http://yourfanstasticsiteUrl.com/news/"; 

    @Override
    protected void buildFeedMetadata(Map<String, Object> model, Feed feed, HttpServletRequest request) {
        feed.setId(feedId);
        feed.setTitle(title);
        setUpdatedIfNeeded(model, feed);
    }

    private void setUpdatedIfNeeded(Map<String, Object> model, Feed feed) {
        @SuppressWarnings("unchecked")
        Date lastUpdate = (Date)model.get(FeedController.LAST_UPDATE_VIEW_KEY);
        if (feed.getUpdated() == null || lastUpdate != null || lastUpdate.compareTo(feed.getUpdated()) > 0) {
            feed.setUpdated(lastUpdate);
        }
    }

    @Override
    protected List<Entry> buildFeedEntries(Map<String, Object> model, HttpServletRequest request, HttpServletResponse response) throws Exception {
        @SuppressWarnings("unchecked")
        List<News> newsList = (List<News>)model.get(FeedController.NEWS_VIEW_KEY);
        List<Entry> entries = new ArrayList<Entry>();
        for (News news : newsList) {
            addEntry(entries, news);
        }
        return entries;
    }

    private void addEntry(List<Entry> entries, News news) {
        Entry entry = new Entry();
        entry.setId(feedId + ", " + news.getId());
        entry.setTitle(news.getTitle());
        entry.setUpdated(news.getCreationDate());
        entry = setSummary(news, entry);
        entry = setLink(news, entry);
        entries.add(entry);
    }

    private Entry setSummary(News news, Entry entry) {
        Content summary = new Content();
        summary.setValue(news.getShortDescription());
        entry.setSummary(summary);
        return entry;
    }

    private Entry setLink(News news, Entry entry) {
        Link link = new Link();
        link.setType("text/html");
        link.setHref(newsAbsoluteUrl + news.getId()); //because I have a different controller to show news at http://yourfanstasticsiteUrl.com/news/ID
        entry.setAlternateLinks(newArrayList(link));
        return entry;
    }

}

Step 6. add your classes to your Spring context
I'm using xml approach. because I'm old and I love xml. No, seriously, I use xml because I may want to declare FeedController a few times with different views (RSS 1.0, RSS 2.0, etc.).

So this is the forementioned spring-mvc.xml

<?xml version="1.0" encoding="UTF-8"?>
<beans xmlns="http://www.springframework.org/schema/beans"
       xmlns:xsi="http://www.w3.org/2001/XMLSchema-instance"
       xsi:schemaLocation="http://www.springframework.org/schema/beans http://www.springframework.org/schema/beans/spring-beans.xsd">

    <bean class="org.springframework.web.servlet.view.ContentNegotiatingViewResolver">
        <property name="mediaTypes">
            <map>
                <entry key="atom" value="application/atom+xml"/>
                <entry key="html" value="text/html"/>
            </map>
        </property>
        <property name="viewResolvers">
            <list>
                <bean class="org.springframework.web.servlet.view.BeanNameViewResolver"/>
            </list>
        </property>
    </bean>

    <bean class="eu.margiel.pages.confitura.feed.FeedController">
        <constructor-arg index="0" ref="newsRepository"/>
        <constructor-arg index="1" value="atomFeedView"/>
    </bean>

    <bean id="atomFeedView" class="eu.margiel.pages.confitura.feed.AtomFeedView"/>
</beans>

And you are done.

I've been asked a few times before to put all the working code in some public repo, so this time it's the other way around. I've describe things that I had already published, and you can grab the commit from the bitbucket.

Hope that helps.