Glimpse on Tomcat performance tuning.

Production environment ;-)

Have You ever wondered about Tomcat configuration in production environment, or just let “this things” to the admins, or even worse, don’t care at all about it? If the answer is “Tomcat configuration ? I/We/Our client just installs tomcat and deploy our application. Why border about any additional configuration ?” You should read this post.

I will not write about all Tomcat’s configuration. It’s pointless. I just want to show some problems with performance with default Tomcat’s configuration in production enviroment. Especially if You are using Tomcat in as web server in internet, with many simultaneous clients and connections. In such cases performance and high responsivity is important.

1. Let’s start from logs. Standard Tomcat’s logs are configured to appear in two places: file and console. In production it’s pointless to have duplicate logs so first thing to gain some speed boost is to replace following line from logging.properties:

.handlers = 1catalina.org.apache.juli.FileHandler, java.util.logging.ConsoleHandler with this one: .handlers = 1catalina.org.apache.juli.FileHandler

2. Second thing to do with logs is to set max file size and protection from overflow. It’s also very easy. Just add new handler like following one:

catalina.java.util.logging.FileHandler

and configure it like this (max 4 filesx10Mb):

1catalina.java.util.logging.FileHandler.pattern = ${catalina.base}/logs/catalina.%g.log 1catalina.java.util.logging.FileHandler.limit = 10000000 1catalina.java.util.logging.FileHandler.count = 4

3. Last thing You have TO HAVE in production environment are asynchronous logs. Synchronous logging is far more time consuming then asynchronous one. Especially when You have numerous clients. Check if Your Tomcat is configured in proper way (I won’t write about this. Just search in web about log4j configuration. It’s lot of this there.)

4. That’s all about logging. Now something much more influent on connection speed-connectors. They are configured in server.xml under node.

Tomcat have 3 main connectors:

BIO – Blocking Java connector which is default one

APR – Uses native C code fo IO (very fast)

NIO – Non blocking connectror in Java (also faster than default)

The first BIO connector (“org.apache.coyote.http11.Http11Protocol”) is set as default one. Why ? Becouse in many cases such configuration it’s enough. Tomcat usually is used in intranets where it’s not required to handle high traffic volume. Moreover BIO connector is very stable.

But if our applications have to serve many http requests the blocking connector isn’t the best choice. So here comes ARP and NIO connector.

The first one (org.apache.coyote.http11.Http11AprProtocol) requires to compile native library (just search in google for ARP) and could be less stable than BIO connector. In exchange ARP connector is very fast, could handle requests simultanously in non blocking mode, have pooling of unlimited size and could handle unlimited threads (in theory, becouse threads are limited with CPU power)

Last connector – NIO (org.apache.coyote.http11.Http11NioProtocol) is something between ARP and BIO. It’s good choice if You don’t want to compile native libraries. NIO connector is also non blocking, little slower in reading static content than ARP, but far more configurable (pool size, no of threads etc).

5. Ok, so now We know, which connector should we choose, but every connector have to be set up in proper way. There are several parameters but the important ones are:

– maxThreads – typical from 150-800 (For BIO this is max nr of open connections)

– maxKeepAliveRequests – typical 1 or 100-250. For BIO this should be set to 1 to disable keep alive (only if we have high concurency and not using SSL). BIO connector automatically disables keep alive for high connection traffic

– connectionTimeout – typical 2000-60000 WARNING: default Tomcat has it set to 20 000! It’s to high for production environment. Good choice is to decrese it to 3000-5000 unless Your production env is working with slow clients. This parameters describes max time between TCP packets during blocking read/write

6. This is “almost” the end of tunning Tomcat for production. The last thing is to configure cache. Default cache is configured to 10 MB. You can set this a little more if You have a lot of static content. Also cache revalidation (standard 5 sec) should be tuned. How ? It’s difficult to say. The best way is to tune this parameters by own during tests.

That’s all. I hope I realized to everyone why not rely on standard Tomcat configuration.

You May Also Like

ODEO new release

Recently, I released a new version 1.1.34 of ODEO (it's ODE tuned for Oracle and ServiceMix).You can check details (and downloads) here: http://top.touk.pl/confluence/display/top/ODEO.This version contains yet another set of fixes, which drive your BPE...Recently, I released a new version 1.1.34 of ODEO (it's ODE tuned for Oracle and ServiceMix).You can check details (and downloads) here: http://top.touk.pl/confluence/display/top/ODEO.This version contains yet another set of fixes, which drive your BPE...

How to automate tests with Groovy 2.0, Spock and Gradle

This is the launch of the 1st blog in my life, so cheers and have a nice reading!

y u no test?

Couple of years ago I wasn't a big fan of unit testing. It was obvious to me that well prepared unit tests are crucial though. I didn't known why exactly crucial yet then. I just felt they are important. My disliking to write automation tests was mostly related to the effort necessary to prepare them. Also a spaghetti code was easily spotted in test sources.
Some goodies at hand

Now I know! Test are crucial to get a better design and a confidence. Confidence to improve without a hesitation. Moreover, now I have the tool to make test automation easy as Sunday morning... I'm talking about the Spock Framework. If you got here probably already know what the Spock is, so I won't introduce it. Enough to say that Spock is an awesome unit testing tool which, thanks to Groovy AST Transformation, simplifies creation of tests greatly.

An obstacle

The point is, since a new major version of Groovy has been released (2.0), there is no matching version of Spock available yet.

What now?

Well, in a matter of fact there is such a version. It's still under development though. It can be obtained from this Maven repository. We can of course use the Maven to build a project and run tests. But why not to go even more "groovy" way? XML is not for humans, is it? Lets use Gradle.

The build file

Update: at the end of the post is updated version of the build file.
apply plugin: 'groovy'
apply plugin: 'idea'

def langLevel = 1.7

sourceCompatibility = langLevel
targetCompatibility = langLevel

group = 'com.tamashumi.example.testwithspock'
version = '0.1'

repositories {
mavenLocal()
mavenCentral()
maven { url 'http://oss.sonatype.org/content/repositories/snapshots/' }
}

dependencies {
groovy 'org.codehaus.groovy:groovy-all:2.0.1'
testCompile 'org.spockframework:spock-core:0.7-groovy-2.0-SNAPSHOT'
}

idea {
project {
jdkName = langLevel
languageLevel = langLevel
}
}
As you can see the build.gradle file is almost self-explanatory. Groovy plugin is applied to compile groovy code. It needs groovy-all.jar - declared in version 2.0 at dependencies block just next to Spock in version 0.7. What's most important, mentioned Maven repository URL is added at repositories block.

Project structure and execution

Gradle's default project directory structure is similar to Maven's one. Unfortunately there is no 'create project' task and you have to create it by hand. It's not a big obstacle though. The structure you will create will more or less look as follows:
<project root>

├── build.gradle
└── src
├── main
│ ├── groovy
└── test
└── groovy
To build a project now you can type command gradle build or gradle test to only run tests.

How about Java?

You can test native Java code with Spock. Just add src/main/java directory and a following line to the build.gradle:
apply plugin: 'java'
This way if you don't want or just can't deploy Groovy compiled stuff into your production JVM for any reason, still whole goodness of testing with Spock and Groovy is at your hand.

A silly-simple example

Just to show that it works, here you go with a basic example.

Java simple example class:

public class SimpleJavaClass {

public int sumAll(int... args) {

int sum = 0;

for (int arg : args){
sum += arg;
}

return sum;
}
}

Groovy simple example class:

class SimpleGroovyClass {

String concatenateAll(char separator, String... args) {

args.join(separator as String)
}
}

The test, uhm... I mean the Specification:

class JustASpecification extends Specification {

@Unroll('Sums integers #integers into: #expectedResult')
def "Can sum different amount of integers"() {

given:
def instance = new SimpleJavaClass()

when:
def result = instance.sumAll(* integers)

then:
result == expectedResult

where:
expectedResult | integers
11 | [3, 3, 5]
8 | [3, 5]
254 | [2, 4, 8, 16, 32, 64, 128]
22 | [7, 5, 6, 2, 2]
}

@Unroll('Concatenates strings #strings with separator "#separator" into: #expectedResult')
def "Can concatenate different amount of integers with a specified separator"() {

given:
def instance = new SimpleGroovyClass()

when:
def result = instance.concatenateAll(separator, * strings)

then:
result == expectedResult

where:
expectedResult | separator | strings
'Whasup dude?' | ' ' as char | ['Whasup', 'dude?']
'2012/09/15' | '/' as char | ['2012', '09', '15']
'nice-to-meet-you' | '-' as char | ['nice', 'to', 'meet', 'you']
}
}
To run tests with Gradle simply execute command gradle test. Test reports can be found at <project root>/build/reports/tests/index.html and look kind a like this.


Please note that, thanks to @Unroll annotation, test is executed once per each parameters row in the 'table' at specification's where: block. This isn't a Java label, but a AST transformation magic.

IDE integration

Gradle's plugin for Iintellij Idea

I've added also Intellij Idea plugin for IDE project generation and some configuration for it (IDE's JDK name). To generate Idea's project files just run command: gradle idea There are available Eclipse and Netbeans plugins too, however I haven't tested them. Idea's one works well.

Intellij Idea's plugins for Gradle

Idea itself has a light Gradle support built-in on its own. To not get confused: Gradle has plugin for Idea and Idea has plugin for Gradle. To get even more 'pluginated', there is also JetGradle plugin within Idea. However I haven't found good reason for it's existence - well, maybe excluding one. It shows dependency tree. There is a bug though - JetGradle work's fine only for lang level 1.6. Strangely all the plugins together do not conflict each other. They even give complementary, quite useful tool set.

Running tests under IDE

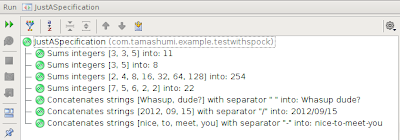
Jest to add something sweet this is how Specification looks when run with jUnit  runner under Intellij Idea (right mouse button on JustASpecification class or whole folder of specification extending classes and select "Run ...". You'll see a nice view like this.

Building web application

If you need to build Java web application and bundle it as war archive just add plugin by typing the line
apply plugin: 'war'
in the build.gradle file and create a directory src/main/webapp.

Want to know more?

If you haven't heard about Spock or Gradle before or just curious, check the following links:

What next?

The last thing left is to write the real production code you are about to test. No matter will it be Groovy or Java, I leave this to your need and invention. Of course, you are welcome to post a comments here. I'll answer or even write some more posts about the subject.

Important update

Spock version 0.7 has been released, so the above build file doesn't work anymore. It's easy to fix it though. Just remove last dash and a word SNAPSHOT from Spock dependency declaration. Other important thing is that now spock-core depends on groovy-all-2.0.5, so to avoid dependency conflict groovy dependency should be changed from version 2.0.1 to 2.0.5.
Besides oss.sonata.org snapshots maven repository can be removed. No obstacles any more and the build file now looks as follows:
apply plugin: 'groovy'
apply plugin: 'idea'

def langLevel = 1.7

sourceCompatibility = langLevel
targetCompatibility = langLevel

group = 'com.tamashumi.example.testwithspock'
version = '0.1'

repositories {
mavenLocal()
mavenCentral()
}

dependencies {
groovy 'org.codehaus.groovy:groovy-all:2.0.5'
testCompile 'org.spockframework:spock-core:0.7-groovy-2.0'
}

idea {
project {
jdkName = langLevel
languageLevel = langLevel
}
}