When distributed monolith may work for you

The Distributed Monolith term surely has a bad press. When you read through blogs and conference talks I’m sure you’d better build a “traditional” monolith rather that a distributed one. If you go with the latter, it means you tried to build microservices but you failed. And now your life is sad and full of pain ;) In this post I’d like to describe our case, when we built something like distributed monolith intentionally, with quite a pleasant final experience.

In my opinion the key to microservices is in the Conway’s Law. Looking from that perspective you’d think that primary use-case for microservices is large organizations with in-house IT department with many small teams, working independently, with large control over their part ot the system. But this doesn’t cover the full spectrum of software development market ;)

When you are a software house you deal with various type of projects. This includes maintenance, rewrite part of a large system and – last but not least – developing new systems from scratch. But the development process is much different than in-house IT: we use small, versatile teams (up to 10 people), not tight stick to roles like webdev, tester (developers, not programmers). There are no two identical projects for us: every customer has its own needs, tools, infrastructure, procedures, etc. (see http://ericsink.com/No_Programmers.html)

If you plan your system architecture you often try to do some checklist that can help you make the best choice. I think the most interesting question from it is:

Is there a part of the system that a single person, or small team, operates independently inside of?

The usual response for a software house is “Hmm… No”. So are we forced to always build monoliths?

The good parts of monolith

Let’s think first what could be the good parts of monolithic architecture, especially for a small team inside a software house:

Simple communication model

When you want to deliver fast, you have to reduce overhead. If your customer ask for a feature, telling him that you first have to investigate how to make your microservices talk to each other could be not acceptable. Also, having less service-to-service communication, makes monitoring and debugging in production a lot easier. It’s different when you build a large microservice stack for a big organization – you surely convinced business owners that you need some time to invest in tools and infrastructure and they have to wait for it to be done before features arrive ;)

Single repository

At software houses, we usually have a lot of freedom choosing CI/CD tooling, some team go with full-stack Gitlab, some prefer Gerrit + Jenkins, some work on customer’s infrastructure. We don’t have repeatable, complicated build pipeline for every project – usually just running tests, make some static code analysis (with Sputnik), sometimes push Docker images somewhere. It’s just easy to have just one repository, not having to setup multiple independently.

Single data source

This is also not constant across projects, but most of them need just one data source, possibly just RDBMS (Postgres) to store business data. It’s easy to administer, manage, migrate. If you want a bit less coupling between parts of the system, separate database schemas for a start could be enough.

Simple deployment infrastructure

Just like above, from deployment perspective, the simplest – the better. Your customer doesn’t want you to spend 3 weeks setting up a Kubernetes cluster. If you can go with plain Docker without dedicated orchestration – go with it. For us – AWS ECS with some home-made automation worked really fine.

The good parts of microservices

On the other hand, while building monolith may have many good parts, it can also be really painful. I think that there are numerous advantages you’ll get from splitting the whole system into few smaller parts. The key is having multiple deployment units, which really gives you benefits:

Resource separation

Bugs happen. It is obvious that your system will someday fail on production. The real question is what happens then? How your system deals with errors? If you use shared resources like database or http client connection pools, one, even not critical part of your system, may cause a full system outage. That’s why splitting your system into few smaller applications matters. You (and your customers) can probably live even if one of the minor functionalities fails.

Independent scaling

It is also good when your system can scale. It’s better when you can scale parts of your system independently. Some of features are massively used and business critical – and you want to run them in high-available mode with possibility to add instances on the fly when traffic increases. But also you have some other parts (e.g. backoffice) that is not heavily used with often zero traffic after working hours. With multiple applications instead of monolith it’s easier to achieve independent scaling.

Network separation

Usually parts of a big system are used from different places. You have some public services (e.g. mailing service), othen with both sides communication (with webhooks). On the other hand – a back-office part shouldn’t be exposed publicly, best hidden in a VPN to a customer’s office. Having these parts separated makes it easier to put them in different networks and then setup a particular policy of each part.

Separate configuration

Defining proper authentication configuration for Java (even in Spring) app could be hard. I guess that defining multiple authentication models (e.g. logged users, internal features for call-center people and public service calls) for different parts of a monolithic application could be a hell. Splitting a monolith into several deployment units, each with separate authentication configuration, may save you many hours of debugging magical untestable code provided by your framework.

Technology experiments

It’s really bad for a project if you’re stick to a legacy technology. Having thousands of lines written in 90’s Javascript framework could be really demotivating for developers. When you have few smaller deployment units, it’s much easier to play with technology experiments. You can either write the whole small part in some crazy technology (we use Elm for a small frontend piece) or try to upgrade some important library just in one place (we switched to 4.x Redux router in smaller application before upgrading the bigger one).

Taking best from two worlds

In our case, we think that we took the best from two approaches. We had small team (in peak 8 people), working on a single Git repository. We delivered 10 separate applications, all using the same datasource (Postgres). We used Kotlin + Spring Boot on backend, and React for frontend. We used Gradle modules to split the backend code into reusable parts, and Spring Boot apps just picked the needed pieces.

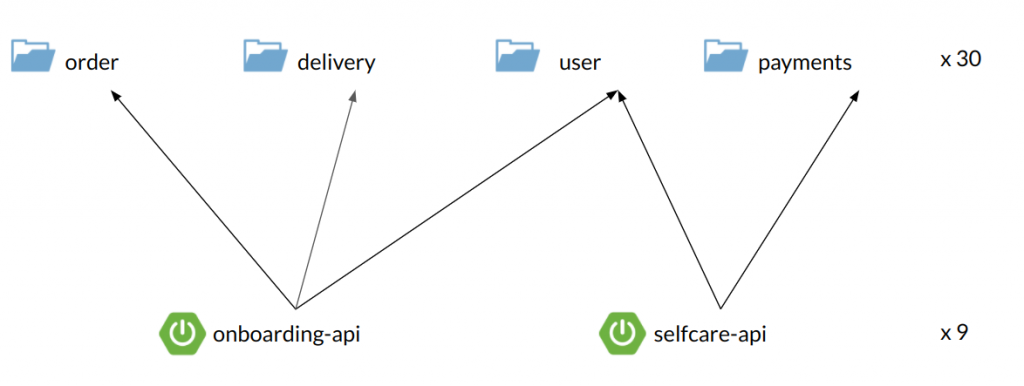
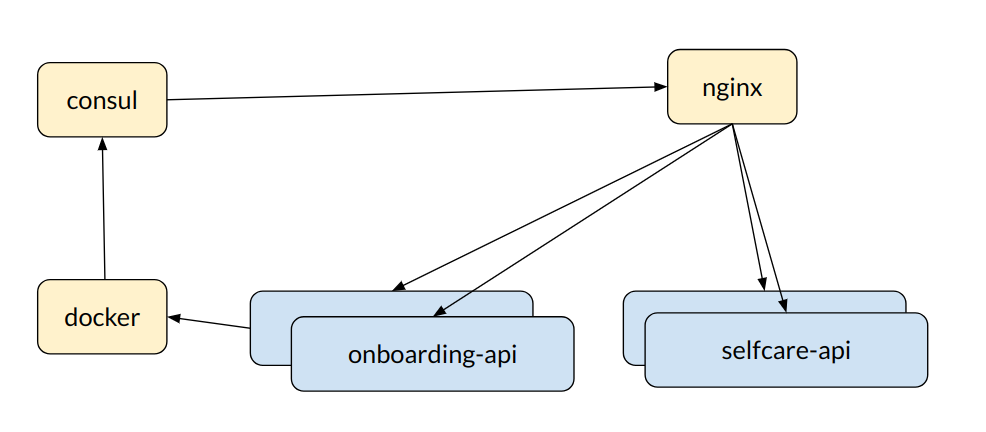
We packed the apps into Dockers, built with Gitlab CI pipelines and used Amazon ECS for container orchestration (with a small API gateway based on Nginx and Consul).

There was no inter-process (HTTP etc.) communication between the apps – we just used modules API for synchronous calls (mostly queries) and Quartz tasks for asynchronous commands. We also had ELK stack for logging and tracing.

To be honest, we were 90% happy. The remaining 10% of things that didn’t work well included:

  • many small modules – we had some performance problems with Intellij at the beginning with indexing all the small modules
  • cyclic dependencies – sometimes we discovered cycling dependencies between these modules; on the other hand – it helped us to remove some flaws from our design
  • tight coupling – our apps were designed by API (consumer) perspective, rather than clean DDD, bounded context thinking; but separate modules could help with this – e.g. a new delivery system was developed as separate part, with its own database schema
  • “all-at-once” deployment – and yes, having just 1 database, we often had to deploy multiple applications at once.

Having said that, I think that we managed a good balance between two worlds. We didn’t struggle with massive infrastructure and tooling, working with different repositories and data sources. We were able to go as fast as we built a single-repository monolith application. But we had some parts separated, with their own configuration/boilerplate, ready to be deployed and scaled independently.

You May Also Like

Spock basics

Spock (homepage) is like its authors say 'testing and specification framework'. Spock combines very elegant and natural syntax with the powerful capabilities. And what is most important it is easy to use.

One note at the very beginning: I assume that you are already familiar with principles of Test Driven Development and you know how to use testing framework like for example JUnit.

So how can I start?


Writing spock specifications is very easy. We need basic configuration of Spock and Groovy dependencies (if you are using mavenized project with Eclipse look to my previous post: Spock, Java and Maven). Once we have everything set up and running smooth we can write our first specs (spec or specification is equivalent for test class in other frameworks like JUnit of TestNG).

What is great with Spock is fact that we can use it to test both Groovy projects and pure Java projects or even mixed projects.


Let's go!


Every spec class must inherit from spock.lang.Specification class. Only then test runner will recognize it as test class and start tests. We will write few specs for this simple class: User class and few tests not connected with this particular class.

We start with defining our class:
import spock.lang.*

class UserSpec extends Specification {

}
Now we can proceed to defining test fixtures and test methods.

All activites we want to perform before each test method, are to be put in def setup() {...} method and everything we want to be run after each test should be put in def cleanup() {...} method (they are equivalents for JUnit methods with @Before and @After annotations).

It can look like this:
class UserSpec extends Specification {
User user
Document document

def setup() {
user = new User()
document = DocumentTestFactory.createDocumentWithTitle("doc1")
}

def cleanup() {

}
}
Of course we can use field initialization for instantiating test objects:
class UserSpec extends Specification {
User user = new User()
Document document = DocumentTestFactory.createDocumentWithTitle("doc1")

def setup() {

}

def cleanup() {

}
}

What is more readable or preferred? It is just a matter of taste because according to Spock docs behaviour is the same in these two cases.

It is worth mentioning that JUnit @BeforeClass/@AfterClass are also present in Spock as def setupSpec() {...} and def cleanupSpec() {...}. They will be runned before first test and after last test method.


First tests


In Spock every method in specification class, expect setup/cleanup, is treated by runner as a test method (unless you annotate it with @Ignore).

Very interesting feature of Spock and Groovy is ability to name methods with full sentences just like regular strings:
class UserSpec extends Specification {
// ...

def "should assign coment to user"() {
// ...
}
}
With such naming convention we can write real specification and include details about specified behaviour in method name, what is very convenient when reading test reports and analyzing errors.

Test method (also called feature method) is logically divided into few blocks, each with its own purpose. Blocks are defined like labels in Java (but they are transformed with Groovy AST transform features) and some of them must be put in code in specific order.

Most basic and common schema for Spock test is:
class UserSpec extends Specification {
// ...

def "should assign coment to user"() {
given:
// do initialization of test objects
when:
// perform actions to be tested
then:
// collect and analyze results
}
}

But there are more blocks like:
  • setup
  • expect
  • where
  • cleanup
In next section I am going to describe each block shortly with little examples.

given block

This block is used to setup test objects and their state. It has to be first block in test and cannot be repeated. Below is little example how can it be used:
class UserSpec extends Specification {
// ...

def "should add project to user and mark user as project's owner"() {
given:
User user = new User()
Project project = ProjectTestFactory.createProjectWithName("simple project")
// ...
}
}

In this code given block contains initialization of test objects and nothing more. We create simple user without any specified attributes and project with given name. In case when some of these objects could be reused in more feature methods, it could be worth putting initialization in setup method.

when and then blocks

When block contains action we want to test (Spock documentation calls it 'stimulus'). This block always occurs in pair with then block, where we are verifying response for satisfying certain conditions. Assume we have this simple test case:
class UserSpec extends Specification {
// ...

def "should assign user to comment when adding comment to user"() {
given:
User user = new User()
Comment comment = new Comment()
when:
user.addComment(comment)
then:
comment.getUserWhoCreatedComment().equals(user)
}

// ...
}

In when block there is a call of tested method and nothing more. After we are sure our action was performed, we can check for desired conditions in then block.

Then block is very well structured and its every line is treated by Spock as boolean statement. That means, Spock expects that we write instructions containing comparisons and expressions returning true or false, so we can create then block with such statements:
user.getName() == "John"
user.getAge() == 40
!user.isEnabled()
Each of lines will be treated as single assertion and will be evaluated by Spock.

Sometimes we expect that our method throws an exception under given circumstances. We can write test for it with use of thrown method:
class CommentSpec extends Specification {
def "should throw exception when adding null document to comment"() {
given:
Comment comment = new Comment()
when:
comment.setCommentedDocument(null)
then:
thrown(RuntimeException)
}
}

In this test we want to make sure that passing incorrect parameters is correctly handled by tested method and that method throws an exception in response. In case you want to be certain that method does not throw particular exception, simply use notThrown method.


expect block

Expect block is primarily used when we do not want to separate when and then blocks because it is unnatural. It is especially useful for simple test (and according to TDD rules all test should be simple and short) with only one condition to check, like in this example (it is simple but should show the idea):
def "should create user with given name"() {
given:
User user = UserTestFactory.createUser("john doe")
expect:
user.getName() == "john doe"
}


More blocks!


That were very simple tests with standard Spock test layout and canonical divide into given/when/then parts. But Spock offers more possibilities in writing tests and provides more blocks.


setup/cleanup blocks

These two blocks have the very same functionality as the def setup and def cleanup methods in specification. They allow to perform some actions before test and after test. But unlike these methods (which are shared between all tests) blocks work only in methods they are defined in. 


where - easy way to create readable parameterized tests

Very often when we create unit tests there is a need to "feed" them with sample data to test various cases and border values. With Spock this task is very easy and straighforward. To provide test data to feature method, we need to use where block. Let's take a look at little the piece of code:

def "should successfully validate emails with valid syntax"() {
expect:
emailValidator.validate(email) == true
where:
email }

In this example, Spock creates variable called email which is used when calling method being tested. Internally feature method is called once, but framework iterates over given values and calls expect/when block as many times as there are values (however, if we use @Unroll annotation Spock can create separate run for each of given values, more about it in one of next examples).

Now, lets assume that we want our feature method to test both successful and failure validations. To achieve that goal we can create few 
parameterized variables for both input parameter and expected result. Here is a little example:

def "should perform validation of email addresses"() {
expect:
emailValidator.validate(email) == result
where:
email result }
Well, it looks nice, but Spock can do much better. It offers tabular format of defining parameters for test what is much more readable and natural. Lets take a look:
def "should perform validation of email addresses"() {
expect:
emailValidator.validate(email) == result
where:
email | result
"WTF" | false
"@domain" | false
"foo@bar.com" | true
"a@test" | false
}
In this code, each column of our "table" is treated as a separate variable and rows are values for subsequent test iterations.

Another useful feature of Spock during parameterizing test is its ability to "unroll" each parameterized test. Feature method from previous example could be defined as (the body stays the same, so I do not repeat it):
@Unroll("should validate email #email")
def "should perform validation of email addresses"() {
// ...
}
With that annotation, Spock generate few methods each with its own name and run them separately. We can use symbols from where blocks in @Unroll argument by preceding it with '#' sign what is a signal to Spock to use it in generated method name.


What next?


Well, that was just quick and short journey  through Spock and its capabilities. However, with that basic tutorial you are ready to write many unit tests. In one of my future posts I am going to describe more features of Spock focusing especially on its mocking abilities.