How to recover after Hibernate’s OptimisticLockException

I’ve read many articles about optimistic locking and OptimisticLockException itself. Problem is that each one of them ended up getting their first exception and no word on recovery. What to do next? Repeat? If so, how? Or drop it? Is there any chance t…

I’ve read many articles about optimistic locking and OptimisticLockException itself. Problem is that each one of them ended up getting their first exception and no word on recovery. What to do next? Repeat? If so, how? Or drop it? Is there any chance to continue? How? Even more, documentation says that if you get Hibernate exception – you’re done, it’s not recoverable:

An exception thrown by Hibernate means you have to rollback your database transaction and close the Session immediately (this is discussed in more detail later in the chapter). If your Session is bound to the application, you have to stop the application. Rolling back the database transaction does not put your business objects back into the state they were at the start of the transaction. This means that the database state and the business objects will be out of sync. Usually this is not a problem, because exceptions are not recoverable and you will have to start over after rollback anyway.

Here is my attempt on this: repeatable and recoverable.

Business case

Let’s say we have distributed application with two web servers, connected to the same database. Applications use optimistic locking to avoid collisions. Customers buy lottery coupons, which are numbered from 1 to 100. In the same second Alice on web server 1 draws two coupons: 11 and 12. In the same moment Bob reserves two coupons on web server 2. It draws 11 and 13 for Bob and tries to write it back to database. But it fails, since Alice’s commit was first. I want a web application server to draw coupons for Bob again and then – try to save again until it succeeds.

Solution

For every request Hibernate associates different Session that is flushed at the end of request processing. If you hit OptimisticLockException then this Request Session is polluted and will be rolled back. To avoid this we will create a separate Hibernate’s Session especially for drawing coupons. If separate session fails – drop this session and try again in a new one. If it succeeds – merge it with a main request session. Request Session cannot be touched during draws. Take a look at the following picture:

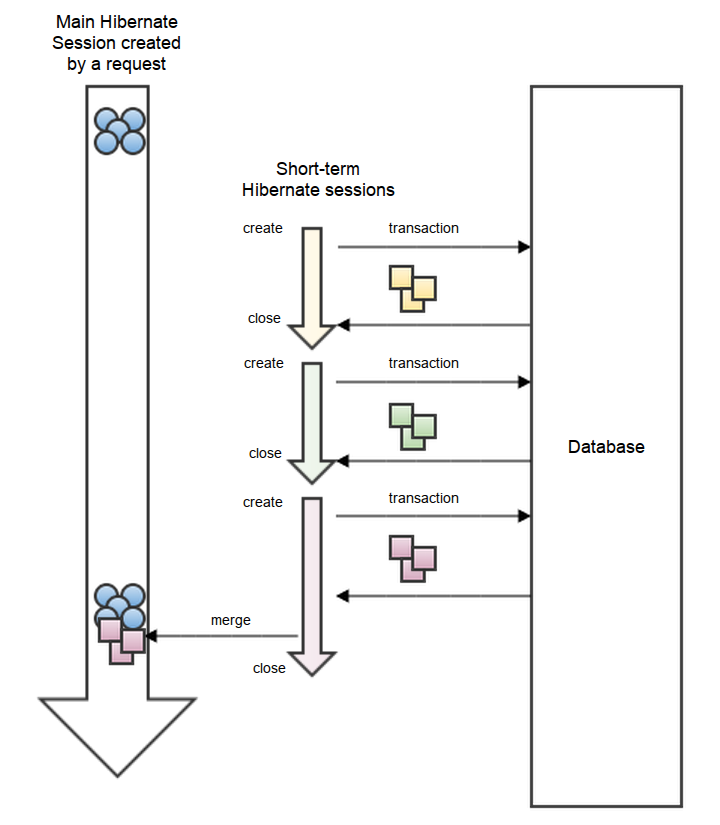
On this picture yellow and green short-term sessions has failed with OptimisticLockException. Red session was successful and these objects are merged to a main session on the left.

Reservation entity

Key requirement here is to keep a domain you want to lock on as small as possible and not coupled directly to anything else. Best approach here is to create some Reservation entity with few fields, let’s say: couponId and customerId. For each Coupon create one Reservation row and use reserved boolean field as a reservation status. For coupon and customer use weak identifiers (long) instead of real entities. This way no object tree will be loaded and Reservation stays decoupled.

import  lombok.extern.slf4j.Slf4j;
import  org.hibernate.*;
import  org.hibernate.ejb.HibernateEntityManager;
import  org.springframework.orm.hibernate4.HibernateOptimisticLockingFailureException;

import  javax.persistence.OptimisticLockException;
import  javax.persistence.PersistenceContext;
import  java.util.List;

@Slf4j
public class  ReservationService  {

    @PersistenceContext
    private  HibernateEntityManager  hibernateEntityManager;

    @SuppressWarnings("uncheked")
    private  Iterable < Reservation >  reserveOptimistic(long  customerId,  final int  count)  throws  NoFreeReservationsException  {
        log.info("Trying to reserve {} reservations for customer {}",  count,  customerId);

        //This is the request session that needs to stay clean
        Session  currentSession =  hibernateEntityManager.getSession();
        Iterable < Reservation > reserved =  null;

        do  {
            //This is our temporary session to work on
            Session  newSession =  hibernateEntityManager.getSession().getSessionFactory().openSession();
            newSession.setFlushMode(FlushMode.COMMIT);
            Transaction  transaction = newSession.beginTransaction();

            List < Reservation > availableReservations =  null;

            try  {
                Query  query = newSession.createQuery("from Reservation r where r.reserved = false")
                    .setLockMode("optimistic",  LockMode.OPTIMISTIC)
                    .setMaxResults(count);

                availableReservations = query.list();

                //There is no available reservations to reserve
                if  (availableReservations.isEmpty()) {
                    throw new  NoFreeReservationsException();
                }

                for  (Reservation  available: availableReservations) {
                    available.reserve(customerId);
                    newSession.save(available);
                }

                //Commit can throw optimistic lock exception if it fails
                transaction.commit();

                //Commit succeeded - this reference is used outside try-catch-finally block
                reserved = availableReservations;

            } 
            catch  (OptimisticLockException  |  StaleObjectStateException  |  HibernateOptimisticLockingFailureException  e) {
                log.info("Optimistic lock exception occurred for customer {} and count {}: {} {}",  customerId,  count,  e.getClass(),  e.getMessage());

                transaction.rollback();

                for  (Reservation  availableMsisdn: availableReservations) {
                    newSession.evict(availableMsisdn);
                }
            } 
            finally  {
                newSession.close();
            }
            //Repeat until we reserve something
        }  while   (reserved ==  null);

        log.info("Successfully reserved {} reservations for customer {}",  count,  customerId);

        //Merge reserved entities to request session
        for  (Reservation  reservedMsisdn: reserved) {
            currentSession.merge(reservedMsisdn);
        }

        return  reserved;
    }
}

This code says it all. It tries to reserve some Reservations until it succeeds in a do-while loop. Main Request Session is not polluted and it achieves our goal.

I hope this example helps you in similar cases. It works as expected for a few months on our customer’s production site and I recommend this solution.

You May Also Like

Clojure web development – state of the art

It’s now more than a year that I’m getting familiar with Clojure and the more I dive into it, the more it becomes the language. Once you defeat the “parentheses fear”, everything else just makes the difference: tooling, community, good engineering practices. So it’s now time for me to convince others. In this post I’ll try to walktrough a simple web application from scratch to show key tools and libraries used to develop with Clojure in late 2015.

Note for Clojurians: This material is rather elementary and may be useful for you if you already know Clojure a bit but never did anything bigger than hello world application.

Note for Java developers: This material shows how to replace Spring, Angular, grunt, live-reload with a bunch of Clojure tools and libraries and a bit of code.

The repo with final code and individual steps is here.

Bootstrap

I think all agreed that component is the industry standard for managing lifecycle of Clojure applications. If you are a Java developer you may think of it as a Spring (DI) replacement - you declare dependencies between “components” which are resolved on “system” startup. So you just say “my component needs a repository/database pool” and component library “injects” it for you.

To keep things simple I like to start with duct web app template. It’s a nice starter component application following the 12-factor philosophy. So let’s start with it:

lein new duct clojure-web-app +example

The +example parameter tells duct to create an example endpoint with HTTP routes - this would be helpful. To finish bootstraping run lein setup inside clojure-web-app directory.

Ok, let’s dive into the code. Component and injection related code should be in system.clj file:

(defn new-system [config]
  (let [config (meta-merge base-config config)]
    (-> (component/system-map
         :app  (handler-component (:app config))
         :http (jetty-server (:http config))
         :example (endpoint-component example-endpoint))
        (component/system-using
         {:http [:app]
          :app  [:example]
          :example []}))))

In the first section you instantiate components without dependencies, which are resolved in the second section. So in this example, “http” component (server) requires “app” (application abstraction), which in turn is injected with “example” (actual routes). If your component needs others, you just can get then by names (precisely: by Clojure keywords).

To start the system you must fire a REPL - interactive environment running within context of your application:

lein repl

After seeing prompt type (go). Application should start, you can visit http://localhost:3000 to see some example page.

A huge benefit of using component approach is that you get fully reloadable application. When you change literally anything - configuration, endpoints, implementation, you can just type (reset) in REPL and your application is up-to-date with the code. It’s a feature of the language, no JRebel, Spring-reloaded needed.

Adding REST endpoint

Ok, in the next step let’s add some basic REST endpoint returning JSON. We need to add 2 dependencies in project.clj file:

:dependencies
 ...
  [ring/ring-json "0.3.1"]
  [cheshire "5.1.1"]

Ring-json adds support for JSON for your routes (in ring it’s called middleware) and cheshire is Clojure JSON parser (like Jackson in Java). Modifying project dependencies if one of the few tasks that require restarting the REPL, so hit CTRL-C and type lein repl again.

To configure JSON middleware we have to add wrap-json-body and wrap-json-response just before wrap-defaults in system.clj:

(:require 
 ...
 [ring.middleware.json :refer [wrap-json-body wrap-json-response]])

(def base-config
   {:app {:middleware [[wrap-not-found :not-found]
                      [wrap-json-body {:keywords? true}]
                      [wrap-json-response]
                      [wrap-defaults :defaults]]

And finally, in endpoint/example.clj we must add some route with JSON response:

(:require 
 ...
 [ring.util.response :refer [response]]))

(defn example-endpoint [config]
  (routes
    (GET "/hello" [] (response {:hello "world"}))
    ...

Reload app with (reset) in REPL and test new route with curl:

curl -v http://localhost:3000/hello

< HTTP/1.1 200 OK
< Date: Tue, 15 Sep 2015 21:17:37 GMT
< Content-Type: application/json; charset=utf-8
< Set-Cookie: ring-session=37c337fb-6bbc-4e65-a060-1997718d03e0;Path=/;HttpOnly
< X-XSS-Protection: 1; mode=block
< X-Frame-Options: SAMEORIGIN
< X-Content-Type-Options: nosniff
< Content-Length: 151
* Server Jetty(9.2.10.v20150310) is not blacklisted
< Server: Jetty(9.2.10.v20150310)
<
* Connection #0 to host localhost left intact
{"hello": "world"}

It works! In case of any problems you can find working version in this commit.

Adding frontend with figwheel

Coding backend in Clojure is great, but what about the frontend? As you may already know, Clojure could be compiled not only to JVM bytecode, but also to Javascript. This may sound familiar if you used e.g. Coffescript. But ClojureScript philosophy is not only to provide some syntax sugar, but improve your development cycle with great tooling and fully interactive development. Let’s see how to achieve it.

The best way to introduce ClojureScript to a project is figweel. First let’s add fighweel plugin and configuration to project.clj:

:plugins
   ...
   [lein-figwheel "0.3.9"]

And cljsbuild configuration:

:cljsbuild
    {:builds [{:id "dev"
               :source-paths ["src-cljs"]
               :figwheel true
               :compiler {:main       "clojure-web-app.core"
                          :asset-path "js/out"
                          :output-to  "resources/public/js/clojure-web-app.js"
                          :output-dir "resources/public/js/out"}}]}

In short this tells ClojureScript compiler to take sources from src-cljs with figweel support and but resulting JavaScript into resources/public/js/clojure-web-app.js file. So we need to include this file in a simple HTML page:

<!DOCTYPE html>
<head>
</head>
<body>
  <div id="main">
  </div>
  <script src="js/clojure-web-app.js" type="text/javascript"></script>
</body>
</html>

To serve this static file we need to change some defaults and add corresponding route. In system.clj change api-defaults to site-defaults both in require section and base-config function. In example.clj add following route:

(GET "/" [] (io/resource "public/index.html")

Again (reset) in REPL window should reload everything.

But where is our ClojureScript source file? Let’s create file core.cljs in src-cljs/clojure-web-app directory:

(ns ^:figwheel-always clojure-web-app.core)

(enable-console-print!)

(println "hello from clojurescript")

Open another terminal and run lein fighweel. It should compile ClojureScript and print ‘Prompt will show when figwheel connects to your application’. Open http://localhost:3000. Fighweel window should prompt:

To quit, type: :cljs/quit
cljs.user=>

Type (js/alert "hello"). Boom! If everything worked you should see and alert in your browser. Open developers console in your browser. You should see hello from clojurescript printed on the console. Change it in core.cljs to (println "fighweel rocks") and save the file. Without reloading the page your should see updated message. Figweel rocks! Again, in case of any problems, refer to this commit.

In the next post I’ll show how to fetch data from MongoDB, serve it with REST to the broser and write ReactJs/Om components to render it. Stay tuned!