TouK Nussknacker – using Apache Flink made easier for analysts and business

Few weeks ago we (TouK) revealed on Github our latest open source project – Nussknacker. What is it and why should you care?

Why?

First, some history: more than year ago one of our clients decided it’s high time for Real Time Marketing. They had pretty large data streams and lots of ideas for marketing campaigns, so one of the key success factors was the ability to process the data fast. We prepared a POC based on Apache Flink and it turned out that it’s really great piece of technology – fast and accurate.

There was just one problem – how to write and customize processes? Flink, as many modern stream processing engines, provides rich and friendly DSL, both in Java and Scala. But for our client that was not really enough. See, they are enterprise that do not employ developers – they have many decent, competent analysts who know the business and SQL – but not Java or (Heaven forbid…) Scala.

Nussknacker to the rescue!

So we decided to create a simple process designer for them. It looks more or less like this:

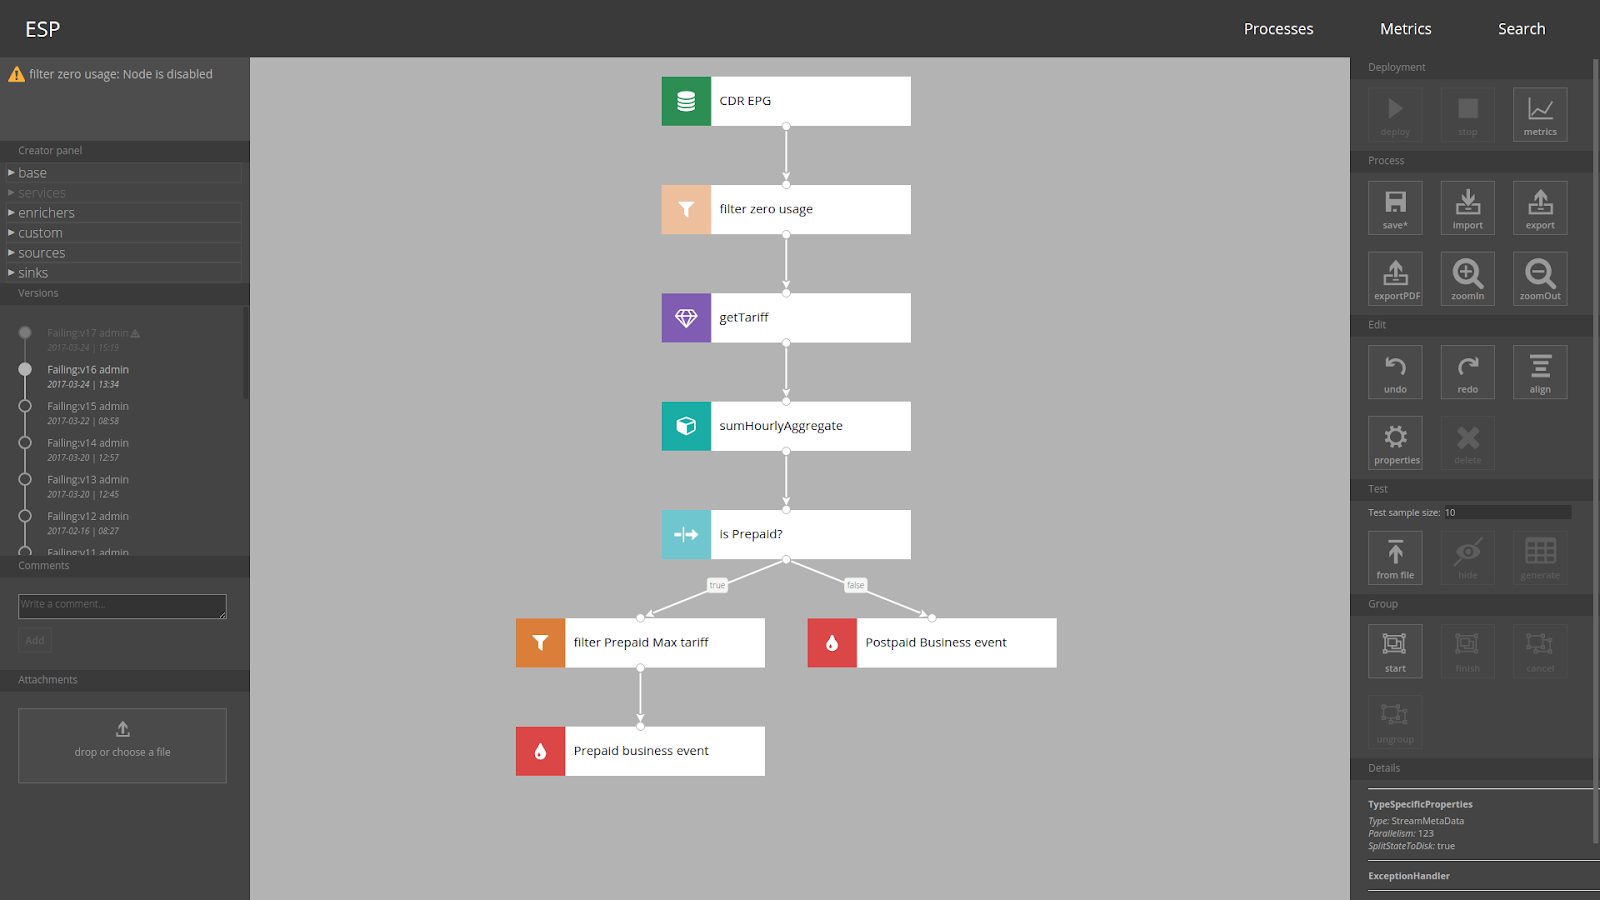
You draw a diagram, fill in the details (like filter expressions – “#input.usageData > 0” or SMS/mail content), then you press the Deploy button and voilà – your brand new process in running on Flink cluster!

Of course first somebody (that is, developer) has to prepare data sources (most probably Kafka topics), design data model (POJOs or case classes) and implement actions – like sending emails or sending some events to another Kafka topic. But once a model of data and external services are defined, an analyst can define and deploy processes all by him/herself.

More features

Sounds a bit scary to let your users run stream processes with GUI? Bad filter conditions can have serious performance implications if you deal with streams of tens of thousands of events per second… That’s why we let user test their diagrams first – each test case can be generated by sample of real data coming from e.g. Kafka and then run in Flink sandbox mini-cluster.

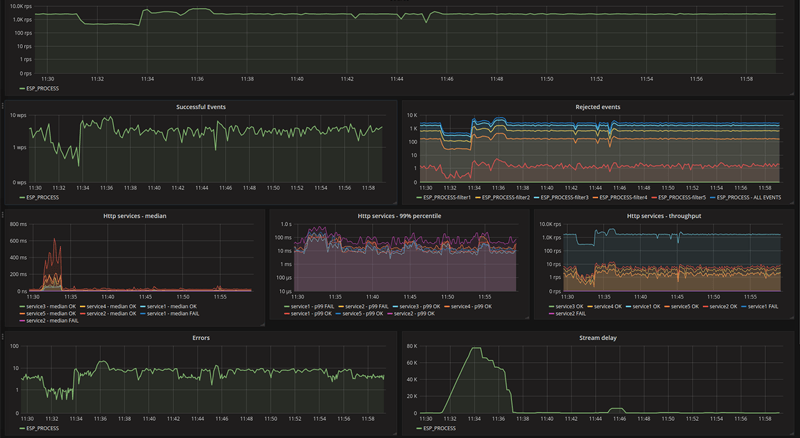
We have also many more features that make working with Nussknacker and Flink easier: subprocesses, versioning, generating PDF documentation, migration between environments and last but certainly not least – integration with InfluxDB/Grafana to provide detailed insight into how process is doing:

Where can I use it?

What are Nussknacker use cases? Our main deployments deal with RTM (Real Time Marketing). One of our clients started with RTM and then found out that Nussknacker is also great choice for fraud detection in real time. Industries we are working with include telcos, banks and media companies. We are also thinking about other possibilities – for example IoT.

Sounds cool?

If you are interested in easy access for semi-technical analysts to streaming data – give Nussknacker a try!

You can find the code at Github: https://github.com/touk/nussknacker, we also have a nice, Docker-based quickstart: https://touk.github.io/nussknacker/Quickstart.html.

And if you are coming to Flink Forward next week in Berlin – join me on Wednesday afternoon to hear more – .

In next days/weeks we’ll post more information on TouK blog both on Nussknacker architecture and internals and on interesting use cases – stay tuned :)

You May Also Like

Spock basics

Spock (homepage) is like its authors say 'testing and specification framework'. Spock combines very elegant and natural syntax with the powerful capabilities. And what is most important it is easy to use.

One note at the very beginning: I assume that you are already familiar with principles of Test Driven Development and you know how to use testing framework like for example JUnit.

So how can I start?


Writing spock specifications is very easy. We need basic configuration of Spock and Groovy dependencies (if you are using mavenized project with Eclipse look to my previous post: Spock, Java and Maven). Once we have everything set up and running smooth we can write our first specs (spec or specification is equivalent for test class in other frameworks like JUnit of TestNG).

What is great with Spock is fact that we can use it to test both Groovy projects and pure Java projects or even mixed projects.


Let's go!


Every spec class must inherit from spock.lang.Specification class. Only then test runner will recognize it as test class and start tests. We will write few specs for this simple class: User class and few tests not connected with this particular class.

We start with defining our class:
import spock.lang.*

class UserSpec extends Specification {

}
Now we can proceed to defining test fixtures and test methods.

All activites we want to perform before each test method, are to be put in def setup() {...} method and everything we want to be run after each test should be put in def cleanup() {...} method (they are equivalents for JUnit methods with @Before and @After annotations).

It can look like this:
class UserSpec extends Specification {
User user
Document document

def setup() {
user = new User()
document = DocumentTestFactory.createDocumentWithTitle("doc1")
}

def cleanup() {

}
}
Of course we can use field initialization for instantiating test objects:
class UserSpec extends Specification {
User user = new User()
Document document = DocumentTestFactory.createDocumentWithTitle("doc1")

def setup() {

}

def cleanup() {

}
}

What is more readable or preferred? It is just a matter of taste because according to Spock docs behaviour is the same in these two cases.

It is worth mentioning that JUnit @BeforeClass/@AfterClass are also present in Spock as def setupSpec() {...} and def cleanupSpec() {...}. They will be runned before first test and after last test method.


First tests


In Spock every method in specification class, expect setup/cleanup, is treated by runner as a test method (unless you annotate it with @Ignore).

Very interesting feature of Spock and Groovy is ability to name methods with full sentences just like regular strings:
class UserSpec extends Specification {
// ...

def "should assign coment to user"() {
// ...
}
}
With such naming convention we can write real specification and include details about specified behaviour in method name, what is very convenient when reading test reports and analyzing errors.

Test method (also called feature method) is logically divided into few blocks, each with its own purpose. Blocks are defined like labels in Java (but they are transformed with Groovy AST transform features) and some of them must be put in code in specific order.

Most basic and common schema for Spock test is:
class UserSpec extends Specification {
// ...

def "should assign coment to user"() {
given:
// do initialization of test objects
when:
// perform actions to be tested
then:
// collect and analyze results
}
}

But there are more blocks like:
  • setup
  • expect
  • where
  • cleanup
In next section I am going to describe each block shortly with little examples.

given block

This block is used to setup test objects and their state. It has to be first block in test and cannot be repeated. Below is little example how can it be used:
class UserSpec extends Specification {
// ...

def "should add project to user and mark user as project's owner"() {
given:
User user = new User()
Project project = ProjectTestFactory.createProjectWithName("simple project")
// ...
}
}

In this code given block contains initialization of test objects and nothing more. We create simple user without any specified attributes and project with given name. In case when some of these objects could be reused in more feature methods, it could be worth putting initialization in setup method.

when and then blocks

When block contains action we want to test (Spock documentation calls it 'stimulus'). This block always occurs in pair with then block, where we are verifying response for satisfying certain conditions. Assume we have this simple test case:
class UserSpec extends Specification {
// ...

def "should assign user to comment when adding comment to user"() {
given:
User user = new User()
Comment comment = new Comment()
when:
user.addComment(comment)
then:
comment.getUserWhoCreatedComment().equals(user)
}

// ...
}

In when block there is a call of tested method and nothing more. After we are sure our action was performed, we can check for desired conditions in then block.

Then block is very well structured and its every line is treated by Spock as boolean statement. That means, Spock expects that we write instructions containing comparisons and expressions returning true or false, so we can create then block with such statements:
user.getName() == "John"
user.getAge() == 40
!user.isEnabled()
Each of lines will be treated as single assertion and will be evaluated by Spock.

Sometimes we expect that our method throws an exception under given circumstances. We can write test for it with use of thrown method:
class CommentSpec extends Specification {
def "should throw exception when adding null document to comment"() {
given:
Comment comment = new Comment()
when:
comment.setCommentedDocument(null)
then:
thrown(RuntimeException)
}
}

In this test we want to make sure that passing incorrect parameters is correctly handled by tested method and that method throws an exception in response. In case you want to be certain that method does not throw particular exception, simply use notThrown method.


expect block

Expect block is primarily used when we do not want to separate when and then blocks because it is unnatural. It is especially useful for simple test (and according to TDD rules all test should be simple and short) with only one condition to check, like in this example (it is simple but should show the idea):
def "should create user with given name"() {
given:
User user = UserTestFactory.createUser("john doe")
expect:
user.getName() == "john doe"
}


More blocks!


That were very simple tests with standard Spock test layout and canonical divide into given/when/then parts. But Spock offers more possibilities in writing tests and provides more blocks.


setup/cleanup blocks

These two blocks have the very same functionality as the def setup and def cleanup methods in specification. They allow to perform some actions before test and after test. But unlike these methods (which are shared between all tests) blocks work only in methods they are defined in. 


where - easy way to create readable parameterized tests

Very often when we create unit tests there is a need to "feed" them with sample data to test various cases and border values. With Spock this task is very easy and straighforward. To provide test data to feature method, we need to use where block. Let's take a look at little the piece of code:

def "should successfully validate emails with valid syntax"() {
expect:
emailValidator.validate(email) == true
where:
email }

In this example, Spock creates variable called email which is used when calling method being tested. Internally feature method is called once, but framework iterates over given values and calls expect/when block as many times as there are values (however, if we use @Unroll annotation Spock can create separate run for each of given values, more about it in one of next examples).

Now, lets assume that we want our feature method to test both successful and failure validations. To achieve that goal we can create few 
parameterized variables for both input parameter and expected result. Here is a little example:

def "should perform validation of email addresses"() {
expect:
emailValidator.validate(email) == result
where:
email result }
Well, it looks nice, but Spock can do much better. It offers tabular format of defining parameters for test what is much more readable and natural. Lets take a look:
def "should perform validation of email addresses"() {
expect:
emailValidator.validate(email) == result
where:
email | result
"WTF" | false
"@domain" | false
"foo@bar.com" | true
"a@test" | false
}
In this code, each column of our "table" is treated as a separate variable and rows are values for subsequent test iterations.

Another useful feature of Spock during parameterizing test is its ability to "unroll" each parameterized test. Feature method from previous example could be defined as (the body stays the same, so I do not repeat it):
@Unroll("should validate email #email")
def "should perform validation of email addresses"() {
// ...
}
With that annotation, Spock generate few methods each with its own name and run them separately. We can use symbols from where blocks in @Unroll argument by preceding it with '#' sign what is a signal to Spock to use it in generated method name.


What next?


Well, that was just quick and short journey  through Spock and its capabilities. However, with that basic tutorial you are ready to write many unit tests. In one of my future posts I am going to describe more features of Spock focusing especially on its mocking abilities.

Sample for lift-ng: Micro-burn 1.0.0 released

During a last few evenings in my free time I've worked on mini-application called micro-burn. The idea of it appear from work with Agile Jira in our commercial project. This is a great tool for agile projects management. It has inline tasks edition, drag & drop board, reports and many more, but it also have a few drawbacks that turn down our team motivation.

Motivation

From time to time our sprints scope is changing. It is not a big deal because we are trying to be agile :-) but Jira's burndowchart in this situation draw a peek. Because in fact that chart shows scope changes not a real burndown. It means, that chart cannot break down an x-axis if we really do more than we were planned – it always stop on at most zero.

Also for better progress monitoring we've started to split our user stories to technical tasks and estimating them. Original burndowchart doesn't show points from technical tasks. I can find motivation of this – user story almost finished isn't finished at all until user can use it. But in the other hand, if we know which tasks is problematic we can do some teamwork to move it on.

So I realize that it is a good opportunity to try some new approaches and tools.

Tools

I've started with lift framework. In the World of Single Page Applications, this framework has more than simple interface for serving REST services. It comes with awesome Comet support. Comet is a replacement for WebSockets that run on all browsers. It supports long polling and transparent fallback to short polling if limit of client connections exceed. In backend you can handle pushes in CometActor. For further reading take a look at Roundtrip promises

But lift framework is also a kind of framework of frameworks. You can handle own abstraction of CometActors and push to client javascript that shorten up your way from server to client. So it was the trigger for author of lift-ng to make a lift with Angular integration that is build on top of lift. It provides AngularActors from which you can emit/broadcast events to scope of controller. NgModelBinders that synchronize your backend model with client scope in a few lines! I've used them to send project state (all sprints and thier details) to client and notify him about scrum board changes. My actor doing all of this hard work looks pretty small:

Lift-ng also provides factories for creating of Angular services. Services could respond with futures that are transformed to Angular promises in-fly. This is all what was need to serve sprint history:

And on the client side - use of service:


In my opinion this two frameworks gives a huge boost in developing of web applications. You have the power of strongly typing with Scala, you can design your domain on Actors and all of this with simplicity of node.js – lack of json trasforming boilerplate and dynamic application reload.

DDD + Event Sourcing

I've also tried a few fresh approaches to DDD. I've organize domain objects in actors. There are SprintActors with encapsulate sprint aggregate root. Task changes are stored as events which are computed as a difference between two boards states. When it should be provided a history of sprint, next board states are computed from initial state and sequence of events. So I realize that the best way to keep this kind of event sourcing approach tested is to make random tests. This is a test doing random changes at board, calculating events and checking if initial state + events is equals to previously created state:


First look

Screenshot of first version:


If you want to look at this closer, check the source code or download ready to run fatjar on github.During a last few evenings in my free time I've worked on mini-application called micro-burn. The idea of it appear from work with Agile Jira in our commercial project. This is a great tool for agile projects management. It has inline tasks edition, drag & drop board, reports and many more, but it also have a few drawbacks that turn down our team motivation.