 I’ve had a pleasure to work with Piotrek Jagielski for about two weeks on Clojure project. I’ve learned a lot, but there is still a lot to know about Clojure for me. In this post I’ll write what fascinated, disappointed and astonished me about this programming language.
Clojure & InteliJ IDEA tips
Before you start your journey with Clojure: * Use Cursive plugin for InteliJ IDEA. In ’14 Edition it was not in the standard plug-in repository (remove La Clojure plug-in and Cursive repository manually). For IDEA ’15 it is in repository. * Colored brackets help me a lot. You can find configuration for colored brackets on Misophistful Github.
Fascinated
Syntax
For many people Clojure brackets are reasons to laugh. Jokes like that were funny at first: “How many brackets did you write today?” I have to admit, that at the beginning using brackets was not easy for me. Once I’ve realized that the brackets are just on the other side of the function name, everything was simple and I could code very fast. After few days I’ve realized that this brackets structure forces me to think more about the structure of the code. As a result the code is refactored and divided into small functions. Clojure forces you to use good programming habits.
Data structure is your code
Clojure is homoiconic, which means that the Clojure programs are represented by Clojure data structures. This means that when you are reading a Clojure code you see lists, maps, vectors. How cool is that! You only have to know few things and you can code.
Do not restart your JVM
Because Clojure code is represented as data structures, you can pass data structure (program) to running JVM. Furthermore, compiling your code to bytecode (classes, jars) may be eliminated.
For example, when you want to test something you are not obligated to start new JVM with tests. Instead you can just synchronize your working file with running REPL and run the function.
Traditional way of working with JVM is obsolete.

In the picture above, on the left you can see an editor, on the right there is running REPL.
The same way you can run tests, which is extremely fast. In our project we had ~80 tests. Executing them all took about one second.
Simplicity is the ultimate sophistication – Leonardo Da Vinci
After getting familiar with this language, it was really easy to read code. Of course, I was not aware of everything what was happening under the hood, but consistency of the written program evoked sense of control.
Disapointed
Data structure is your code
When data structure is your code, you need to have some additional operators to write effective programs. You should get to know operators like ‘->>’, ‘->’, ‘let’, ‘letfn’, ‘do’, ‘if’, ‘recur’ …
Even if there is a good documentation (e.g. Let), you have to spend some time on analyzing it, and trying out examples.
As the time goes on, new operators will be developed. But it may lead to multiple Clojure dialects. I can imagine teams (in the same company) using different sets of operators, dealing with the same problems in different ways. It is not good to have too many tools. Nevertheless, this is just my suspicion.
Know what you do
I’ve written a function that rounds numbers. Despite the fact that this function was simple, I wanted to write test, because I was not sure if I had used the API in correct way. There is the test function below:
(let [result (fixture/round 8.211M)]
  (is (= 8.21M result))))
Unfortunately, tests were not passing. This is the only message that I received:
:error-while-loading pl.package.calc-test
NullPointerException   [trace missing]
(pst)
NullPointerException
Great. There is nothing better than a good exception error. I’ve spent a lot of time trying to solve this, and solution was extremely simple. My function was defined with defn-, instead of defn. defn- means private scope and test code, could not access testing function.
Do not trust assertions
Assertions can be misleading. When tested code does not work properly and returns wrong results, error messages are like this:
ERROR in math-test/math-operation-test (RT.java:528)
should round using half up
expected: (= 8.31M result)
 actual: java.lang.IllegalArgumentException: Don't know how to create ISeq from: java.math.BigDecimal
I hadn’t got time to investigate it, but in my opinion it should work out of the box.
Summary
It is a matter of time, when tools will be better. Those problems will slow you down, and they are not nice to work with.
Astonished
The Clojure concurrency impressed me. Until then, I knew only standard Java synchronization model and Scala actors model. I’ve never though that concurrency problems can be solved in a different way. I will explain Clojure approach to concurrency, in details.
Normal variables
The closest Clojure’s analogy to the variables are vars, which can be created by def.
(defn a01 []
  (def amount 10)
  (def amount 100)
  (println amount))
We also have local variables which are only in let scope. If we re-define scope value of amount, the change will take place only in local context.
(defn a02 []
  (let [amount 10]
    (let [amount 100]
      (println amount))
    (println amount)))
The following will print:
100
10
Nothing unusual. We might expect this behavior.
Concurrent access variables
The whole idea of concurrent access variables can be written in one sentence. Refs ensures safe shared access to variables via STM, where mutation can only occur via transaction. Let me explain it step by step.
What is Refs?
Refs (reference) is a special type to hold references to your objects. As you can expect, basic things you can do with it is storing and reading values.
What is STM?
STM stands for Software Transactional Memory. STM is an alternative to lock-based synchronization system. If you like theory, please continue with Wikipedia, otherwise continue reading to see examples.
Using Refs
(defn a03 []
  (def amount (ref 10))
  (println @amount))
In the second line, we are creating reference. Name of this reference is amount. Current value is 10. In the third line, we are reading value of the reference called amount. Printed result is 10.
Modifying Refs without transaction
(defn a04 []
  (def amount (ref 10))
  (ref-set amount 100)
  (println @amount))
Using ref-set command, we modify the value of the reference amount to the value 100. But it won’t work. Instead of that we caught exception:
IllegalStateException No transaction running clojure.lang.LockingTransaction.getEx (LockingTransaction.java:208)
Using transaction
(defn a05 []
  (def amount (ref 10))
  (dosync (ref-set amount 100))
  (println @amount))
To modify the code we have to use dosync operation. By using it, we create transaction and only then the referenced value will be changed.
Complete example
The aim of the previous examples was to get familiar with the new operators and basic behavior. Below, I’ve prepared an example to illustrate bolts and nuts of STM, transactions and rollbacks.
The problem
Imagine we have two references for holding data: * source-vector containing three elements: “A”, “B” and “C”. * empty destination-vector.
Our goal is to copy the whole source vector to destination vector. Unfortunately, we can only use function which can copy elements one by one – copy-vector.
Moreover, we have three threads that will do the copy. Threads are started by the future function.
Keep in mind that this is probably not the best way to copy vectors, but it illustrates how STM works.
(defn copy-vector [source destination]
  (dosync
    (let [head (take 1 @source)
          tail (drop 1 @source)
          conj (concat head @destination)]
      (do
        (println "Trying to write destination ... ")
        (ref-set destination conj)
        (println "Trying to write source ... ")
        (ref-set source tail)
        (println "Sucessful write " @destination)))))

(defn a06 []
  (let [source-vector (ref ["A" "B" "C"]) destination-vector (ref [])]
    (do
      (future (copy-vector source-vector destination-vector))
      (future (copy-vector source-vector destination-vector))
      (future (copy-vector source-vector destination-vector))
      (Thread/sleep 500)
      @destination-vector
      )))
Execution
Below is the output of this function. We can clearly see that the result is correct. Destination vector has three elements. Between Sucessful write messages we can see that there are a lot of messages starting with Trying to write. What does it mean? The rollback and retry occurred.
(l/a06)
Trying to write destination ...
Trying to write source ...
Trying to write destination ...
Trying to write destination ...
Sucessful write (A)
Trying to write destination ...
Trying to write destination ...
Trying to write source ...
Sucessful write  (B A)
Trying to write destination ...
Trying to write source ...
Sucessful write  (C B A)
=> ("C" "B" "A")
Rollback
Each thread started to copy this vector, but only one succeed. The remaining two threads had to rollback work and try again one more time.
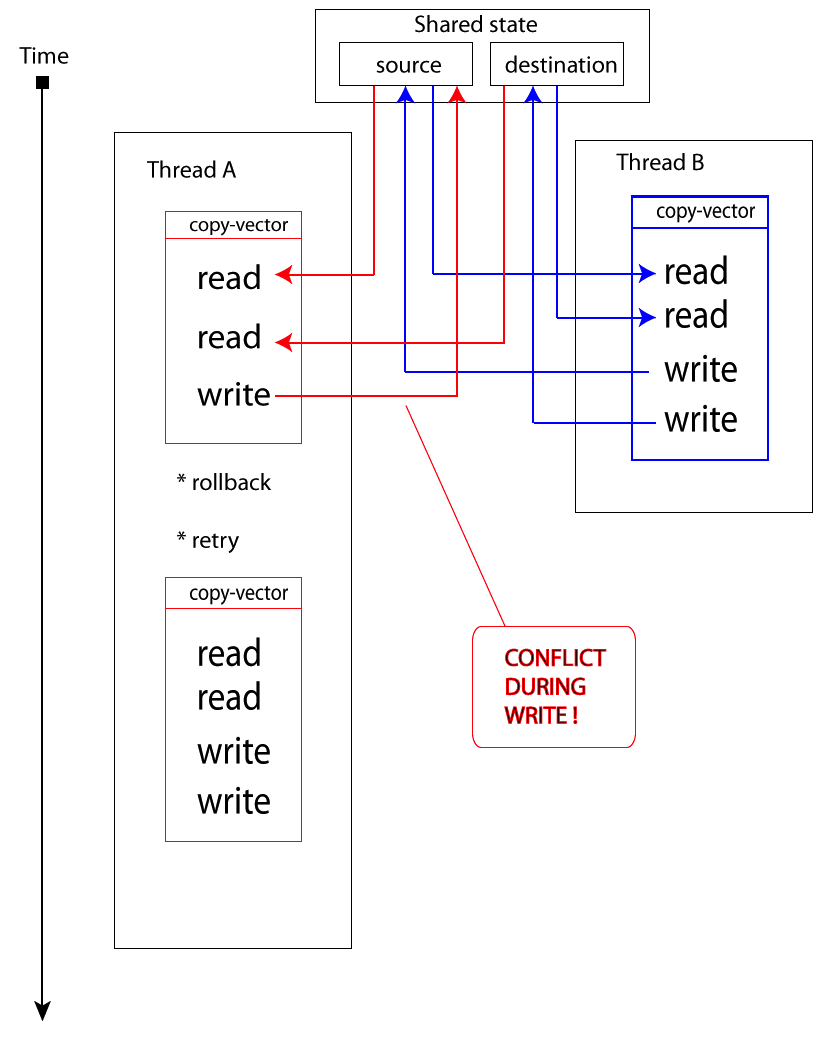
When Thread A (red one) wants to write variable, it notices that the value has been changed by someone else – conflict occurs. As a result, it stops the current work and tries again whole section of dosync. It will try until every write operation succeed.
Pros and cons of STM
Cons: * Everything that happens in dosync section has to be pure, without side effects. For example you can not send email to someone, because you might send 10 emails instead of one.
* From performance perspective, it makes sense when you are reading a lot from Refs, but rarely writing it.
Pros: * Written code is easy to read, understand, modify. * Refs and transactions are part of standard library, so you can use it in Vanilla Java. Take a look at this blog post for more examples.
Summary
There is a lot that Java developers can gain from Clojure. They can learn how to approach the code and how to express the problem in the code. Also they can discover tools like STM.
If you like to develop your skills, you should definitely experiment with Clojure.
Blog from Michał Lewandowski personal blog.